Castle Creations BEC 2.0 Issue with Kraton v3

This site may earn a commission from merchant affiliate
links, including eBay, Amazon, and others.

CPizzle

Fairly New Member
Messages
5
Reaction score
1
Arrma RC's
I have installed the castle creations BEC 2.0 onto my Kraton v3 using the method from the picture below.
31619


31620


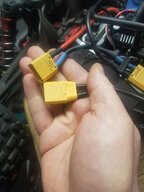
The second picture is my install. According to many of the instructions I have come across, I believe I've done the install correctly. But ever since the install my throttle has been broken on my transmitter. The reason for the BEC install is because I installed a pro modeler steering servo which seems to work great. I set the voltage to 8.4v and it worked fine. But that's when I realized my throttle did not work. I thought I fried my ESC so I bought a new one along with a new motor, transmitter and two new receivers. I have tried every possible combination of just old parts, just new parts and a combination of old and new parts and my throttle control will not work. I t makes no since to me that will a whole new set on electronics: motor, ESC, transmitter, receiver, and new and stock servo that I still have this issue. Technically it is a brand new R/C. I'm thinking about asking Arrma and Castle Creations for help on this issue since I have invested a lot of time and money and still have not resolved it. If anyone thinks they might know what's up with this issue or if they need more info please let me know.
 
Yes they are both soldered to the same connector. Red to positive and block to negative. Since the tip of the other connector has the positive loop back the the connector I soldered it to it should work the same as your but I could be wrong.
31627
 
Do you know the max voltage of the receiver? 8.4 volts is a lot to feed the receiver.

I recommend going with a Holmes RX Bypass adapter - https://holmeshobbies.com/electroni...ssories/holmes-hobbies-rx-bypass-adapter.html

In this setup, the Castle BEC will feed only the servo and the receiver will get it's power from the ESC which is usually 6 volts. Everything is plug and play and you only need to plug the adapter in between the Castle BEC and the servo along with the two wire plug from the adapter into the receiver.

Brian
 
Last edited:
I think I had a similar problem, and it confused the heck out of me. I had mine like yours, both the pos and neg wires connected to the same XT connector. It wouldn't work, until I moved one of the wires to the other XT, like in the pic from Erstadw above. Don't ask me whyo_O
 
I just checked and the TR325 receiver is rated at only 4 to 6 volts. So it will depend on which receiver you have, if the 8.4 volts is an issue or not.

Brian
 
Do you have the negative and positive from the bec going to the same plug? Can't tell in your pic. Here is how I have mine and works just fine. View attachment 31626
When you soldered these bec wires in did you totally replace the xt90 connectors?
Or did you somehow pull back esc wire and solder bec to it and then added shrink wrap?
I'm looking to install my bec, thanks!
 
34526
34527
When you soldered these bec wires in did you totally replace the xt90 connectors?
Or did you somehow pull back esc wire and solder bec to it and then added shrink wrap?
I'm looking to install my bec, thanks!
I used the same xt90 connectors. I soldered the power wires from the bec right on top of the power wires from the esc at the xt90 and put new shrink tube over. Make sense?
Again make sure you pull the red wire from the plug that comes from esc to your receiver. I just pulled the pin out out of the plug and folded it over then put shrink tube over to keep it neat. The shrink tube I have is a bit too small to fit over the plug from the esc so I had to use scissors to stretch it a bit.
 
View attachment 34526View attachment 34527
I used the same xt90 connectors. I soldered the power wires from the bec right on top of the power wires from the esc at the xt90 and put new shrink tube over. Make sense?
Again make sure you pull the red wire from the plug that comes from esc to your receiver. I just pulled the pin out out of the plug and folded it over then put shrink tube over to keep it neat. The shrink tube I have is a bit too small to fit over the plug from the esc so I had to use scissors to stretch it a bit.
Thank you!
OK so I'll take a look later abo
View attachment 34526View attachment 34527
I used the same xt90 connectors. I soldered the power wires from the bec right on top of the power wires from the esc at the xt90 and put new shrink tube over. Make sense?
Again make sure you pull the red wire from the plug that comes from esc to your receiver. I just pulled the pin out out of the plug and folded it over then put shrink tube over to keep it neat. The shrink tube I have is a bit too small to fit over the plug from the esc so I had to use scissors to stretch it a bit.
Thanks for the reminder on the red wire!
So how did you get the blue shrink wrap on?
 
Thank you!
OK so I'll take a look later abo

Thanks for the reminder on the red wire!
So how did you get the blue shrink wrap on?
Had to fully un-solder the wires and put new shrink tube. Then solder them back on the connector. I put the big esc wire in the connector cup first then the small bec wire on top. Wish I had a pic of the solder job without the heat shrink but I don't.
 
Had to fully un-solder the wires and put new shrink tube. Then solder them back on the connector. I put the big esc wire in the connector cup first then the small bec wire on top. Wish I had a pic of the solder job without the heat shrink but I don't.
Ohhh, OK that's what I was wondering. I couldn't tell if you did that or just shaved some of the coating off the ESC wire and soldered on.
So I guess I would have to take apart xt90 to do this?
 
To do it the way I did, yes you will have to take the connector apart. I think the connectors without the cap that goes over solder joints work better for this. You may have trouble getting the cap to go back on with the additional wire. Here's a pic of the two different connectors. If your connector has the cap I would remove it and use shrink tube. Just easier in my opinion.
 

Attachments

  • 20190403_103442.jpg
    20190403_103442.jpg
    206.7 KB · Views: 57
To do it the way I did, yes you will have to take the connector apart. I think the connectors without the cap that goes over solder joints work better for this. You may have trouble getting the cap to go back on with the additional wire. Here's a pic of the two different connectors. If your connector has the cap I would remove it and use shrink tube. Just easier in my opinion.
Got it, thanks!
I'll see when I pull off cap what can be done
 
Oh and is there a trick to removing cap?
Or push in both locking clips at same time and remove?
 
I removed the cap, and ran the wire through, soldered, and put the cap back on. It is a pain to get off, but if you pry a little with a small screwdriver, it will come off.
 
Cap came off no issues there. I slid wire through cap. I had a buddy solder it because I currently don't have a large enough soldering gun.... And he Frickin gives it back to me with the banana connector pulled back and leaning slightly because the plastic on the xt got so hot it melted. Wtf!
"oh, I. Didn't look at that end" he says.
This is why I end up with so many tools and teach myself how to do everything.
He said it's soldered with a special solder iron or the bullets are removed from plug first.
Now I'm screwed for driving this weekend because I'm gonna need a new iron and have to order plugs. ?
 
I melted one the other day too. I applied heat too many times in a row without cooling some in between. Luckily for me it was an old connector I was using to practice soldering on. I think I have seen a video where a guy uses a wet sponge to cool the plastic faster. Hopefully you have a shop near by that stocks some xt90's.
 
I melted one the other day too. I applied heat too many times in a row without cooling some in between. Luckily for me it was an old connector I was using to practice soldering on. I think I have seen a video where a guy uses a wet sponge to cool the plastic faster. Hopefully you have a shop near by that stocks some xt90's.
Closest shops are about 40 but with rush hour forget it.
Amazon prime... Got 5 sets of xt90 no sparks for $17.50 and it'll be here tomorrow
Good tip thanks.
What iron were you using?
I was going to get something nice for $100, like a Weller but harbor freight is local and has a 1000 watt gun for $25.
I think I'm going to roll the dice on it
 
I searched a lot when I bought mine. Ended up getting the hakko fx888d29by. Lots of good reviews. Got it for about 100 bucks on ebay. It's also available on amazon as well I see.
 
Old Thread: Hello . There have been no replies in this thread for 90 days.
Content in this thread may no longer be relevant.
Perhaps it would be better to start a new thread instead.
Back
Top