Typhon First speedrun build.. V3 Typhon

This site may earn a commission from merchant affiliate
links, including eBay, Amazon, and others.

Notoriousone

Very Active Member
Messages
620
Reaction score
1,461
Arrma RC's
  1. Limitless
  2. Mojave
  3. Notorious
  4. Typhon 6s
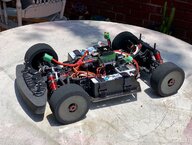
So, I got bit by the speedrun bug a few months ago and thought Id try building my basic blue V3 Typhon 6S into something a little faster. I've been in RC for years and had many vehicles, but never had a dedicated speedrunner. First thing I did for a month was research, and I quickly saw that there wasn't much info to be found in general on building one of these things. So after some looking around I came across this forum, a few others, facebook groups and the like with some solid info. After reading a bunch of good info and ordering up parts, the transformation began.. I can get into more detail later, but this is the result so far..

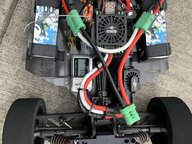
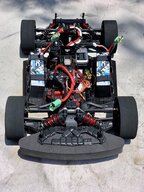
Stock V3 Typhon 6S chassis, suspension, arms and linkage, Saga custom RC carbon battery trays
Rear hubs and arms shimmed to reduce play, rear wheels 0 degree plate installed. Shocks have RPM limiter clips installed
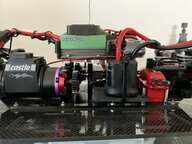
Center diff replaced with EM performance 8mm spool with 29t pinion/34t spur installed. 500k diff fluid in front and rear diffs
Hot racing front and rear chassis braces, motor mount, and center diff mount, full bearing kit
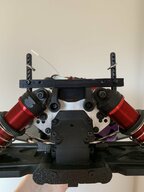
Alza racing center diff top plate/Mamba XLX mount, ultra low shock towers front and rear
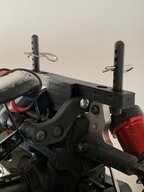
Mugen Seiki MRX front bumper/foam, 3D printed rear body mounts
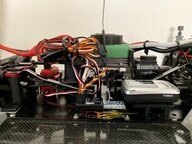
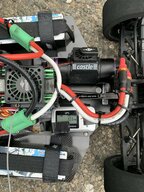
Poseidon 1800 KV motor, Castle fan, Castle Mamba XLX Esc, Killmode 13,200 UF cap pack
Dual SMC 7600 Mah 3S matched battery packs, Castle 6.5 battery and 8mm motor connectors
BSR racing foam tires, double pink compound
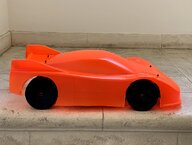
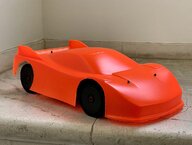
Ipanema Blackhawk warrior body
Futaba 4PV with R314 telemetry receiver

During setup I had a few issues with things like motor rotation direction, throttle channels reversed and other minor things that were resolved eventually. So far I've only done 4 test runs in the street outside my house with no body, as the body isn't ready yet. I live in the middle of the city so its hard to find big open areas with no traffic, I had to get out there at 6 am on a sunday to test lol. All test runs were over 80 mph, with a best of 93 mph before I called it quits. This thing is a beast for sure, at no point was I past half throttle. It ran great with no issues whatsoever, the motor was barely warm to the the touch, and even with no body and a few bumps in the street it ran straight and true so I'm pretty happy so far. Once the body is reinforced and ready, and I can run in a proper setting I'm hoping to see somewhere around 125 to 130 mph, at least.
 

Attachments

  • IMG_1477.jpeg
    IMG_1477.jpeg
    413.5 KB · Views: 262
  • IMG_1475.jpeg
    IMG_1475.jpeg
    498.3 KB · Views: 129
  • unnamed (2).jpg
    unnamed (2).jpg
    342.8 KB · Views: 125
  • unnamed.jpg
    unnamed.jpg
    361.4 KB · Views: 112
Last edited:
Wow, looks very well thought out, great results to start, I might steel a few ideas for my road Typhon, not wanting a dedicated speed machine, but something that will be at home on a street circuit.

Can't wait to see this thing in action with the body on, congrats on a beautiful build.
 
Really liking the pieces you've chosen for your build, looks like you've gone all out. I'm running the same Alza ultra-low shock towers on my V4 Typhon, and just got the sama Alza center diff cover/Castle XLX mount that you're using a few days ago. I'm curious to see how those items work out for you with your build.
 
OMG... that color, you won't lose that in a hurry..???

I'm really liking that body style, I'm surprised how many speed runners don't use that type of body where the wheels etc are covered, because lets be honest speed running is all about aero at the end of the day..??
 
Loving what you've done so far especially with the weight distribution/low CG of a battery on each side.

Would love to see some more closer up pics of your Typhon as well as some video once you get some more runs in. Good luck. (y)


I'm surprised how many speed runners don't use that type of body where the wheels etc are covered,
It maybe in some cases for the same reason as myself ~ I'm hoping to enter some ROSSA (Radio Operated Scale Speed Association) events in the "Electric Open Wheel" class this year.
To qualify for that class you have to meet certain criteria; one of which is that any body shell (standard or custom) must not cover the wheels.

ROSSA in case you don't know covers UK, USA, Australia and Europe and it is the official body for recording any/all R/c related speed records.
Link: http://www.rossa.org.uk/index.html
 
I'm really liking that body style, I'm surprised how many speed runners don't use that type of body where the wheels etc are covered, because lets be honest speed running is all about aero at the end of the day..??


Well that is a good shape for a full car- which if it was a full size real car would be able to fit more than one person.

A typhon buggy body has open wheels- but but less frontal and surface area overall.

So more like an F1 car- purpose built without needing a traditional passenger car based in dimensions such as Nascar requires.

Not than an F1 car should be the pinnacle of inspiration either- as we shouldn't be anywhere near as concerned with downforce areo needed to stick in turns.

I *really* like the build the OP did here though. Very through, very clean.

Couple questions- what do the foam tires look like now after a few passes?

And what bearings did you use? I put Eddy's in my Notorious, but then learned they are Abec-3 so I used Abec-5 from a different supplier in my Typhon.
 
Really liking the pieces you've chosen for your build, looks like you've gone all out. I'm running the same Alza ultra-low shock towers on my V4 Typhon, and just got the sama Alza center diff cover/Castle XLX mount that you're using a few days ago. I'm curious to see how those items work out for you with your build.

Thanks, the Alza parts are working out great so far with no issues, but one small thing.. The front tower holds the shocks at such an angle that it locks out a lot of movement because the lower spring cups touch the suspension arm, and also it limits the amount of preload you can dial in
because the collar is basically contacting the tower, but still it isn't really an issue, it works great anyway
OMG... that color, you won't lose that in a hurry..???

I'm really liking that body style, I'm surprised how many speed runners don't use that type of body where the wheels etc are covered, because lets be honest speed running is all about aero at the end of the day..??
Yup, the color is Tamiya flourescent orange, the brightest I could find.. I need to see this thing with my old eyes when its far away.. Think brighter than the brightest traffic cone you've ever seen
Loving what you've done so far especially with the weight distribution/low CG of a battery on each side.

Would love to see some more closer up pics of your Typhon as well as some video once you get some more runs in. Good luck. (y)


It maybe in some cases for the same reason as myself ~ I'm hoping to enter some ROSSA (Radio Operated Scale Speed Association) events in the "Electric Open Wheel" class this year.
To qualify for that class you have to meet certain criteria; one of which is that any body shell (standard or custom) must not cover the wheels.

ROSSA in case you don't know covers UK, USA, Australia and Europe and it is the official body for recording any/all R/c related speed records.
Link: http://www.rossa.org.uk/index.html
Thanks, will post some pics up soon, and video once I get some good runs in
Well that is a good shape for a full car- which if it was a full size real car would be able to fit more than one person.

A typhon buggy body has open wheels- but but less frontal and surface area overall.

So more like an F1 car- purpose built without needing a traditional passenger car based in dimensions such as Nascar requires.

Not than an F1 car should be the pinnacle of inspiration either- as we shouldn't be anywhere near as concerned with downforce areo needed to stick in turns.

I *really* like the build the OP did here though. Very through, very clean.

Couple questions- what do the foam tires look like now after a few passes?

And what bearings did you use? I put Eddy's in my Notorious, but then learned they are Abec-3 so I used Abec-5 from a different supplier in my Typhon.
I used Eddys as well, they made a big difference. I don't really know what abec-3 is, will have to look into it.. The BSR foams are looking great, almost no wear at all after being run 4 or 5 times. I have GRP's as well but I have seen bad things happen with them (to be fair, not to me but ive seen many videos of blowouts, crashes, caused by GRP's) Also the BSR foams are wider and taller, and have a more square edge than GRP tires do, helps to keep it planted when running 0 degree camber and toe (at least I think so)
 
Last edited:
Got in a 6 am run this morning. It was cold weather so it was slippery, I'm still running with no body, and the batteries were only at 75% but it still felt planted enough for me to hold the throttle open for about half a second longer than before .. it hit 97 mph, 4 mph faster than before and still more left in it. But i'm running out of room here, need more space
 

Attachments

  • unnamed.jpg
    unnamed.jpg
    391.6 KB · Views: 72
Borrowed from google..??

The ABEC rating system includes grades 1,3,5,7, and 9. The higher the ABEC rating, the tighter the tolerances are, making the bearing a more precision part. High precision and small tolerances are required for bearings to function at very high RPM, in products like high speed routers that must spin at 20 to 30,000 RPM.

Also...

https://en.m.wikipedia.org/wiki/ABEC_scale
 
Got in a 6 am run this morning. It was cold weather so it was slippery, I'm still running with no body, and the batteries were only at 75% but it still felt planted enough for me to hold the throttle open for about half a second longer than before .. it hit 97 mph, 4 mph faster than before and still more left in it. But i'm running out of room here, need more space
Great stuff! Fully charged batteries make a big difference. You did some great research as your first go at this looks really good. At some point (once you find a good road and the limits of this setup) I suspect this setup will max out in that range of 120-140. I would recommend switching to a long can 40mm motor like the tp 4070 once you are ready for more speed.

Anxious to see some videos of this beast!

-Liberty
 
The ipanema body needs to be reinforced before using it, way too flimsy for speed. i always use fiberglass some use drywall tape and shoegoo(many layers). Build looks nice,def capable of some mph.
 
The ipanema body needs to be reinforced before using it, way too flimsy for speed. i always use fiberglass some use drywall tape and shoegoo(many layers). Build looks nice,def capable of some mph.
Thanks Phildogg, yea that body is just flimsy, especially the sides once cut out for the big BSR tires. I've never fiberglassed a body before, so my buddy who knows what hes doing will be helping with that, hopefully soon. I cant wait to run with the body, not only to see what speed it gets up to but also cause I think just the body itself, once fiberglassed will provide enough downforce to keep it planted at speed, even though ive cut out the rear wing. I just want enough downforce to keep it planted, but not too much to slow it down..
 
A few quick pictures of the HR motor and diff mounts, the EM performance spool, and the Alza racing top plate/XLX mount
One of the few pics I took during the build.. the Alza top plate machine work is top quality
About the wiring, it looks messy but it’s secure with all the zip ties and doesn’t move.. it’s good until I can figure out something, maybe 3D print a bracket or something to contain it all
 

Attachments

  • B153DBD2-8B85-4802-9E4F-CB26D06FFA0C.jpeg
    B153DBD2-8B85-4802-9E4F-CB26D06FFA0C.jpeg
    338.6 KB · Views: 80
  • 1EEE70E7-CC52-45CA-BB78-A35060690F98.jpeg
    1EEE70E7-CC52-45CA-BB78-A35060690F98.jpeg
    344.1 KB · Views: 78
  • 634D76E1-A5FE-4321-8E66-E9CDEE67E142.png
    634D76E1-A5FE-4321-8E66-E9CDEE67E142.png
    1 MB · Views: 79
Last edited:
One area that was challenging on this build was the body posts.. once you go to the low shock towers you need to find new ways to mount them. The front wasnt a problem as the Mugen bumper came with posts, but the rear was an issue. I looked st different ways to mount them with not much success, but in the end my buddy Eric came through with a custom 3D printed mount that I attaches to the rear plastic bulkhead with self tapping screws.. a solid solution, it works great. The silver screws in the pic are the self tapping screws
 

Attachments

  • E9EE721D-7F9B-479F-B74D-577106B1AE27.jpeg
    E9EE721D-7F9B-479F-B74D-577106B1AE27.jpeg
    200.2 KB · Views: 69
  • 2C65E0DA-90B3-49A5-861B-49A6712309C0.jpeg
    2C65E0DA-90B3-49A5-861B-49A6712309C0.jpeg
    252.6 KB · Views: 67
About the wiring, it looks messy but it’s secure with all the zip ties and doesn’t move.. it’s good until I can figure out something, maybe 3D print a bracket or something to contain it all
Just thought I'd throw some ideas your way for helping you to tidy up the wiring. Some of these solutions are ideas I've used on my 1:1 scale real cars in the past but the practice is still the same.

One way to contain groups of wires is by using "corrugated plastic wire covers" which come in a variety of sizes ~ I've used these on amp installs before and they're great because they are split down the centre line so feeding existing and pre-fitted wiring is less of a problem.
Example search: https://www.google.com/search?q=cor...n8HiAhU5RBUIHbMHDCUQ_AUIDygC&biw=1242&bih=568

Another good way is using "heat resistant wiring sleeves" (used in engine bays) as they can look very cool whilst serving an important job of not letting any heat effect your wiring. They vary in type/size with some needing the wiring to be fed through, others split down the centre and others having velcro sides allowing you to wrap the wires.
Example search: https://www.google.com/search?q=hea...oMHiAhVlQxUIHaM7B-wQ_AUIDygC&biw=1242&bih=568

To hold the wires in place I think cable ties are neat enough but to stop them moving around you could use "cable tie sticky pads" ~ again available in different types/sizes depending on manufacturer but all do the same job.
Example search: https://www.google.com/search?q=cab...oMHiAhWxSBUIHW3ZBc4Q_AUIDygC&biw=1242&bih=568

Lastly if you think outside the box a little there are lots of things designed for other jobs that could be maybe re-purposed to hold your wiring/wiring conduits/cables in place.
For example I once used "ignition lead holders" for just such a purpose because it allowed me to mount it to MDF and hold various cables all next to each other making for a tidy install. They come in plastic, metal, two hole, three hole etc etc.
Example search: https://www.google.com/search?q=ign...onEKHTQVDcMQ_AUIDygC&biw=1242&bih=568#imgrc=_

Hope that helps and gives you some ideas or at least food for thought. (y)
Some good ideas there, I use the corrugated covers in my house for cables already, a smaller size world work well for RC. The colored heat protectant wrap is nice, I could use that for other projects I have going on as well
 
The Futaba got me too with the reversed throttle channel.
 
New PB from yesterday, 103mph with no body.. At top speed it was pretty much at the limits of controllability, with the road I’m on not being level, and with a fair amount of camber to it as well. I need the body the keep it planted, it will be fiberglassed and ready to use soon. I did two runs, on the first it got the power down and did 103mph with no issues.. I was happy. On the second run it went into a full four wheel slide at about 80mph and did two 360’s before sliding to a stop. Thankfully it didnt tip over or hit anything, so no damage.. But the long slide ground the hell out the foam tires lol. Lesson learned, I need to run in warmer weather and get the body ready
 

Attachments

  • 24B21E5A-995D-40DE-B7AB-CB9E04C764E2.jpeg
    24B21E5A-995D-40DE-B7AB-CB9E04C764E2.jpeg
    402.1 KB · Views: 60
Old Thread: Hello . There have been no replies in this thread for 90 days.
Content in this thread may no longer be relevant.
Perhaps it would be better to start a new thread instead.
Back
Top