How to shim your diff (with pictures)

This site may earn a commission from merchant affiliate
links, including eBay, Amazon, and others.

bricoletout

Member
Messages
26
Reaction score
23
Location
France
Arrma RC's
Hi, here is a tutorial about how I shimmed my diffs.
It could be differents for yours. I hope it is clear enough, my english is not perfect.
There is also the french translation.
http://ambiance-rc-loisir.forumacti...-differentiels-arrma-1-8-kraton-talion-typhon

Thanks to :

@RCROD
@Thomas P
@Rich Duperbash
Adam Drake ("How to" videos)
Also :
https://www.arrmaforum.com/threads/diff-shim-heads-up.3303/
https://www.arrmaforum.com/threads/shims-that-work-for-arrma-diffs.5908/
https://www.arrmaforum.com/threads/help-me-shim-with-mugen-e0206-shim-set.7374/#post-71998

A lot of from the following instructions here comes from these posts/threads/videos.

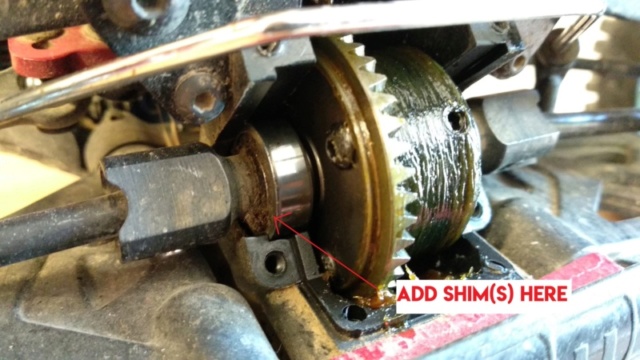
We will shim 3 things :

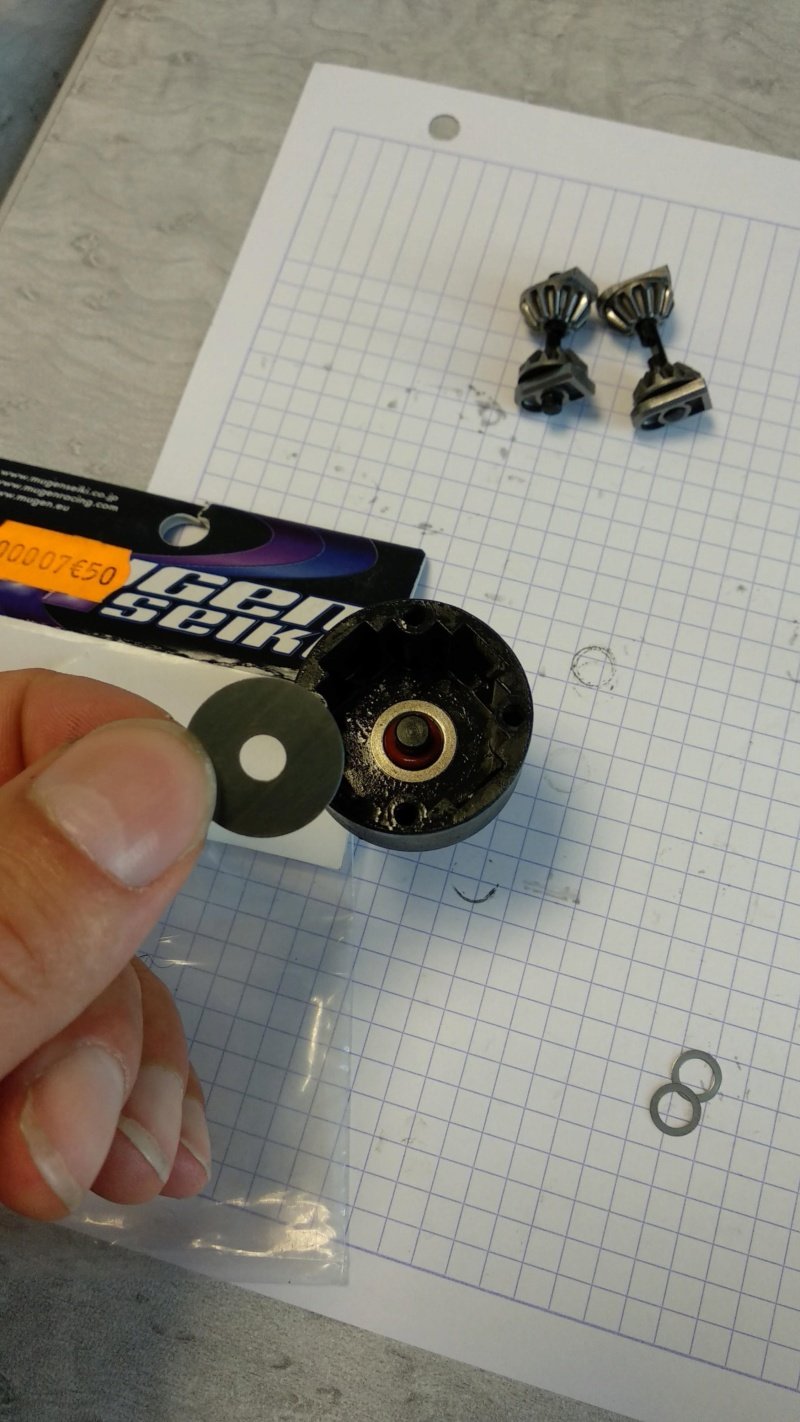
The planetary with the satellites gear (red),
The diffs outdrives (blue),
The spur diff gear diff with the main input gear (green).


diff10.png

diff210.png


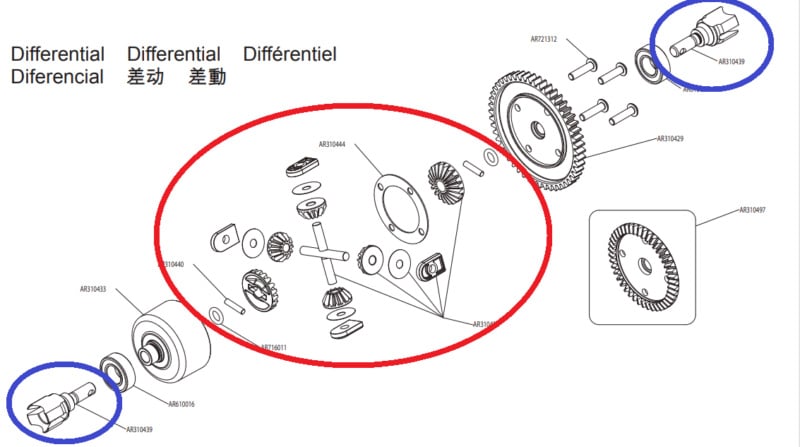
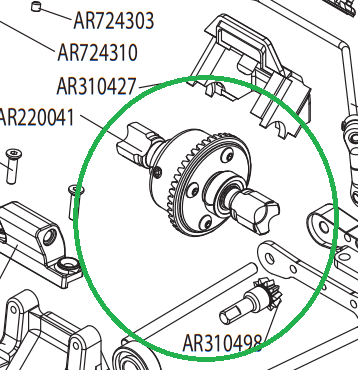
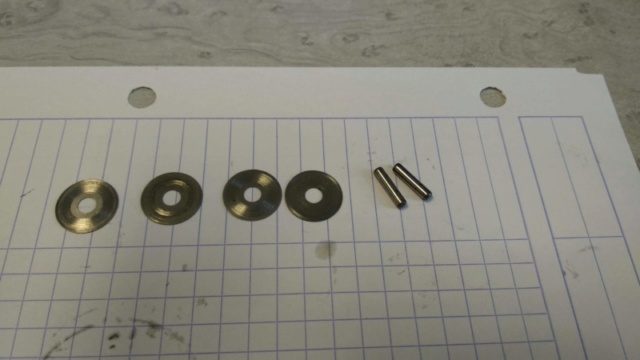
We will need different shims.
Look at this thread to find your shims :

https://www.arrmaforum.com/threads/shims-that-work-for-arrma-diffs.5908/

I used

Mugen E0206 for the internal gear (red),
Kyosho KYO96643 5x7mm for the diffs outdrives (blue)
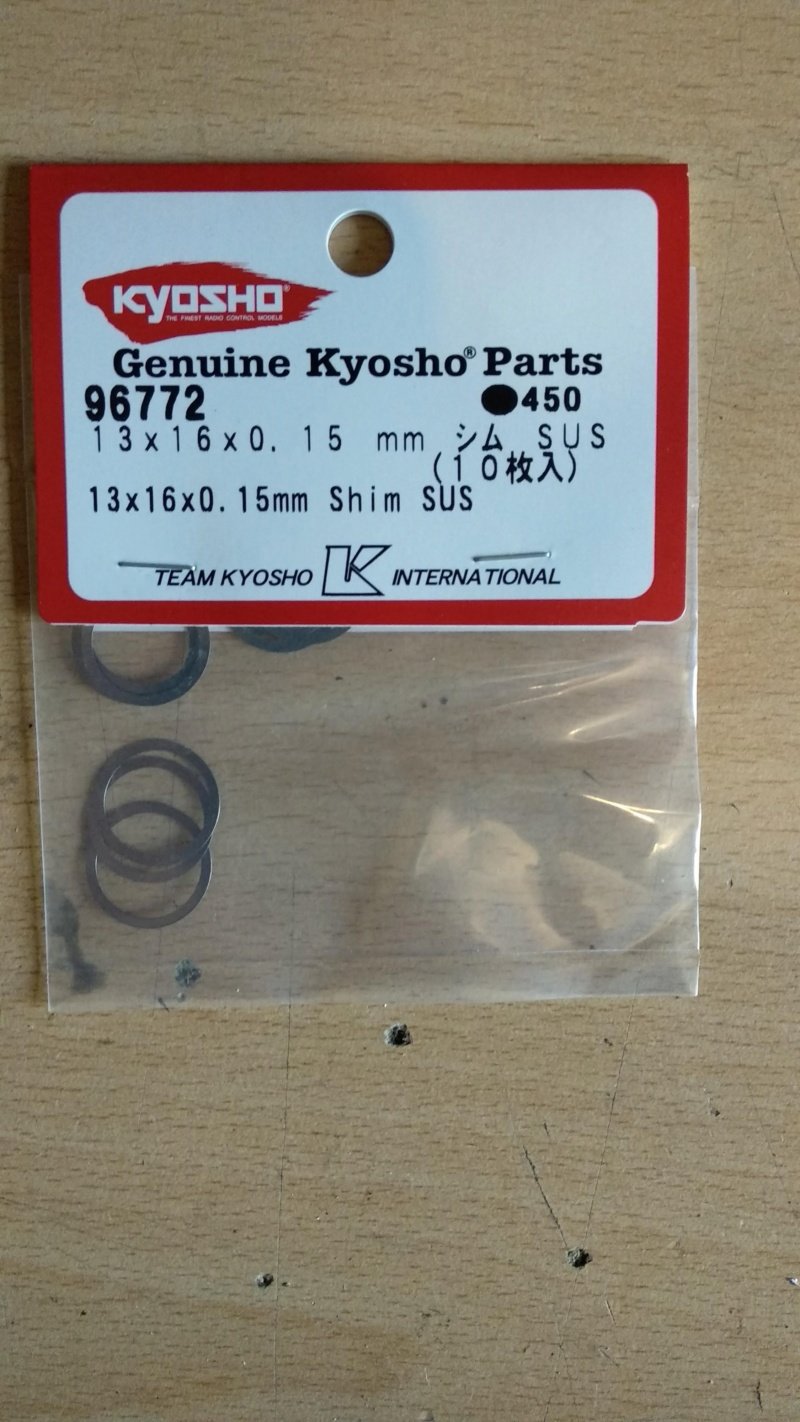
Kyosho KYO96772 for the all diff with the main input gear (green)

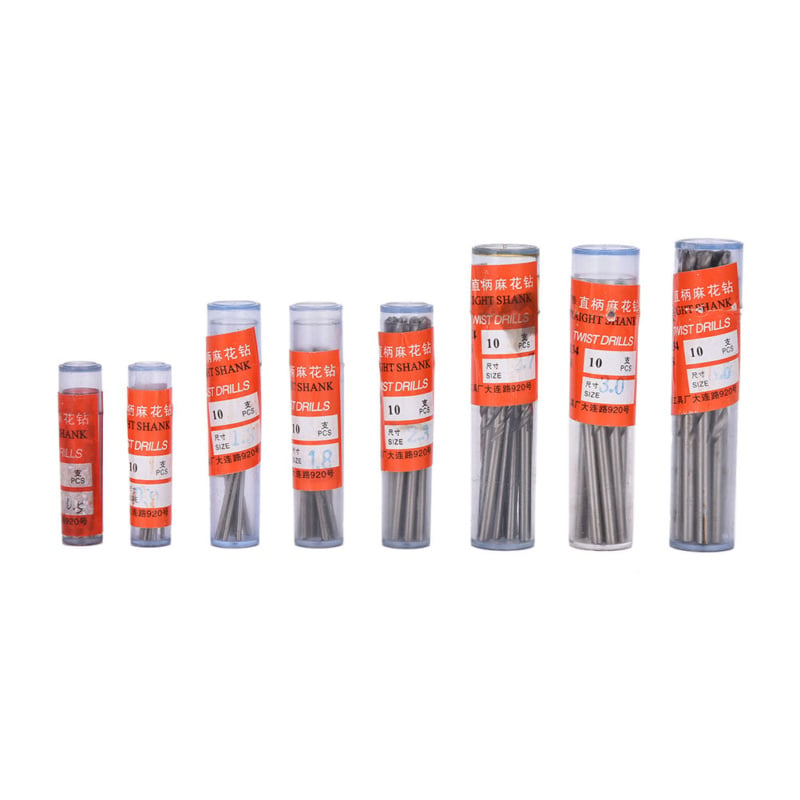
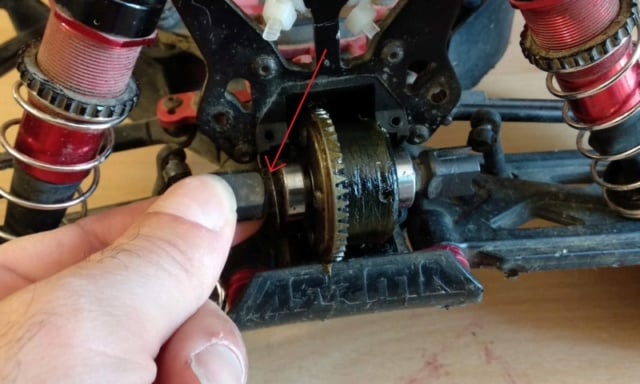
Optional cross pin :

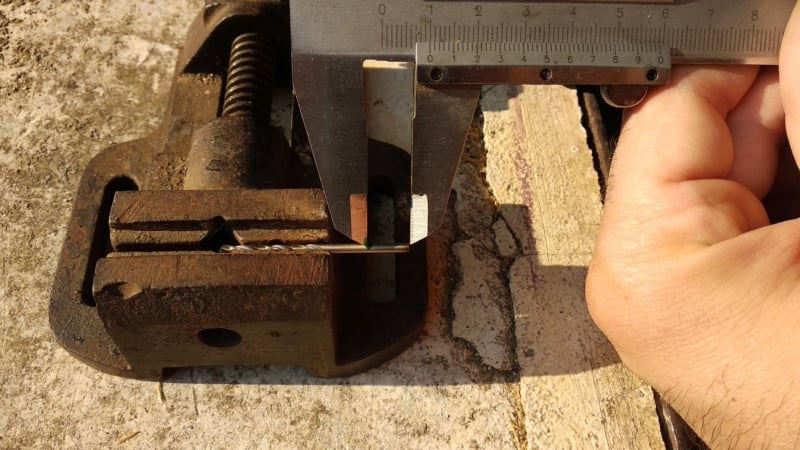
2.5mm HSS drill bits to cut 9.5mm (cheap to find on ebay)
Cut them and check their length with the planetary

110.jpg


210.jpg


310.jpg

3bis10.jpg

3bis210.jpg

3bis310.jpg

3bis410.jpg


1 : Dismantle the diffs from the car

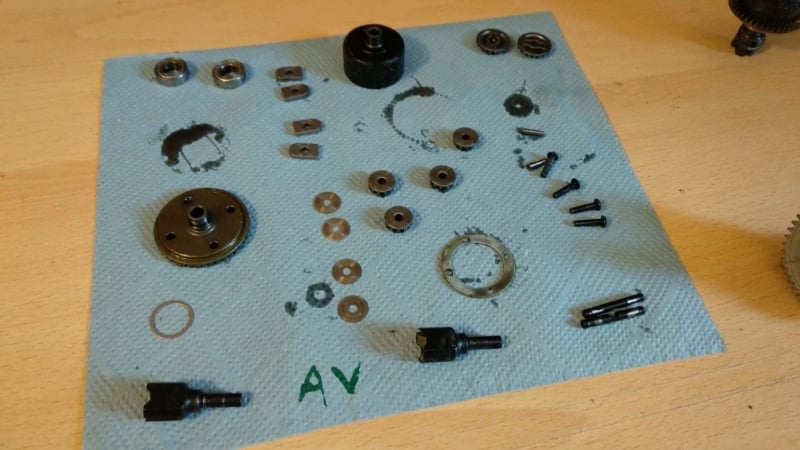
2 :Open the diffs and clean all the parts


Tips :
I let the gear on a kitchen paper and they dried easily and alone in few minutes.
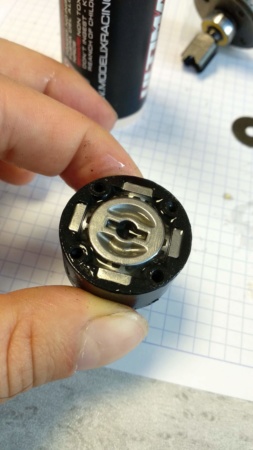
Take care of the DIFF GASKET, don’t tore it !

41110.jpg

511.jpg

711.jpg

811.jpg

1011.jpg


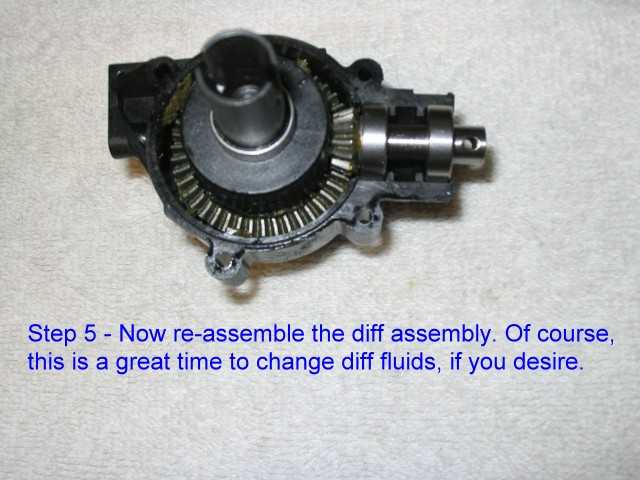
We will rebuild the diff dry first in order to check the diff is not to tight !
 
Last edited:
3 : Outdrive shim

Stock outdrive play


Add one shim(5x18mm) under the planetary on the diff cup side and see the side to side play of the outdrive.

1211.jpg


131110.jpg

141110.jpg


Add the necessary 5x7mm shim at the outside of the diff cup, on the outdrive.
I put two of 0.2mm shim to get 0.4mm. But it will depend on your diff.
The goal is to let the minimum play possible.

1511.jpg

1611.jpg


You need to do the same for the other outdrive on the spur gear side.
You can add one shim under the planetary but It was to tight for me.
I used two 0.2mm shim on the outdrive here also.

2011.jpg


4 : Planetary and satellite shim

We have already added one shim under the planetary (diffcup) at the previous step. It’s a good starting point but maybe you will find that with more or less it’s better for your diff.

I replaced all the stock satellite shims 3.5x12 with the mugen ones.
If you have different shims, try different combination to add a little more thickness to the stock shim.

171110.jpg


Rebuild the diff with the 4 satellites inside the diff cup

Close the diff and test it without oil ! (On my pictures there is some grease because it is my final build with everything checked (I tried to use some grease on the gear and shafts but I’m not sure it’s necessary).

211110.jpg

221110.jpg


If the diff run smooth then you should have bulletproof diff. If it’s to tight, try to remove shims (start with the big ones under the planetary) or reduce the thickness.

Then open the diff and add the oil. Some people uses grease on joints, shafts, gear before putting the silicone oil. I did the same for this time.

2311.jpg


Keep the replaced parts from the diff for spares and futures shimming.

241110.jpg


Conclusion :

I used this talion V2 diff :

Front :

- 0.4mm thickness shim for the two outdrives (diff-cup side and spur gear side).

- One shim under the planetary on the diff cup side

- And I replaced all the satellites shims with the ones from mugen kits.
- And two homemade cross pin.

Middle :

- 0.3 mm thickness shim for the outdrive of the diff-cup side
- 0.4 mm thickness shim for the outdrive of the spur gear side

- One shim under the planetary on the diff cup side
- Also one shim under the planetary on the spur gear side.

+ satellites and home home-made cross pin like the front diff.

Rear
- 0.4 mm thickness shim for the outdrive of the diff-cup side
- 0.5 mm thickness shim for the outdrive of the spur gear side

- One shim under the planetary on the diff cup side

+ satellites and home home-made cross pin like the front and middle diff

But it could be different for you and different for the front – rear – middle diff. Don’t overtight your diff.

5 : The spur diff gear diff with the main input gear

From the box I have one shim on the spur gear side, between the bearing and the diff case.
We need to adjust the side to side play of the all diff and to check the good ring and pinion shimming.

Stock play :


For this you will need to add (or put a thicker) 13x16mm shim(s) on the bearing side first and check the shimming of the spur gear with the pinion/ main input shaft. It should be smooth and even slightly tight on big wheel truck (Kraton, outcast, Talion…).


261110.jpg

251110.jpg


Conclusion :

I added 2 shims on the front diff (stock shim + 0.30 mm) and one on the rear diff (stock shim + 0.15mm).
There is still a good amount of play between the spur gear and the pinion.

EDIT : as noticed by @olds97_lss it could be useful to add shims under the main input shaft/ pinion in order to make the shaft more engaged with the spur gear.
I still have to check if it is possible. Updates : I tried with 0.3mm shim and the pinion was pulling the diff cup. So I will try later with thinner shims.

Pictures not from ARRMA but for example (source : http://csgbenefits.org/mgt/transmission.htm)

Before : you can see that the pinion is not fully engaged.
pinion10.png


Then add shims

diff-s10.jpg


After you can see the pinion is more engaged.

diff-s11.jpg


Hope i will be useful.

My arrma is strong and can jump on trees !

 
Last edited:
What's the purpose of using drill stock to replace the sun gear pins? Are the stock pins known to break?

Also, why bother removing play on the output shafts? Those just float and shouldn't harm anything or benefit by having less play. I've never messed with that on any diffs.

Have you seen there to be a need to add shims behind the diff pinion? On my outcast, I wasn't able to add more than 2 shims to the ring gear side of the diff as the case doesn't allow for more. Yet, I blew my front diff in my outcast running 4S. The tips of a couple teeth on the ring gear got ruined. I've had the truck for 3 weeks, probably have run 15 packs through it. Diff blown already after shimming. I ordered a new diff and will reshim it similarly, but may try adding a shim or two behind the pinion to see if it's too tight or not.

Also, naptha dissolves silicone diff oil. After 18 years in the hobby, I finally figured that out. LOL! I just put a bit of naptha in a throw away container, then use a toothbrush to scrub everything down. It also dissolves the normal grease we use on the ring/pinion. Then your shimming a very clean diff before adding the oil/grease. When the naptha evaporated, it left a layer of dirty dirty silicone oil in the bottom of the container, so you will either need to wipe it out to reuse it, or throw it away.

Yes, the Sun gear pin is known to break. I've seen it before on Facebook groups.

The play on the oupout shaft may have as consequences that the shat will apply pressure on the sun gear in the direction of the satellite. Do you see what I mean.
@RCROD will explain it better than me.

I still have to shim the main gear with the diff pinion. So I will see if shims added behind the pinion could help for better engagement. (I will do it in a couple of days).

Blowing your shimmed diff on 4S ? You must be hard in the throttle!

Nice for the naptha, thanks :)

Oh, I see. I guess if the dog bone was jammed in the cup or something it would jam the shaft into the sun gear, but outside of that, I couldn't see it being slop you have to care about. Considering how much room the bones have to float, I couldn't see that being an issue.

I don't know what the deal is with the diff and why it broke. Other than a fluke on power landing I'm not remembering. I'm usually pretty vigilant about not doing that because my other trucks cannot handle that kind of stress at all. Savage Flux HP and Brushless Revo v1. I'm running the original ring/pinion/cups/spiders/suns in both of my revo diffs and have been for 20 months. All I've changed were bearings on the rear diff. If I can make a brushless revo diff last that long, I can't wrap my head around what I did with this thing. I broke 2 pinions in about 10 months running time with my savage flux, so a few months back, I got a center diff transmission for it to help combat that. Both running the proline 3.8" trenchers on 4S. Just like the outcast.

Really, the only thing I do different with the outcast than those 2 trucks is get bigger air, because it can take it. I do flips and wheelies all the time with them as well. I just don't air them out quite as much, the e-revo especially. It bottoms out so hard...

Once the new diff shows up, I'll maybe take the diff case/bulkhead apart completely since I have the front section off the outcast entirely, so I could get at the pinion cup. Perhaps there's a crack in it I'm not seeing allowing for the gears to separate under power.
 
What's the purpose of using drill stock to replace the sun gear pins? Are the stock pins known to break?

Also, why bother removing play on the output shafts? Those just float and shouldn't harm anything or benefit by having less play. I've never messed with that on any diffs.

Have you seen there to be a need to add shims behind the diff pinion? On my outcast, I wasn't able to add more than 2 shims to the ring gear side of the diff as the case doesn't allow for more. Yet, I blew my front diff in my outcast running 4S. The tips of a couple teeth on the ring gear got ruined. I've had the truck for 3 weeks, probably have run 15 packs through it. Diff blown already after shimming. I ordered a new diff and will reshim it similarly, but may try adding a shim or two behind the pinion to see if it's too tight or not.

Also, naptha dissolves silicone diff oil. After 18 years in the hobby, I finally figured that out. LOL! I just put a bit of naptha in a throw away container, then use a toothbrush to scrub everything down. It also dissolves the normal grease we use on the ring/pinion. Then your shimming a very clean diff before adding the oil/grease. When the naptha evaporated, it left a layer of dirty dirty silicone oil in the bottom of the container, so you will either need to wipe it out to reuse it, or throw it away.

Since bricoletout put me on the spot (ha, ha), I will try and explain. LOL

The reason(s) to remove the play on the outdrives, is simply put, too much play is not good, especially when these 6S capable diffs spin as fast as they do. I am very fussy, and have countless shims, shim kits and washers, so I decided to dry-fit all 3 of my diffs countless times to get just right (tight with no play, but still super smooth and not notchy at all). Dry-fitting involved adding more 3.5x12x.15mm shims, than more dry-fits replacing the .15mm shims with thicker 3.5x12x.2mm shims (*this was the best fit). Dry-fitting also involved trying (1) 5x18 shim, (2) 5x18 shims and also tried without any 5x18 shims (center diff I ended up using two 5x18 shims, and used only one on the front/rear diffs). After all this countless dry-fitting, I had the best shimmed diffs I could possibly have, but when I pressed in or pulled hard on the outdrives, I noticed the internal gear mesh would change slightly, due to this outdrive play. Otherwards, even after the diffs were shimmed perfectly inside, they would still feel a bit notchy when I pressed really hard in or out on the outdrives, when spinning the gears. This was noticeable on all 3 diffs, especially the center diff. Since I already had a 5x7 shim kit (.1, .2, & .3mm thickness), these were the perfect size to shim all this unnecessary play on the outdrives (note: the shims and thickness I used varied on the center diff compared to the rear/front diffs). After shimming the outdrives, I tried pushing and pulling real hard on the outdrives, and the internal gear mesh did not change.

Shimming the outdrives takes all the unnecessary play out which should make the diffs more durable, and last even longer. The other important point is the internal gear mesh does not change, regardless if the wheels push in or out on the front/rear diff outdrives, or chassis flex causing the same on the center diff. Also by removing all the play in the outdrives may also help prevent the cross pins from possible breakage, as all that back and forth movement (in and out play) on the outdrives would definitely be hard on the pins, never mind the extra wear it could cause on the internal gears. If you are going to spend the time shimming the internal diff gears, why would you not also shim the outdrives, especially when they have so much play and could cause extra wear, etc...

Thank you for this great answer, I couldn't do better. You were the guy for this answer (ha ha).
 
are you sure 2.5mm upgrade over 2.25 stock?? Hope so as I ordered my 2.5mm Blank bits from McMaster Carr which is c2 carbide steel ?? let me know if I still got the right size... if not I can send it back once it gets here and request different size.. thanks.. I’m running 6s as dual 3s thanks and I have Kraton 6s v4 newest version
 
are you sure 2.5mm upgrade over 2.25 stock?? Hope so as I ordered my 2.5mm Blank bits from McMaster Carr which is c2 carbide steel ?? let me know if I still got the right size... if not I can send it back once it gets here and request different size.. thanks.. I’m running 6s as dual 3s thanks and I have Kraton 6s v4 newest version
The regular 6S BLX diffs uses 2.25mm pins, the 6S EXB diffs uses 2.5mm pins.
 
This is some awesome info here. Can I ask about how to find the right size pin here or start my own thread?

Edit sorry. Just saw above.
 
Last edited:
3 : Outdrive shim

Stock outdrive play


Add one shim(5x18mm) under the planetary on the diff cup side and see the side to side play of the outdrive.

: I tried with 0.3mm shim and the pinion was pulling the diff cup. So I will try later with thinner shims.

Pictures not from ARRMA but for example (source : http://csgbenefits.org/mgt/transmission.htm)

Before : you can see that the pinion is not fully en

Then add shims

diff-s10.jpg


After you can see the pinion is more engaged.

diff-s11.jpg


Hope i will be useful.

My arrma is strong and can jump on trees !

How have the diffs held up after shimming the input gear pinion from the inside The diff. Did the shims last?
 
At the beginning of the thread there was some back-and-forth about whether the outdrives need to be shimmed. I'd just like to add that my AE RC8B4e race buggy has outdrive shimming so there is likely some benefit to it, otherwise, the most successful rc racing company wouldn't do it. Just saying!
 
Old Thread: Hello . There have been no replies in this thread for 90 days.
Content in this thread may no longer be relevant.
Perhaps it would be better to start a new thread instead.
Back
Top