
- Messages
- 35
- Reaction score
- 104
- Arrma RC's
- Kraton 6s
- Typhon 6s
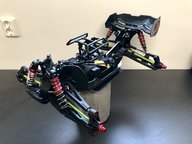
After running my Kraton mainly stock for a few hard bashing sessions I decided that it was time for a solid upgrade on the whole rig.
Parts takes some time to get here to Sweden from USA so the build have so far been in two sessions and will be finished in a couple of weeks. +
So here goes nothing...
Chassi: M2C Goliath series. Choosing this chassi felt like a no brainer. Low weight and super quality and finish!
Servo: Power HD LW-25MG. This was not my first choise, but was what my LHS had in store that day. OK strength and same speed as Arrma servo.
Servo mount: Original for now, will be upgraded in session 2 to Hot Racing.
Engine: Original with 12T pinion. Pinon will be changed for Tekno T15 in session 2.
Engine mount: Original and the plan is to leave it that way.

Glitch buster: Power HD RX30. Snug fit in the transmitter box!

Front tower: Voltage Hobbies, black anodized. These are from a used car that I bought online and would use for parts. The towers where not listed in the ad so it was a happy surprise when I received it")
Gearbox case: Hot Racing. Also from the "donator" car and the main reason for that purchase
Suspension arm mount: GPM. Also from the "donator" car. These might be changed in the future for Voltage Hobbies.

Front arm droopscrew: M2C.

Parts takes some time to get here to Sweden from USA so the build have so far been in two sessions and will be finished in a couple of weeks. +
So here goes nothing...
Chassi: M2C Goliath series. Choosing this chassi felt like a no brainer. Low weight and super quality and finish!
Servo: Power HD LW-25MG. This was not my first choise, but was what my LHS had in store that day. OK strength and same speed as Arrma servo.
Servo mount: Original for now, will be upgraded in session 2 to Hot Racing.
Engine: Original with 12T pinion. Pinon will be changed for Tekno T15 in session 2.
Engine mount: Original and the plan is to leave it that way.
Glitch buster: Power HD RX30. Snug fit in the transmitter box!
Front tower: Voltage Hobbies, black anodized. These are from a used car that I bought online and would use for parts. The towers where not listed in the ad so it was a happy surprise when I received it
Gearbox case: Hot Racing. Also from the "donator" car and the main reason for that purchase
Suspension arm mount: GPM. Also from the "donator" car. These might be changed in the future for Voltage Hobbies.
Front arm droopscrew: M2C.
 But that was a easy fix with the dremel.