Kraton v3 rebuild

This site may earn a commission from merchant affiliate
links, including eBay, Amazon, and others.

Lufkin25

Member
Messages
54
Reaction score
30
Arrma RC's
Just got started on rebuilding my kraton v3. I've had it for a few months now and have maybe 15 packs through it. I have learned a lot about these cars and made a lot of mistakes along the way. Hoping that some information or a picture I post will be able to help someone else with their build or with their arrma..

20190330_075850.jpg

Here is my m2c chassis and skid plates. Ready to be assembled.

20190330_080017.jpg

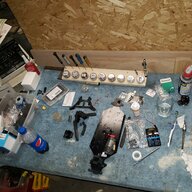
Here is what I have to start with. No body, a scratched and bent stock chassis and...

20190330_080204.jpg

A stripped out motor gear with a stripped set and a missing motor mount screw.. remember I said I made some mistakes along they way? This was a few of them lol

20190330_092130.jpg

I removed 4 x 4mm rear gear case screws and 1 x 4mm chassis brace screw to remove the entire rear end. I replaced the 5 screws after I fitted it to my new chassis. I used the 4 x 4mm long screws included with my m2c skid plate for use with the T Bone Racing 2.0 wheelie bar. Took a few tries to figure it out but I decided that the TBR wheelie bar goes on on top of the skid plate. So it goes chassis, skid plate, and then the wheelie bar.

20190330_092204.jpg

Like this...

20190330_225406.jpg

Then I installed my new hobbystar 4082 with a hot racing motor mount and center diff carrier. Waiting on some parts from voltage hobbies now... upper rear front suspension mount and steering rack. Both parts seem to bend on me a lot. I have had great luck with my voltage shock tower and rear chassis brace. They have taken a beating and are still true! I will post more when I make more progress. Hope this helps someone!
 
Good job! While you are waiting on the parts I would take apart the front end and inspect everything. Check the diff bulkhead for cracks. Check your pin braces. Make sure the CVD' aren't bent, etc.
 
Thank you, that's really good advice. I forgot to mention. It has been down a week already and I cant keep my hands off of it. The bulkhead has 0 run time on it. I thought all I broke was the front upper rear suspension mount. Come to find out I destroyed my bulkhead too... lol
15541191111845434057840538063534.jpg

Going to have to rebuild the center diff when my new spur comes on Friday. The gear doesn't look too bad but I know it has wear bc of how bad the pinion gear is.

I am looking for advice on my front a arms. I am using RPM arms and have managed to destroy or lose all of my fancy factory spacers. I use washers for spacers now but I'm not sure how many is too many or if they are even needed. Does anyone else use spacers on their front RPM a arms?
15541198274833153157866398752810.jpg

I use 1 in the front and 2 in the back. There is still some play when it is all mounted up. Curious if it is too tight though bc I have broken 2 front upper rear suspension mounts recently and never had an issue before. I try not to over tighten the pins bc I noticed the rear suspension mount will bend if you go too tight... I bet the voltage hobbies wont bend..?
Thank you bicketbam for the good advice!
 
Thank you, that's really good advice. I forgot to mention. It has been down a week already and I cant keep my hands off of it. The bulkhead has 0 run time on it. I thought all I broke was the front upper rear suspension mount. Come to find out I destroyed my bulkhead too... lol View attachment 34343
Going to have to rebuild the center diff when my new spur comes on Friday. The gear doesn't look too bad but I know it has wear bc of how bad the pinion gear is.

I am looking for advice on my front a arms. I am using RPM arms and have managed to destroy or lose all of my fancy factory spacers. I use washers for spacers now but I'm not sure how many is too many or if they are even needed. Does anyone else use spacers on their front RPM a arms?
View attachment 34344
I use 1 in the front and 2 in the back. There is still some play when it is all mounted up. Curious if it is too tight though bc I have broken 2 front upper rear suspension mounts recently and never had an issue before. I try not to over tighten the pins bc I noticed the rear suspension mount will bend if you go too tight... I bet the voltage hobbies wont bend..?
Thank you bicketbam for the good advice!
You’re welcome! I use the stock spacers with my RPM a-arms but washers are fine. I would use just enough so that you can’t slide the arm front to back. You definitely don’t want it too tight.
 
Good deal! I will add 1 more washer on each arm then. There is still play with only 3 of them. Wonder if that affects the steering at all? Cant seem to dial in my trim very good. I am wanting to end up with a "like new" handling kraton out of this build. Things like this is exactly what I need to learn. Awesome!

Went out to look at the arms and checked my pins just to make sure, they're bent. Should have listened to you Bicketybam! Got new ones in and ready for my voltage parts to come. I have full synthetic "rc lube" I think I will use on the pins.
 
So my parts came and I made a little more progress
15542091974481947095399707204933.jpg

I had to drill a hole through the stock esc mount because the max8 wouldn't line up with the pre drilled holes. I put a nut on the back side to make sure it doesn't come lose.
1554209351784410958999971577758.jpg

Also had to mount the esc 180° from the stock one. Because the cap pack (that must be installed for warranty claims) hit the driveshaft. The wires coming out of the esc also were in the way of the driveshaft. Which I didnt plan on. I put extensions on my.motor wires but now with the esc turned 180° I am worried my wires are too short
15542095233115787556984975494198.jpg

Tell me what you all think please. I don't want to take them apart at all. It was a tiresome learning experience to say the least. But if it is in my best intrest I'll tear them apart and redo them.
20190402_082806.jpg

15542096894953788767950685005918.jpg

Tired me trying to work late at night started getting frustrated with my front end. I had it on there once and it seemed to fit great. But after my parts came and I got them installed I couldnt get the front end to go on. I had my voltage hobbies steering rack on upside down.
15542099381051441616556049375636.jpg

It goes this way with the curve away from the gearbox.
15542099959463785232818859418028.jpg

Not like this. With the curve facing the gearbox. Also note the direction your a arms face. They apparently have to both go the same way. I had mine flipped 180 and it went together but did not look right at all. Hoping for a test drive today with my new build!
 
So my parts came and I made a little more progress
View attachment 34433
I had to drill a hole through the stock esc mount because the max8 wouldn't line up with the pre drilled holes. I put a nut on the back side to make sure it doesn't come lose.
View attachment 34434
Also had to mount the esc 180° from the stock one. Because the cap pack (that must be installed for warranty claims) hit the driveshaft. The wires coming out of the esc also were in the way of the driveshaft. Which I didnt plan on. I put extensions on my.motor wires but now with the esc turned 180° I am worried my wires are too short
View attachment 34435
Tell me what you all think please. I don't want to take them apart at all. It was a tiresome learning experience to say the least. But if it is in my best intrest I'll tear them apart and redo them.
View attachment 34436
View attachment 34437
Tired me trying to work late at night started getting frustrated with my front end. I had it on there once and it seemed to fit great. But after my parts came and I got them installed I couldnt get the front end to go on. I had my voltage hobbies steering rack on upside down. View attachment 34438
It goes this way with the curve away from the gearbox.
View attachment 34439
Not like this. With the curve facing the gearbox. Also note the direction your a arms face. They apparently have to both go the same way. I had mine flipped 180 and it went together but did not look right at all. Hoping for a test drive today with my new build!
I did the same thing the first time I put the Voltage Hobby steering rack on, lol. As for the motor leads, I would run them and see how it goes. Could they be a little longer? Sure. But I think you can get away with it. It’s looking good!
 
I think you're defeating the purpose of the skid plate by having it under the wheelie bar mount. And on the spacers/washers on the front, I put 1 thin one in the rear, and 2 thin/1 thick in the front. The more you move the top control arm towards the rear, the more positive caster you have, making it want to track straight, like the way front forks are on a motorcycle/bicycle. Good job though, always fun up-grading.
 
I think you're defeating the purpose of the skid plate by having it under the wheelie bar mount. And on the spacers/washers on the front, I put 1 thin one in the rear, and 2 thin/1 thick in the front. The more you move the top control arm towards the rear, the more positive caster you have, making it want to track straight, like the way front forks are on a motorcycle/bicycle. Good job though, always fun up-grading.

Agree on the skid plate. I didn’t catch that.

What’s the deal with 2 wheelie bars? That looks a little odd. I’d take the wheels off the stock one.
 
I think you're defeating the purpose of the skid plate by having it under the wheelie bar mount. And on the spacers/washers on the front, I put 1 thin one in the rear, and 2 thin/1 thick in the front. The more you move the top control arm towards the rear, the more positive caster you have, making it want to track straight, like the way front forks are on a motorcycle/bicycle. Good job though, always fun up-grading.
That's what I thought. I was completely undecided about the skid plate. When I put the skid plate on with the TBR mount in between the skid plate and chassis, the TBR mount acts as a spacer and the skid plate hangs down and looks like a hook to dig into dirt on catch on stuff. I was thinking there would be more strength to it it if was metal on metal also. I will try the other configuration though because I see the benefit of having the skid plate doing the actual skidding though lol duh
Thanks man, good advice!
 
Agree on the skid plate. I didn’t catch that.

What’s the deal with 2 wheelie bars? That looks a little odd. I’d take the wheels off the stock one.
Yeah... it does look pretty odd. I wont run it with a wing on, they only cause me headaches with broken wing mounts. I wanted to run the TBR and decided to just throw it on... broke one of the wheels first wheelie I did with it lol... I was waiting to break another wing mount to cut the wheels off. That's exact what happened!
20190402_181227.jpg

So I put the arrma wheels on my TBR wheelie bar after I changed arrmas (I assume plastic) bearings with waterproof ones. Now it doesn't look so goofy lol
 
Yeah... it does look pretty odd. I wont run it with a wing on, they only cause me headaches with broken wing mounts. I wanted to run the TBR and decided to just throw it on... broke one of the wheels first wheelie I did with it lol... I was waiting to break another wing mount to cut the wheels off. That's exact what happened!View attachment 34514
So I put the arrma wheels on my TBR wheelie bar after I changed arrmas (I assume plastic) bearings with waterproof ones. Now it doesn't look so goofy lol
Where does the front of the brace attach to? Hard to tell in the picture? The diff case?
Screenshot_20190403-082152.png
 
I got my skid plates mounted on the bottom yesterday after I built a new ramp. I am having some heat issues with my motor. It is a 2000kv 4082 with a max8 esc and a 17t pinion. I have a motor fan coming from China. Ordered it over a month ago but ordered year racing fans bc I wanted some sooner. They came and I destroyed them the 2nd time I took my truck out. The fans fell through their housing when I landed hard. So no cooling for now.. my motor got up to 150° 2 times already... hope a fan fixes it. Or else I will have to use a smaller pinion. I will be building an outcast soon with my extra parts i have laying around. Another build thread coming soon!
 
Some may disagree, but I don't think 150 is too hot. And where did you find that iddy biddy "o" on your keyboard?:)
 
Some may disagree, but I don't think 150 is too hot. And where did you find that iddy biddy "o" on your keyboard?:)
?? My dad asked me the same thing! I have a Samsung galaxy it's on my keyboard. The only reason I felt it was too hot is from watching Rich's videos in California on 90°+ days (see what I did there with the iddy biddy o ?) and he says 140 is as hot as he wants to get. He uses a 17t pinion a lot too. I can only run for a little less than 10 minutes and it's up to 150 already. How hot is too hot for you? What do your motors run at?
 
Old Thread: Hello . There have been no replies in this thread for 90 days.
Content in this thread may no longer be relevant.
Perhaps it would be better to start a new thread instead.
Back
Top