Outcast 6S Wheels

This site may earn a commission from merchant affiliate
links, including eBay, Amazon, and others.

Lefty_Al

Premium Member!
Premium Member
Build Thread Contributor
Messages
266
Reaction score
431
Location
Sydney, Australia
Arrma RC's
  1. Outcast 6s
  2. Typhon 3s
  3. Vorteks
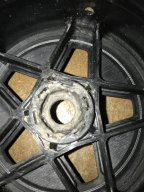
Took the Outcast for a bash last weekend and straight up it was having issues popping wheelies. Gave the car the once over and found that the left rear hex in the wheel had chewed itself pretty much out. Was able to get a run in by tightening the wheel nut to 2 gorilla grunts and finished off a couple of batteries with no further issue. I suspect is was caused by the nut loosening off a bit. Lesson learnt, will always check the nuts before a run and have lined up some spare 17mm hex tools for the bashing box.


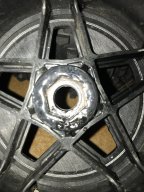
Went home and ordered a pair of new wheels/tyres that arrived today. I took a look at the hex set up and it looks pretty weak. Was thinking about filling in the 6 cavities behind the hex with superglue to try and give some extra strength. Comparing the 2 new wheels, the hexes appear to be glued/bonded in they are not orientated the same.
20200131_163253.jpg


Anyone have a better solution?
 
Fill it with gorilla glue. Super glue I think is to soft
Thank you, that is just the sort of info I need :)
I think I'll go with this one. Pretty sure the last bottle I got foamed up a bit, not sure I want that for this job.

Gorilla.JPG
 
Last edited:
Super glue is a cyanoacrylate and is very hard.
It is designed to get into the parent structures and bond on a molecular level.
It is no good for filling gaps or having flexibility and as such will not work well for your intended application.
A good option would be the non-foaming gorilla glue or to use a two part epoxy designed for plastic such as the PC7 epoxy paste.
One word of caution is ensure that all surfaces are extremely clean or nothing will stick.
Goodluck with your project.
 
One last idea that I have had to use in a pinch while out away from home. I had a hex strip a wheel hub may also,
I bought a box of flat toothpicks from the dollar store near by and a tube of their house brand super glue.
Cut the toothpicks so they are all flat and square on one end ( not round or pointed),
Insert one or two add a few drops of super glue and repeat until full.
The last couple we had to pound down with the side of a spare mag but it worked.
We then took a small pair of side cutters and cut them flush as possible to the top of the wheel hub.
By the time we finished up with the 4th wheel the 1st and second were well dry and ready to be remounted.
The 3rd and 4th we waited approximately 10-15 minutes and then mounted them.
This was all done on the tailgate of my truck in a park with no real tools to speak of, only what was carried in a emergency bag and a local dollar store.
8 months later I haven't touched it and it still gets bashed often.
Maybe it can help you maybe not.
Goodluck
 
Last edited:
Thanks for the feedback, i'll be off to my local hardware store today and get some gorilla glue. I've had good luck with the foaming version before in fixing broken parts, so the non foaming one should work out well. I like the toothpick idea. Sometimes the emergency fixes end up lasting much longer than expected!!!!.
 
Before now in a pinch I have wrapped tin foil around a wheel nut tightly really moulding it, ca'd it in the wheel hex, let it dry, scrape off the top of the foil, use the hub shaft to knock out the nut and it reinstates your hex, was actually a field repair for the br in late 2017 and it's still goin strong today.
 
what about extending the hex pin and adding a notch in the wheel for the longer pin to sit in
 
Best fix. You have to find metal tubing to fit around the hex on the rim like a ring on your finger. The same as some 1/5 scale rim.baja 5b
Might take some homework. Well worth the study time at home depot!
20200220_141417.jpg
 
Best fix. You have to find metal tubing to fit around the hex on the rim like a ring on your finger. The same as some 1/5 scale rim.baja 5b
Might take some homework. Well worth the study time at home depot!

I can see that helping but the cavities next to the hex are still there and it could still spin. My Outcast wheels don't have that added support in the middle of the cavity next to the hex. I filled the mine with JB Weld epoxy. I have not had a chance to test on good hard dirt as it's snowy here currently but I believe it should help a lot.
 
I never spun a hex on my baja 5b ss. The motor is a championship ported 30.5 from ESP motors right around 7 hp.never spun a hex. It's the overall flex that breaks it not really that little cavity. Try applying the jb weld all around like a steal ring.
I can see that helping but the cavities next to the hex are still there and it could still spin. My Outcast wheels don't have that added support in the middle of the cavity next to the hex. I filled the mine with JB Weld epoxy. I have not had a chance to test on good hard dirt as it's snowy here currently but I believe it should help a lot.
Looked at your rim again. You have plenty of meat their to build up some jb weld all around the hex. In layers if needed.
 
I never spun a hex on my baja 5b ss. The motor is a championship ported 30.5 from ESP motors right around 7 hp.never spun a hex. It's the overall flex that breaks it not really that little cavity. Try applying the jb weld all around like a steal ring.

Looked at your rim again. You have plenty of meat their to build up some jb weld all around the hex. In layers if needed.

Different wheels man. Yours have more support from the beginning. Throw some outcast backflips on that 5b.. I bet it will spin the hex... but although a strong motor I’m not sure it has the same torque of a 6s brushless either. Apples to oranges really imo.
 
It look taller in the photo you showed. The hex on the rim. You just need to support the outer edge of that hex. If you have only 3/16, wrap that little bit in layers of jb weld bring it into the webbing of the rim. Any bit of support should help.
Just trying to give ideas.
35 lbs baja 0-50 about 4 seconds
ESP 30.5 championship ported 990 carb,stuffed crank CPI center pipe and heavily shaved cooling fly wheel.
 
Last edited:
It look taller in the photo you showed. The hex on the rim. You just need to support the outer edge of that hex. If you have only 3/16, wrap that little bit in layers of jb weld bring it into the webbing of the rim. Any bit of support should help.
Just trying to give ideas.

The photo above isn’t mine but same wheels. Here’s an example of one of mine with spun hex. I JB’d 2 full sets now. 2nd photo is the JB’d wheel
 

Attachments

  • 404F7257-5612-4FE1-8C27-2DB86D3CC5B5.jpeg
    404F7257-5612-4FE1-8C27-2DB86D3CC5B5.jpeg
    411.5 KB · Views: 53
  • C109E1C6-CF3A-4495-9FAD-10A6D5EB391E.jpeg
    C109E1C6-CF3A-4495-9FAD-10A6D5EB391E.jpeg
    411.3 KB · Views: 45
That right photo I exactly is looking good,that jb weld. Should hold! Cold weather will test holding strength! Hope all works more fun no extra money spent!
Are outcast 4s and 6s rim's the same just different size?
 
That right photo I exactly is looking good,that jb weld. Should hold! Cold weather will test holding strength! Hope all works more fun no extra money spent!
Are outcast 4s and 6s rim's the same just different size?

I think they are the same size but maybe updated somehow. I have Kraton 4&6s. I looked at the 4S wheels and the hex on them looks beefed up...more material on the outside comparerd to my V3 6S. The Kraton wheels don't have that stupid cavity either like the Outcast wheels.
 
Old Thread: Hello . There have been no replies in this thread for 90 days.
Content in this thread may no longer be relevant.
Perhaps it would be better to start a new thread instead.
Back
Top