Senton [SOLVED] Putting motor/gear module back in - Senton 4x4 3s BLX

This site may earn a commission from merchant affiliate
links, including eBay, Amazon, and others.

SaltyMedic

Member
Messages
6
Reaction score
6
Location
Sandy, UT
Arrma RC's
  1. Senton 6s
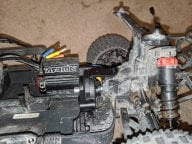
I have a Senton 4x4 3s BLX I got for Christmas.

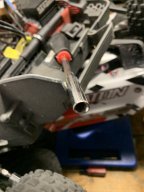
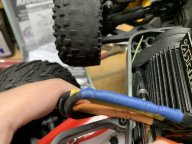
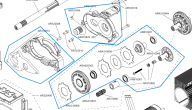
I had to take it apart for the first time as a bearing had disintegrated. As others have stated, sliding the motor/gear box out was an adventure.

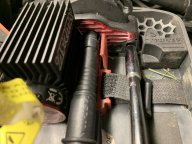
Now that I'm putting it back together, it doesn't want to slide back in all the way. I've pushed as hard as I can, but it won't go in far enough for that top clip to attach. Since I can't get it pushed in far enough, that little red plastic piece that the battery strap is attached to also won't slide in.

Any advice other than keep trying?

Thank you.

Jason
 
Rocking it back and forth is what I needed when I took the motor out. The gear wasn't lining up. If it's not that, make sure you don't have any debris in the bottom of the chassis. Those little tabs must be able to slide into the chassis fully.

Also, do you have any good bashing spots around Sandy? I'm just getting back into this hobby and am trying to think of other places to run my Arrma.
 
I use a socket type screwdriver to help tap it in the rest of the way once everything is lined up. I’ll try to take a pic in a few.
 
My hands do not work so well so I have to use a little force in a different way. This has been my trick on my 2 models.
 

Attachments

  • 699A0CB3-B642-4D42-AC1B-8EF9370B9294.jpeg
    699A0CB3-B642-4D42-AC1B-8EF9370B9294.jpeg
    287.9 KB · Views: 139
  • 58C62FB6-BFCC-4275-8A69-C0C1E9269B8A.jpeg
    58C62FB6-BFCC-4275-8A69-C0C1E9269B8A.jpeg
    206 KB · Views: 147
  • 9B76FB7E-B081-4710-BC2C-AB64C2821702.jpeg
    9B76FB7E-B081-4710-BC2C-AB64C2821702.jpeg
    244.6 KB · Views: 129
What did you change exactly? Did you put something isnide the slipper hub? Because there might be something jaming everything up remov the red piece with the velcro you can do anything if its there
The motor module has to slide streight on and not sideways if its going sideways you might havecravked the alluminum slipper hub in the rear
 
Thanks for the replies.

I have circled in blue in the attached exploded parts view the new parts that I replaced.The exception is that I used the Hot Racing brand metal spur gear and 3 metal slipper clutch pads. The head of the screw for the slipper clutch assembly got stripped when I tried to take it apart, so I had to replace the whole thing. I never got to see what it looked like on the inside, so I'm guessing by following the exploded parts view. Looking at that parts view, the bearing that goes inside the clutch assembly has a different part number than the other bearings I used in this repair job. Is it a different size? I used :

6700RS Ball Bearing 10x15x4mm for Traxxas RC Vehicles 5119 Slash Rustler,10x15 Blue Rubber Sealed Ball Bearings
https://smile.amazon.com/gp/product/B0854225FG/ref=ppx_yo_dt_b_asin_title_o02_s00?ie=UTF8&psc=1

My RC store sold me OEM Arma bearings, but I realized they aren't sealed and I didn't want to have this happen again soon. These should be the same demensions.

Also attached is a photo of what it looks like as far as I can push it. You can see that the clip is not attached and that there is some metal on that shaft that I'm assuming is not supposed to be exposed when it is pushed all the way in

Yes, I did use that nut that was included in the maintenance kit. I just removed it, and it didn't make a difference. Why do they include it if its not necessary?

The shaft is lining up. I was able to tighten the slipper clutch by using an allen wrench and rolling the car forward.

@Jackjax801 - I'm new to this myself. There is an open space park in our neighborhood near Albion middle school that I take my 5 y/o son with me to go drive our cars at. Dirt roads and whatnot. I think it was the exposure to the sand/dirt/mud we were driving in that ate up my bearing.

@JAM - thanks for the tip. I just tried using a nut driver, didn't budge

I cleaned out the debris. I even tried adding a light coat of some general purpose grease on the brackets for the mounts on the body. No joy.

Ideas?

Thank you!

Jason
 

Attachments

  • IMG_20200406_211518.jpg
    IMG_20200406_211518.jpg
    402.5 KB · Views: 101
  • 2020-04-06_21-29.png
    2020-04-06_21-29.png
    144.7 KB · Views: 111
Thanks for the replies.

I have circled in blue in the attached exploded parts view the new parts that I replaced.The exception is that I used the Hot Racing brand metal spur gear and 3 metal slipper clutch pads. The head of the screw for the slipper clutch assembly got stripped when I tried to take it apart, so I had to replace the whole thing. I never got to see what it looked like on the inside, so I'm guessing by following the exploded parts view. Looking at that parts view, the bearing that goes inside the clutch assembly has a different part number than the other bearings I used in this repair job. Is it a different size? I used :

6700RS Ball Bearing 10x15x4mm for Traxxas RC Vehicles 5119 Slash Rustler,10x15 Blue Rubber Sealed Ball Bearings
https://smile.amazon.com/gp/product/B0854225FG/ref=ppx_yo_dt_b_asin_title_o02_s00?ie=UTF8&psc=1

My RC store sold me OEM Arma bearings, but I realized they aren't sealed and I didn't want to have this happen again soon. These should be the same demensions.

Also attached is a photo of what it looks like as far as I can push it. You can see that the clip is not attached and that there is some metal on that shaft that I'm assuming is not supposed to be exposed when it is pushed all the way in

Yes, I did use that nut that was included in the maintenance kit. I just removed it, and it didn't make a difference. Why do they include it if its not necessary?

The shaft is lining up. I was able to tighten the slipper clutch by using an allen wrench and rolling the car forward.

@Jackjax801 - I'm new to this myself. There is an open space park in our neighborhood near Albion middle school that I take my 5 y/o son with me to go drive our cars at. Dirt roads and whatnot. I think it was the exposure to the sand/dirt/mud we were driving in that ate up my bearing.

@JAM - thanks for the tip. I just tried using a nut driver, didn't budge

I cleaned out the debris. I even tried adding a light coat of some general purpose grease on the brackets for the mounts on the body. No joy.

Ideas?

Thank you!

Jason
The nut is an obsolete part it was used in the arrma mega slipper clutch assembly. Your sungear key has a hole to allow the slipper screw to go inside for clearance. Check if the slipperclutch is not installed backwards. The bering inside the slipper clutch is flanged its not a traditional bearingit has a lip
IMG_1754.JPG
The bearing should look something like this
 
I wonder if things were not lined up when going back together inside the clutch. Arrma site will give you part # for the bearings which I believe will lead you to the bearing dimensions. Also in case this helps. This is my new back up that came in fully assembled from Jennys.
 

Attachments

  • 18A66189-C297-4332-B65D-8AB076A74F58.jpeg
    18A66189-C297-4332-B65D-8AB076A74F58.jpeg
    338.8 KB · Views: 78
Here's what mine looks liyke all the way in.

7.jpg


Either the shaft isn't going in, or the case is binding. If you take the slipper clutch out and put it on the shaft, how far does it go? Mine goes this far:

6.jpg


If that goes in all the way, I would try to fit the power module by itself (no slipper) into the slot and see how that goes. My guess is the plastic is binding up somewhere.
 
Thank you very much for everyone weighing in. I've ordered the flanged bearing and it will be in sometime next week. I'll try reassembling it once it comes in. I'll report back with my status then.

Thank you

Jason
 
I was able to get everything back together. Additional things I changed, not sure which one was the culprit:

  1. Moved one of the slipper pads from one side to the other. Its supposed to take 3 pads with the metal variety. I wasn't sure which one was supposed to get 2
  2. put in the bearing with the flange to replace the bearing I had put in without the flange
  3. removed the nut that came with the maintenance kit
Jason
The nut must have been the issue. The pads are 2 in the front 2 in the rear of the spur gear. The 3s versions uses3 bads i think and the 4s clutch 4 idk why
 
I was able to get everything back together. Additional things I changed, not sure which one was the culprit:

  1. Moved one of the slipper pads from one side to the other. Its supposed to take 3 pads with the metal variety. I wasn't sure which one was supposed to get 2
  2. put in the bearing with the flange to replace the bearing I had put in without the flange
  3. removed the nut that came with the maintenance kit
Jason
If you have a 3S, 1 front pad, 2 rear. 4S gets 2 front, 2 rear.
 
Glad I found this. I was ready to use that nut that came with the slipper maintenance kit. I would of been in trouble!? Getting ready to repair my slipper that snapped. Thanks everyone!??
 
Old Thread: Hello . There have been no replies in this thread for 90 days.
Content in this thread may no longer be relevant.
Perhaps it would be better to start a new thread instead.
Back
Top