Servo/Bellcrank

This site may earn a commission from merchant affiliate
links, including eBay, Amazon, and others.

VinnieFive0

Member
Messages
21
Reaction score
0
Arrma RC's
  1. Granite
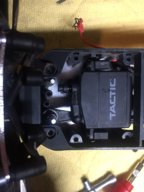
wondering if anyone knows if there's a specific position for the servo to be turned at before installing the servo to the bellcran/horn. I can't seem to get the bell crank and steering posts to stay put on top of the skid plate without moving around. When I did get the bellcrank to sit still, I plugged a battery in to test the new servo I installed, however, when I turned the wheels from my radio the wheels seemed to turn a tad bit, but no where near a full turn. The bell crank ends up moving around also. Also, are the turnbuckles in the front supposed to be adjusted a certain way? I recently installed aluminum caster blocks and alumnium front knuckles in case that had something to do with it. The servo I am using is the Tactic tsx-45. The exploded pictures online don't seem to help.
 
When I say bell crank I mean steering assembly as well. The steering assembly does not sit still on the skid plate.
 
Yes, there is!
  1. First remove the servo arm from the servo (the Arrma supplied arm)
  2. Then attach a battery to the esc, turn on your transmitter (Tx) and turn on the esc.
  3. Make sure you turn the steering adjustment on your Tx to the very centre (in the middle)
  4. Then turn off your esc, then your Tx.
  5. Position your servo as it will be put in your car
  6. Take the servo horn and carefully slide it onto the servo. The correct position is (standing in front of the vehicle 90° or perpendicular to the bottom of the car. But in reality this is not possible with the supplied Arrma 25t servo horn, so a bit to the right is ok. But make it as close to perpendicular as possible (in other words avoid pointing to the left)
Before you close the servo bay, make sure all wheels are from the ground, attach a battery again and turn on Tx and Esc.
See if the servo horn can move freely when turning the steering wheel to both directions (carefully, as the servo can still move)

You can make some adjustments on the maximum servo throw in both directions, called steering D/L

Then put on the hatch, and re-check the servo horn throw. Does it run into the sides or the hatch or servo bay?
The servo horn should move freely, without hitting anything.
 
Last edited:
Thanks that was really detailed. I will try that method later today, but when I did it the steering assembly would shift left to right and fall out of its position and sometimes the servo itself would lift up a tinky bit and fall back into place.
 
The pins that hold the bell crank in position need to engage the holes in the floor of the servo area and the holes on the underside of the servo hatch. So if you have either off the car the bell crank will not be held in position. The servo is held in place the same way. It will be loose unless both upper and lower covers to that compartment are on. You have to jiggle the steering assembly around a bit while closing these up to allow the pins to find their holes. Make sure they are in there before tightening anything up.

I don't like to disagree with Mr. @Unusual RC, but I believe it is best to have your servo horn at a perfect 90 degree angle to the servo case with it powered up and in the neutral position. If it isn't at a 90, your steering will not be symmetrical. Find the spline position that gets you closest to 90 and then use trim to make it perfect. Ideally, you would then set toe and tracking mechanically using the turnbuckles. Most however set toe with the turnbuckles and tracking with the trim which is much easier and works ok too.
 
I don't like to disagree with Mr. @Unusual RC, but I believe it is best to have your servo horn at a perfect 90 degree angle to the servo case with it powered up and in the neutral position. If it isn't at a 90, your steering will not be symmetrical. Find the spline position that gets you closest to 90 and then use trim to make it perfect. Ideally, you would then set toe and tracking mechanically using the turnbuckles. Most however set toe with the turnbuckles and tracking with the trim which is much easier and works ok too.

No offence @Dustin Mustangs ;)
Feel free to disagree!

And you are right about the perfect solution would be 90° / perpendicular to the bottom of the car.
Nevertheless I found for the ADS-5, ADS-7, Savox SW-0230MG and Savox 1258TG that the zero/nill/0/neutral position of the servo with the Arrma (25t) servo horn is slightly offset to the right, as I describe above.

Indeed I did not mean by a far amount, just 90° or perpendicular is not possible without trimming the servo in advance.
So you have to be as close as possible, but avoid any deviation to the left (standing in front of the car).
I will update the text above accordingly.

Unfortunately, I am not at home so I can make a picture of my servo's in the "garage" of disassembled Fury's on my workbench :p
 
Like this?

For some reason my video didn't share ^


Attachments

  • image.jpg
    image.jpg
    205.9 KB · Views: 45
Keeping the pins of the bell crank in position is nearly impossible for me. Are the ball studs that the turnbuckles connect to suppose to be mounted in holes also? I only have the pins that are underneath the steering posts mounted into the holes on the skid plate.
 
It is tricky until you get the hang of it... I always put the top cover on last and obviously start with the bottom pins all properly engaged. Put the top cover in position and gently squeeze it and the chassis together with one hand. Use a pair of needle nose pliers in your free hand to reach in from the side and move the top of the pins around until they find their hole. You will likely have to do this from both sides. Do not tighten up the screws until everything is seated and the the top is sitting flush with no pressure. You can use a flashlight to peek in there through the sides and verify everything is kosher.

The design of this area is horrible imo and ease of maintenance is one of many reasons why.
 
Old Thread: Hello . There have been no replies in this thread for 90 days.
Content in this thread may no longer be relevant.
Perhaps it would be better to start a new thread instead.
Back
Top