Sevin's Outcast Jeep + Indestructible Body Tutorial

This site may earn a commission from merchant affiliate
links, including eBay, Amazon, and others.
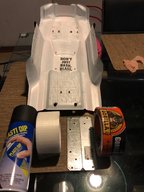
I finished the external reinforcements for my outcast Jeep, it added 0.16 lbs to the weight of the body. Some people will surely not like the look of this but I think it just makes the jeep look tough (and it certainly makes it tough!).

View attachment 22872
View attachment 22873

View attachment 22874

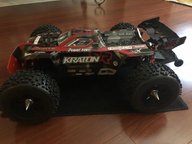
sevin7 WOW - This is by far the best body I have seen on a #6s rig...... Looks like you put a lot of work into this body and you can tell by how awesome it looks brother! I will be working on a Proline body for my 6s #v3 #KRATON and will be using the Foundation straps and the shoe goo as well.. Also, superb job on this entire post!
 
Last edited:
I bought a new Notorious and right away decided I couldn't handle my dislike for the appearance of the stock body (the functionality was fine, or might be fine if I reinforced the body). I decided to go for a Jeep body. I care about durability just as much as looks so I did my typical indestructible body routine (this is my 3rd time doing it, other bodies are for Slash and Stampede and they have held up exceptionally well). I've never really documented how I do this process until now and I feel like its worth sharing. It takes a lot of time to do it right but once done you should never need another body. Below is information on my outcast Jeep build along with a generic tutorial (with some specifics for the Outcast or most 8th scale Arrmas) for making the indestructible body.

First, here are the parts I put on my Outcast/Notorious:
  • 10075 - TBR XV4 2.0 Front Bumper - ARRMA Kraton V2 / V3 2018. I chose this for the good looks, skid protection, warranty, and new mounting block part that should provide great durability. It works great and I did try it with the stock Notorious body and it fit but the body had to bend a very small amount amount to get it to fit.
  • 10076 - TBR 2.0 Wheelie Bar Set - ARRMA Kraton / 6S / V2 / V3 2018. I chose this over the TBR outcast bumpers because the ones currently available do not have the new mounting block and I've read that the popular outcast one that mounts to the rear bulk head can destroy your bulk head. This one also sticks out further in the rear and it ended up being much further than I was expecting and I'm not a fan of how it looks but its proven to be very functional. UPDATE Oct 12 2018: This wheelie bar/bumper has a critical flaw (mine broke in the same place as others). Read this thread for more information. TBR said they are working on addressing the flaw.
  • Pro-line Jeep body 3405-00. This fits the Outcast almost perfectly, but you can't use the stock wing or wheelie bar unless you cut out the back. I had no intention of keeping the stock wing as I think it looks ridiculous and the stock wheelie bar is ok but I'm not cutting up my body to use it, which is why I got the TBR bumper with the wheelie bar.
  • Pro-line Extended Front and Rear Body Mounts (T/E-MAXX) 6304-00. I already had extended body mounts for the Slash 4x4 and I tested them with my Slash Jeep body on the outcast and saw that they were not long enough. I compared all the Pro-line body mounts and found that the E-Maxx ones are the longest (I did this buy counting the number of holes when looking at the pictures). The E-Maxx mounts are also thicker and have larger circle mounting areas on top compared to the Slash 4x4.

How to make your body (and mounting) nearly indestructible:

1. Use pro-line extended body mounts even if you don't need the extension. They require a slight modification to make them hold on really well (more on that later), but once done you will never have issues with breaking pins. For the outcast there were some extra steps because the mounts are not made for the outcast and I did some extra stuff to further increase durability. First, when installing the mounts on the outcast you will find that the holes don't align perfectly, so the mount will fit in one hole perfectly but the other one will have to make a new hole through the body mount post. To ensure a tight fit use a nut on the end of the screw since your new hole will be loose. For my outcast I further increased the durability in the rear by mounting extra mounts on the backside of the shock tower (I used extra Slash 4x4 mounts I had laying around; If I had ordered 2 sets of the E-Maxx mounts then I could have made it even stronger). The extended mounts in the rear are also typically braced at the top when they are really tall like mine, but the included brace will not fit so I used another spare Slash 4x4 post I had laying around, you can use anything that fits.

View attachment 22846

Rear shock tower detail - notice the extra body mounts on the back with an extra screw above the rear shock tower. This makes the rear mounts far more durable. It would be even better if you used something longer on the rear (I used what I had laying around).

View attachment 22847


2. After painting your body apply a piece of metal at the front and rear mounting locations. I used this "foundation strap" from Lowes ($1). Its made of 20 gauge steel. I cut it to length and drill holes to align with the body holes. I recommend first putting a piece of gorilla tape (or similar) between the body and the metal to prevent messing up your paint. Use screws to secure the straps onto the body then apply shoe goo and dry wall tape to glue the straps on. If your body has a gap between the strap and the body (such as the hood of the jeep where its rounded), then apply shoe goo between the strap and the body to fill the gap.

View attachment 22848

3. Apply shoe goo and dry wall tape on the entire inside of the body. I recommend painting your windows for maximum durability so that you can shoe goo them. There are many tutorials on this step so I won't detail it, but I will say don't go light on the shoe goo. I used 2 and half 3.7 oz bottles of shoe goo on my Jeep. For super strength apply shoe goo and tape, let it try, then apply another layer with the tape running in the opposite direction (I only did this in places where I felt the most reinforcement was needed). Be aware that this step adds a lot of weight to the body (it added about 0.3 lbs to my Jeep). Note: the picture below doesn't show a second layer I added and forgot to take a picture of.

View attachment 22849

4. After the shoo goo has fully dried (24 hours), apply Plasti Dip to the entire inside of the body. Spray this stuff on super thick (so thick that it turns into a liquid and fills in all the holes in the drywall tape). Its very light weight (a full can added less than 0.1 lbs). This stuff fills in all the extra holes in the drywall tape, adds resistance to bending, makes the inside of the body less likely to tear (if you get rocks thrown in there), and adds a nice looking interior finish that also prevents light from passing through the body (its like backing your paint job with super thick black paint). This thread contains a somewhat scientific test of different kinds of body reinforcements and the shoe goo + plasti dip was the winner (technically its 3M Rubberized Undercoating but that stuff costs 3 times as much as plasti dip and is not available locally and I found that plasti dip works very well).

View attachment 22850

4. Apply custom body mount screws. The stock screws that come with the Pro-line extend body mounts suck. They are not long enough to securely hold everything in place. Get some ~25mm screws with the same m4 threads from a hardware store (Lowes has them, this is a common screw); Don't worry about the head on the screw. Screw the longer screws into the body mounts much further than the stock ones go in, which means they are going to have to screw into plastic that has not been drilled out yet, so I use a drill before doing this. I screwed my Jeep body mount screws in about ~10mm. Now you need to cut the head off the screw off and do it at the right length for mounting your body and still having a lot of threads for the pro-line nuts to screw into; do some testing and measuring to make sure you get this right, its important that the nuts have a lot of screw to grab onto.

View attachment 22852

Make sure the screws stick out past your body far enough to have a lot of threads for the nuts:

View attachment 22853

5. If you did all of the steps above then your body will be nearly indestructible when driving and jumping off road. However, all of the reinforcements done so far were on the interior of the body and they do nothing to stop the lexan from grinding on the street, which is a common thing if you flip over on the road. The last step is to apply exterior reinforcements to the body in the places where its most likely to skid on the road. I do this using screws, washers, nuts, and mending plates (be creative). I have not finished this step on my Jeep yet so the picture below is from my Stampede 4x4 body:

Note: the wear you see on the lexan is from a test run to see where the thing was going to get worn down. After applying the metal to the exterior the lexan no longer contacts the road.

View attachment 22856

One more thing I plan on doing with my outcast Jeep is adding something between the interior body roll tower thing and the roof of the Jeep so that they are nearly touching (to add extra strength when landing on the roof).
@sevin7 - What kind of Drywall tape did you grab at Lowes - Easy Joint Tape 2-in x 100-ft Solid Self-Adhesive Joint Tape??

1571398947075.png
 
Last edited:
I bought a new Notorious and right away decided I couldn't handle my dislike for the appearance of the stock body (the functionality was fine, or might be fine if I reinforced the body). I decided to go for a Jeep body. I care about durability just as much as looks so I did my typical indestructible body routine (this is my 3rd time doing it, other bodies are for Slash and Stampede and they have held up exceptionally well). I've never really documented how I do this process until now and I feel like its worth sharing. It takes a lot of time to do it right but once done you should never need another body. Below is information on my outcast Jeep build along with a generic tutorial (with some specifics for the Outcast or most 8th scale Arrmas) for making the indestructible body.

First, here are the parts I put on my Outcast/Notorious:
  • 10075 - TBR XV4 2.0 Front Bumper - ARRMA Kraton V2 / V3 2018. I chose this for the good looks, skid protection, warranty, and new mounting block part that should provide great durability. It works great and I did try it with the stock Notorious body and it fit but the body had to bend a very small amount amount to get it to fit.
  • 10076 - TBR 2.0 Wheelie Bar Set - ARRMA Kraton / 6S / V2 / V3 2018. I chose this over the TBR outcast bumpers because the ones currently available do not have the new mounting block and I've read that the popular outcast one that mounts to the rear bulk head can destroy your bulk head. This one also sticks out further in the rear and it ended up being much further than I was expecting and I'm not a fan of how it looks but its proven to be very functional. UPDATE Oct 12 2018: This wheelie bar/bumper has a critical flaw (mine broke in the same place as others). Read this thread for more information. TBR said they are working on addressing the flaw.
  • Pro-line Jeep body 3405-00. This fits the Outcast almost perfectly, but you can't use the stock wing or wheelie bar unless you cut out the back. I had no intention of keeping the stock wing as I think it looks ridiculous and the stock wheelie bar is ok but I'm not cutting up my body to use it, which is why I got the TBR bumper with the wheelie bar.
  • Pro-line Extended Front and Rear Body Mounts (T/E-MAXX) 6304-00. I already had extended body mounts for the Slash 4x4 and I tested them with my Slash Jeep body on the outcast and saw that they were not long enough. I compared all the Pro-line body mounts and found that the E-Maxx ones are the longest (I did this buy counting the number of holes when looking at the pictures). The E-Maxx mounts are also thicker and have larger circle mounting areas on top compared to the Slash 4x4.

How to make your body (and mounting) nearly indestructible:

1. Use pro-line extended body mounts even if you don't need the extension. They require a slight modification to make them hold on really well (more on that later), but once done you will never have issues with breaking pins. For the outcast there were some extra steps because the mounts are not made for the outcast and I did some extra stuff to further increase durability. First, when installing the mounts on the outcast you will find that the holes don't align perfectly, so the mount will fit in one hole perfectly but the other one will have to make a new hole through the body mount post. To ensure a tight fit use a nut on the end of the screw since your new hole will be loose. For my outcast I further increased the durability in the rear by mounting extra mounts on the backside of the shock tower (I used extra Slash 4x4 mounts I had laying around; If I had ordered 2 sets of the E-Maxx mounts then I could have made it even stronger). The extended mounts in the rear are also typically braced at the top when they are really tall like mine, but the included brace will not fit so I used another spare Slash 4x4 post I had laying around, you can use anything that fits.

View attachment 22846

Rear shock tower detail - notice the extra body mounts on the back with an extra screw above the rear shock tower. This makes the rear mounts far more durable. It would be even better if you used something longer on the rear (I used what I had laying around).

View attachment 22847


2. After painting your body apply a piece of metal at the front and rear mounting locations. I used this "foundation strap" from Lowes ($1). Its made of 20 gauge steel. I cut it to length and drill holes to align with the body holes. I recommend first putting a piece of gorilla tape (or similar) between the body and the metal to prevent messing up your paint. Use screws to secure the straps onto the body then apply shoe goo and dry wall tape to glue the straps on. If your body has a gap between the strap and the body (such as the hood of the jeep where its rounded), then apply shoe goo between the strap and the body to fill the gap.

View attachment 22848

3. Apply shoe goo and dry wall tape on the entire inside of the body. I recommend painting your windows for maximum durability so that you can shoe goo them. There are many tutorials on this step so I won't detail it, but I will say don't go light on the shoe goo. I used 2 and half 3.7 oz bottles of shoe goo on my Jeep. For super strength apply shoe goo and tape, let it try, then apply another layer with the tape running in the opposite direction (I only did this in places where I felt the most reinforcement was needed). Be aware that this step adds a lot of weight to the body (it added about 0.3 lbs to my Jeep). Note: the picture below doesn't show a second layer I added and forgot to take a picture of.

View attachment 22849

4. After the shoo goo has fully dried (24 hours), apply Plasti Dip to the entire inside of the body. Spray this stuff on super thick (so thick that it turns into a liquid and fills in all the holes in the drywall tape). Its very light weight (a full can added less than 0.1 lbs). This stuff fills in all the extra holes in the drywall tape, adds resistance to bending, makes the inside of the body less likely to tear (if you get rocks thrown in there), and adds a nice looking interior finish that also prevents light from passing through the body (its like backing your paint job with super thick black paint). This thread contains a somewhat scientific test of different kinds of body reinforcements and the shoe goo + plasti dip was the winner (technically its 3M Rubberized Undercoating but that stuff costs 3 times as much as plasti dip and is not available locally and I found that plasti dip works very well).

View attachment 22850

4. Apply custom body mount screws. The stock screws that come with the Pro-line extend body mounts suck. They are not long enough to securely hold everything in place. Get some ~25mm screws with the same m4 threads from a hardware store (Lowes has them, this is a common screw); Don't worry about the head on the screw. Screw the longer screws into the body mounts much further than the stock ones go in, which means they are going to have to screw into plastic that has not been drilled out yet, so I use a drill before doing this. I screwed my Jeep body mount screws in about ~10mm. Now you need to cut the head off the screw off and do it at the right length for mounting your body and still having a lot of threads for the pro-line nuts to screw into; do some testing and measuring to make sure you get this right, its important that the nuts have a lot of screw to grab onto.

View attachment 22852

Make sure the screws stick out past your body far enough to have a lot of threads for the nuts:

View attachment 22853

5. If you did all of the steps above then your body will be nearly indestructible when driving and jumping off road. However, all of the reinforcements done so far were on the interior of the body and they do nothing to stop the lexan from grinding on the street, which is a common thing if you flip over on the road. The last step is to apply exterior reinforcements to the body in the places where its most likely to skid on the road. I do this using screws, washers, nuts, and mending plates (be creative). I have not finished this step on my Jeep yet so the picture below is from my Stampede 4x4 body:

Note: the wear you see on the lexan is from a test run to see where the thing was going to get worn down. After applying the metal to the exterior the lexan no longer contacts the road.

View attachment 22856

One more thing I plan on doing with my outcast Jeep is adding something between the interior body roll tower thing and the roof of the Jeep so that they are nearly touching (to add extra strength when landing on the roof).

@sevin7 - 1st this is one of the best post's i HAVE seen on this form on how to mod your body!!I HANDS DOWN.. Anyways, I picked up all of the material from Lowes today to make some minor mod to my #v3 #6s #KRATON stock body! I just need to pick up the shoe goo and I can start bolting down my 2 foundation straps close to the body mount holes. Also, my new dBoots Backflips came in as well :)
 

Attachments

  • v3 Body Mod.jpeg
    v3 Body Mod.jpeg
    113.8 KB · Views: 65
  • V3 rED bODY1.jpg
    V3 rED bODY1.jpg
    91.5 KB · Views: 68
As for the foundation straps just use them as washers and don’t secure them let them sit loose. I used to secure them and I would break a lot of body posts
 
Old Thread: Hello . There have been no replies in this thread for 90 days.
Content in this thread may no longer be relevant.
Perhaps it would be better to start a new thread instead.
Back
Top