Kraton Speed run and small upgrades

This site may earn a commission from merchant affiliate
links, including eBay, Amazon, and others.

tonyM

Member
Messages
94
Reaction score
172
Arrma RC's
  1. Kraton 6s
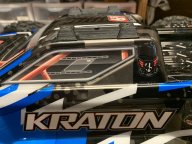
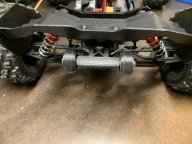
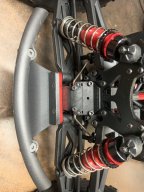
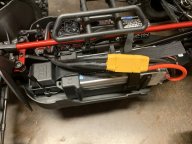
Got home a little early from work today and even tho I said I didn’t want to change the batt connectors yet, I did it. The ec5 popped out a couple times yesterday so I did away with it and the built in series plug, which I think was not helping the issue of unplugging. Made the move to
Xt90’s.
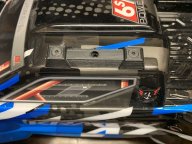
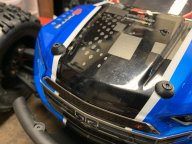
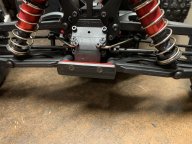
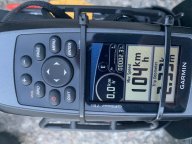
Then i swapped out the pinion for the speed one and took it out for some speed runs on the pavement. First thing I noticed was the screaming sound was gone I had yesterday. Bonus. She topped out at 104kmh! Very impressed for straight out of the box although at that speed it was quite hairy lol.
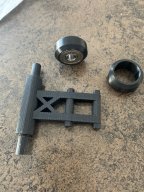
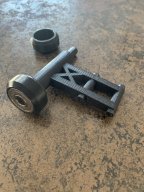
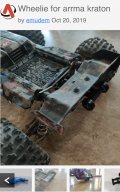
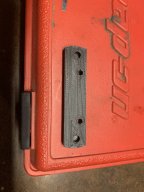
After that I decide to warm up the 3D printer and build this little guy to straighten out the Rpm bumper issue. Nothing fancy but functional. All in all had a good day lol.
 

Attachments

  • 15F09240-AAD2-4C77-95F1-12A54C1C1424.jpeg
    15F09240-AAD2-4C77-95F1-12A54C1C1424.jpeg
    291.9 KB · Views: 69
  • 4CE66E5A-AB46-4E8D-8E8C-7BB2BE20EAEB.jpeg
    4CE66E5A-AB46-4E8D-8E8C-7BB2BE20EAEB.jpeg
    370.7 KB · Views: 69
  • 9A2EBFE8-5E9C-4923-B1B1-605BEF2DCC02.jpeg
    9A2EBFE8-5E9C-4923-B1B1-605BEF2DCC02.jpeg
    353.4 KB · Views: 80
  • 0E192827-5715-41D5-B95F-DEFC8135A3FE.jpeg
    0E192827-5715-41D5-B95F-DEFC8135A3FE.jpeg
    301.5 KB · Views: 65
  • 0E473277-5F9D-475E-9729-4E4B552E7631.jpeg
    0E473277-5F9D-475E-9729-4E4B552E7631.jpeg
    291.6 KB · Views: 60
You made a TBone Racing type endcap for the pins. Nice. Much needed with the RPM bumper.(y)(y)
 
Printed up a few more little items. Made some lid skids, these are v1.0 and will need a little tweaking. I messed up on the screw countersink holes, just a hair to small, but I’ll get some upsidedown miles on them regardless.
Also printed a wheelie bar I found on thingiverse. (The body guards I designed using Tinkercad) and it turned out great.the designer put a lot of thought and accuracy into the fitment of everything. Haven’t mounted it yet, need one more bearing, only had 3 this size in my “collection”
 

Attachments

  • 1345F3FF-CF58-4D0D-B811-883636C72488.jpeg
    1345F3FF-CF58-4D0D-B811-883636C72488.jpeg
    322.8 KB · Views: 45
  • 49E376FF-DE8D-4CB2-8355-CD801D547F2C.jpeg
    49E376FF-DE8D-4CB2-8355-CD801D547F2C.jpeg
    316.4 KB · Views: 46
  • 507EFBB2-74D9-453B-983A-E6075FDC3971.jpeg
    507EFBB2-74D9-453B-983A-E6075FDC3971.jpeg
    271.9 KB · Views: 45
  • 984B2171-289A-443D-9B7A-B431E70C0CA5.jpeg
    984B2171-289A-443D-9B7A-B431E70C0CA5.jpeg
    464.6 KB · Views: 41
  • 1CFFAB7C-FBB2-4244-8683-3E4E0EA606AF.jpeg
    1CFFAB7C-FBB2-4244-8683-3E4E0EA606AF.jpeg
    332.2 KB · Views: 49
Great work!
I always like to see 3D printed parts....

Do you think the wheelie bar will hold up? They seem to take big hits....

My comment for a possible improvement would be to sink the mounting screws in further for the body protectors you designed. (Assuming this thing sees pavement and could grind the metal down to the point of making the hex tool not fit)
 
The wheelie bar tucks up under the rear wing so it “should” last a while. Like everything else I print, this will be the tester and then I can tweak the design later
 

Attachments

  • E35B3014-E5B7-4FE7-91C8-0B50E43B8F8D.jpeg
    E35B3014-E5B7-4FE7-91C8-0B50E43B8F8D.jpeg
    770.1 KB · Views: 43
Printed up a few more little items. Made some lid skids, these are v1.0 and will need a little tweaking. I messed up on the screw countersink holes, just a hair to small, but I’ll get some upsidedown miles on them regardless.
Also printed a wheelie bar I found on thingiverse. (The body guards I designed using Tinkercad) and it turned out great.the designer put a lot of thought and accuracy into the fitment of everything. Haven’t mounted it yet, need one more bearing, only had 3 this size in my “collection”
Nice work Tony. One thing I noticed. You might want to increase the fore and aft angles on those roof mount skids. They seem very high with very hard angles in the front and back. One high speed roll and you might rip the roof right off. Have a look at this K8S pic, and notice how low those roof skids are. Smaller is better in this one area.
1583174291156.png
 
Did you also reinforce the top skid with a bracket/plate below it under the body?
 
Yeah I like those on the 8s. The first ones I made were lower and had more laid back angles but they were to low for my liking. Maybe I’ll try again tonite. That’s the beauty of building your own parts. Refining them.

@SrC yeah I made 2.5mm thick plates slightly larger than the skids for “washers”. Same under the hood buttons.

Here’s the first ones I made.
 

Attachments

  • E4991D11-E5F8-482B-9F90-1C3F772CB252.jpeg
    E4991D11-E5F8-482B-9F90-1C3F772CB252.jpeg
    276.6 KB · Views: 44
Yeah I like those on the 8s. The first ones I made were lower and had more laid back angles but they were to low for my liking. Maybe I’ll try again tonite. That’s the beauty of building your own parts. Refining them.

@SrC yeah I made 2.5mm thick plates slightly larger than the skids for “washers”. Same under the hood buttons.

Here’s the first ones I made.
These are probably better suited on the roof, and if they wear down quickly, you just print new ones. Those larger ones are just going to put a ridiculous amount of stress on the roof, unless you make a full side to side plate, to mount underneath.
 
Old Thread: Hello . There have been no replies in this thread for 90 days.
Content in this thread may no longer be relevant.
Perhaps it would be better to start a new thread instead.
Back
Top