Thinking of getting a 3D printer

This site may earn a commission from merchant affiliate
links, including eBay, Amazon, and others.

Slevin

Pew pew!!
Military Veteran
Build Thread Contributor
Messages
809
Reaction score
571
Location
Wisconsin
Arrma RC's
  1. Kraton 6s
  2. Typhon 6s
So I’m thinking of getting a 3D printer. I’d first have to raise some capital and that usually means I have to sell something of mine. I might sell my Kraton to fund it. Not sure yet. Still thinking about it.

I’ve obviously have done a ton of research on the Google. I don’t want to spend a ton of money as I’m new to to this but I do want the best bang for my buck as I’m sure most people feel this way.

I’m looking at, and open to others, the Creality Ender 3 pro, Creality CR-10s, and the Sovol SV01.

I like the print dimensions of the CR-10s but I’ve read that the SV01 is amazing out of the box. I know the Ender 3 has a TON of support and requires a lot of upgrades to be superb.

Are there any others I’m missing and should be considering? I’d say my budget would be less than $500 but then it all depends on what I could get for my Kraton.
 
Do you think that you will need the bigger build volume? I’m regretting getting the Ender 5 for that reason. I should have went with a 400x400 build plate.
 
Depending on what your plans are with it another thing to consider is Bowden extruders vs. direct drive extruder. Direct drive has the motor directly mounted to the hot end and feeds the filament directly into it and travels along the gantry as it prints. A bowden tube printer has the motor that feeds the filament fixed to the side of the gantry and pushes the filament through a PTFE tube down into the hot end. Advantage of direct drive is retraction precision, especially with flexible filaments. Disadvantages of direct drive is usually cost up front is a little more and it adds weight to the gantry and can cause one side to sag slightly if there's only 1 side driving the lift and can lose some precision if cranked up print speeds because the added weight of a motor adds more intertia as it moves around rapidly.

So when I first jumped into 3D printing I went with the ender 3 pro. For me I wanted something that I could get low cost to start with until I got the hang of it. It allowed me to jump in to get my feet wet and if it wasn't for me I wasn't out a ton of money up front and if I got more into it I knew there was a ton of upgradability to make it better over time as I saw fit. Larger build area upgrade kits, direct drive kits, better hot ends, etc all out there and available.

Out of the 3 you listed and knowing what I know now if it were me and money were not as big of an issue I would get the CR10 mostly due to build volume and almost as much support/upgradability as the Ender 3. If I am semi budget conscious and not necessarily concerned about larger build volume I think I would go with the Sovol. It's not as widely known as the Ender 3 but it's based on the same open source design and the appeal of a direct drive, glass bed, level sensor, and dual Z axis drive make it a good bang for the buck. I've heard good things about them and I hear their Facebook group is a really good source for support.

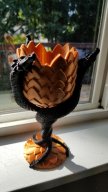
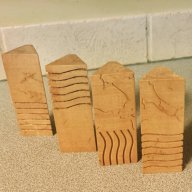
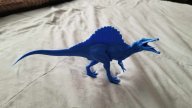
Anyways my 2 cents. Attached are some prints I did with my ender 3 pro completely stock no upgrades incase you might be pondering it's quality without upgrades first.
 

Attachments

  • Resized_20190925_105823.jpeg
    Resized_20190925_105823.jpeg
    181.4 KB · Views: 58
  • Screenshot_20200426-130433_Instagram.jpg
    Screenshot_20200426-130433_Instagram.jpg
    307.4 KB · Views: 65
  • Resized_20190920_132249.jpeg
    Resized_20190920_132249.jpeg
    205.6 KB · Views: 60
Depending on what your plans are with it another thing to consider is Bowden extruders vs. direct drive extruder. Direct drive has the motor directly mounted to the hot end and feeds the filament directly into it and travels along the gantry as it prints. A bowden tube printer has the motor that feeds the filament fixed to the side of the gantry and pushes the filament through a PTFE tube down into the hot end. Advantage of direct drive is retraction precision, especially with flexible filaments. Disadvantages of direct drive is usually cost up front is a little more and it adds weight to the gantry and can cause one side to sag slightly if there's only 1 side driving the lift and can lose some precision if cranked up print speeds because the added weight of a motor adds more intertia as it moves around rapidly.

So when I first jumped into 3D printing I went with the ender 3 pro. For me I wanted something that I could get low cost to start with until I got the hang of it. It allowed me to jump in to get my feet wet and if it wasn't for me I wasn't out a ton of money up front and if I got more into it I knew there was a ton of upgradability to make it better over time as I saw fit. Larger build area upgrade kits, direct drive kits, better hot ends, etc all out there and available.

Out of the 3 you listed and knowing what I know now if it were me and money were not as big of an issue I would get the CR10 mostly due to build volume and almost as much support/upgradability as the Ender 3. If I am semi budget conscious and not necessarily concerned about larger build volume I think I would go with the Sovol. It's not as widely known as the Ender 3 but it's based on the same open source design and the appeal of a direct drive, glass bed, level sensor, and dual Z axis drive make it a good bang for the buck. I've heard good things about them and I hear their Facebook group is a really good source for support.

Anyways my 2 cents. Attached are some prints I did with my ender 3 pro completely stock no upgrades incase you might be pondering it's quality without upgrades first.
Thanks for the input! Very valuable! I am considering the cr10s.
 
Do you think that you will need the bigger build volume? I’m regretting getting the Ender 5 for that reason. I should have went with a 400x400 build plate.


Do you "regret" it because of the amount of table space it requires? I can easily see falling into the trap of "Oh, But I *Might* Want To Make Something BIG In The Future", and then never print anything bigger than a wheel or some suspension parts!

I'm not sure what you have, but *IF* I buy one, I'll most likely get the Creality Ender 3 pro, along with the spares and upgrades you guys have already recommended.
 
@jondilly1974 seems to print a lot of custom parts for his RCs and stuff like side skirts for 1/8 scale or LWB 1/10 scale are too large to print in a single piece. He also likes to print many parts at once it seems ?
 
Do you "regret" it because of the amount of table space it requires? I can easily see falling into the trap of "Oh, But I *Might* Want To Make Something BIG In The Future", and then never print anything bigger than a wheel or some suspension parts!

I'm not sure what you have, but *IF* I buy one, I'll most likely get the Creality Ender 3 pro, along with the spares and upgrades you guys have already recommended.
@jondilly1974 seems to print a lot of custom parts for his RCs and stuff like side skirts for 1/8 scale or LWB 1/10 scale are too large to print in a single piece. He also likes to print many parts at once it seems ?
Yep my 220x220mm build plate is just too small for things like wings. I have to print them upright, which reduces layer strength. If I had a 400x400mm plate I could comfortably print all of my designs to date.
 
I have a couple OG CR-10's (300x300) so don't have any experience with the others but I found it covers most of the parts I want to print size wise. There is one instance in which I would benefit from a bigger bed... I would like to print models that I would later mold into some bodies eventually in polycarb. I figured I could just chop the model in half and put it back together post print. I originally bought my first CR10 and realized I needed two. One for when I have large prints going (and larger nozzle) and one for detailed work. (due to print times) If I had to do it again.. I'd get a resin printer for smaller detailed parts and FDM for larger prints.
 
It is hard to beat the CR10 for initial costs, aftermarket/upgrades, and community support it has.

8th scale body
20200330_145846.jpg
1 8thCapture.JPG


10th scale body
1 10thCapture.JPG
1 10th Capture2.JPG


My printer needs some fine tuning, but overall works pretty good.
My first upgrade will be a better bed. It seems to have high and low spots all over!!!!

The CR10S Pro heat up time with the higher wattage Meanwell power supply sure is nice. It is also very quiet.
Once thing to consider is if you would ever want to have an enclosure the older models are more ideal for that so that the control box/power supply can be outside of the hot enclosure.
 
Meh I could remove my motherboard and PSU box too. It’s just a few screws. But it’s not designed to be removed, so I get your point.
 
This is sort-of a ghetto hack, but if I start the print with a build plate raft and then check on it after a few hours.... some times I put a few dabs of hot glue on it where it connects to the raft and its always fine after that.

Then I don't need the enclosure
 
This is sort-of a ghetto hack, but if I start the print with a build plate raft and then check on it after a few hours.... some times I put a few dabs of hot glue on it where it connects to the raft and its always fine after that.

Then I don't need the enclosure
Glass bed and some hair spray will fix you up. ????
 
The glass bed I get, but hair spray?

If you spray the bed won't it make the fused filament stick to the bed?

Or is that what you want to keep the part stuck down so each layer aligns and prints "in register"?
 
The glass bed I get, but hair spray?

If you spray the bed won't it make the fused filament stick to the bed?

Or is that what you want to keep the part stuck down so each layer aligns and prints "in register"?
Yes it is to keep it stuck to the bed. 99% of my print failures occur in the first layer not laying down properly messing up layers above it.

Because of certain material properties, poor bed leveling (bed is too far away from the nozzle when print lays down first layer), or slicer settings (not enough material being pushed through the nozzle to be squished into the bed firmly) the filament doesn't stick, lifts, pulls, gets dragged away, etc. Also some materials that require high amounts of heat will pull the print off the bed as the layers cool down and gets pulled up towards the hotter layers as they are being layed down above them.

Lifting/warping tends to occur most when the print or parts of it have only a small amount of surface area touching bed. Ways to prevent warping are enclosing the printer so hot air is trapped in and cool air is kept out so the print cools more uniformly and/or using methods to make the print stick to the bed better for the first layer.

One way to get better first layer adhesion is using a raft. A raft as mentioned is a couple layers of material printed flat and is larger in diameter than your print so there is more surface area to stick to the bed better. Once the raft prints your object starts to print on top of it and sticks better to the raft because filament sticks better to itself. The downside of rafts is it's a waste of material, takes more time to print overall, most of the time difficult to remove from your print, and the bottom surface of your print will be really rough and not smooth like it would be if you didn't use a raft.

Other ways to get things to stick better for the first layer are laying down a layer of glue stick, using painters tape on the glass, hair spray, Elmer's glue, and a variety of other methods. I use the hair spray method with nylon filaments because nylon has chemical properties that make it slippery when melted so it doesn't like to stick to glass beds well and with hair spray the nylon sticks no problems. When the print finishes and cools it is still easy to remove and the hair spray washes off and whatever small trace of hair spray that was absorbed is not that big of deal in regards to bottom layer finish quality. I Iike the hair spray method because it's simple, cleans off easily, less messy.
 
Last edited:
Well I’ve learned a lot here!


You and me both!
Yes it is to keep it stuck to the bed. 99% of my print failures occur in the first layer not laying down properly messing up layers above it.

Because of certain material properties, poor bed leveling (bed is too far away from the nozzle when print lays down first layer), or slicer settings (not enough material being pushed through the nozzle to be squished into the bed firmly) the filament doesn't stick, lifts, pulls, gets dragged away, etc. Also some materials that require high amounts of heat will pull the print off the bed as the layers cool down and gets pulled up towards the hotter layers as they are being layed down above them.

Lifting/warping tends to occur most when the print or parts of it have only a small amount of surface area touching bed. Ways to prevent warping are enclosing the printer so hot air is trapped in and cool air is kept out so the print cools more uniformly and/or using methods to make the print stick to the bed better for the first layer.

One way to get better first layer adhesion is using a raft. A raft as mentioned is a couple layers of material printed flat and is larger in diameter than your print so there is more surface area to stick to the bed better. Once the raft prints your object starts to print on top of it and sticks better to the raft because filament sticks better to itself. The downside of rafts is it's a waste of material, takes more time to print overall, most of the time difficult to remove from your print, and the bottom surface of your print will be really rough and not smooth like it would be if you didn't use a raft.

Other ways to get things to stick better for the first layer are laying down a layer of glue stick, using painters tape on the glass, hair spray, Elmer's glue, and a variety of other methods. I use the hair spray method with nylon filaments because nylon has chemical properties that make it slippery when melted so it doesn't like to stick to glass beds well and with hair spray the nylon sticks no problems. When the print finishes and cools it is still easy to remove and the hair spray washes off and whatever small trace of hair spray that was absorbed is not that big of deal in regards to bottom layer finish quality. I Iike the hair spray method because it's simple, cleans off easily, less messy.

Thanks for the detailed explanation. I might never get a printer, but I enjoy learning new things like this as often times I can relate it to something else.
 
At the least for those considering buying a printer I would recommend downloading the student/hobby version of Fusion 360.
Then follow some YouTube tutorials and see how you fancy doing design work.

I personally really like this guys instructional videos:
 
At the least for those considering buying a printer I would recommend downloading the student/hobby version of Fusion 360.
Then follow some YouTube tutorials and see how you fancy doing design work.

I personally really like this guys instructional videos:
I have watched quite a few of his tutorials and am subbed to his channel. ??
 
Old Thread: Hello . There have been no replies in this thread for 90 days.
Content in this thread may no longer be relevant.
Perhaps it would be better to start a new thread instead.
Back
Top