I strioped down ma new one for some personal touch

Navigation
Install the app
How to install the app on iOS
Follow along with the video below to see how to install our site as a web app on your home screen.
Note: This feature may not be available in some browsers.
More options
You are using an out of date browser. It may not display this or other websites correctly.
You should upgrade or use an alternative browser.
You should upgrade or use an alternative browser.
Outcast What did you do with your Outcast today?
- Thread starter Snoprosledneck88
- Start date
-
- Tags
- outcast
This site may earn a commission from merchant affiliate
links, including eBay, Amazon, and others.
links, including eBay, Amazon, and others.
Ooh whats that personal touch or are you going to keep us waitingI strioped down ma new one for some personal touch

Gonna change the 2mm hex screws for 2.5 insted now..
Hope to show it by the end of weekend
Nice man! Just imagining you working in the small room of yours. Btw how would ur xl kraton fit in that room haha
Well the XL Nero are on the edge, so will thw Kraton XL be to
I bought one! First brand new truck in almost 2 years!
JMS RC
Active Member
- Messages
- 231
- Reaction score
- 641
- Location
- Sweden
- Arrma RC's
- Infraction
- Kraton 8S
- Kraton 6s
- Kraton EXB
- Nero
- Outcast 6s
- Talion
- Typhon 6s
- Typhon 3s
Thought it would be cool to start a thread: What did you do with your Outcast today?
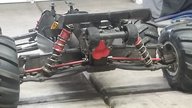
I took the front diff out this morning and put in some 50,000 fluid to help reduce front end tire balloon. Took it out and it made a good difference. Really like how it handles now and distributes power.
LHS has the stock body clip and body clip retainers so I bought them a week ago and put them on the body. Had a couple missing or broken.
Outcast started to feel a little bland today and I thought it would be a good time to put on the 17T pinion. Omfg did that wake that thing up! Damn, like getting a new rig again. Absolute monster. Looking forward to getting it back out again tomorrow.
So what did you do with your outcast today?
Had to remove my front diff, started thinking about the diff fluid. Did you just change to 50k in the front and kept center and rear stock fluid ?
Mine is 4 days old. Got some parts I ordered installed today, shimmed the diffs and replaced the oil.
RPM front arms (store didn't have them, only had rears).
Savox SW1210SG (stock servo didn't make it 5 feet).
TBR wheelie bar/skid.
Made homemade steel wear plates for the skids.
Shimmed diffs and used 100/500/100 in them.
RPM front arms (store didn't have them, only had rears).
Savox SW1210SG (stock servo didn't make it 5 feet).
TBR wheelie bar/skid.
Made homemade steel wear plates for the skids.
Shimmed diffs and used 100/500/100 in them.
Doughboyoutcast
Fairly New Member
- Messages
- 1
- Reaction score
- 0
- Arrma RC's
WTF MIKE
Active Member
- Messages
- 921
- Reaction score
- 745
- Arrma RC's
Lmao I love the ball sackI drove it till it broke kinda put my phone in it for gps and im only on 4s and got it to 53 mph but thats with a 22t and put my truck nuts on
Coopsonthefarm
Active Member
Diffs Put 20k in the rear - 1/2 500k & 1/2 1 mil in middle - 60k front - punch setting 9 - 12t pinion = BEAST MODE!!
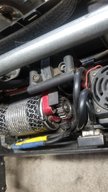
Just installed a single fan hobbywing motor cooler. Had to crimp it a bit in the vice so it would fit snug. Also removed the endcap screws so I could slide it on easier. I could have turned the fan to be on it's side, but I wanted it pointing up a bit so it could suck in clean air better. To do that, I had to cut the center cage/body brace pin off and the plastic part a bit where the clip goes. Also had to cut a bit off the heat sink. Probably all pointless... but I like it better this way.


JMS RC
Active Member
- Messages
- 231
- Reaction score
- 641
- Location
- Sweden
- Arrma RC's
- Infraction
- Kraton 8S
- Kraton 6s
- Kraton EXB
- Nero
- Outcast 6s
- Talion
- Typhon 6s
- Typhon 3s
Mine is 4 days old. Got some parts I ordered installed today, shimmed the diffs and replaced the oil.
RPM front arms (store didn't have them, only had rears).
Savox SW1210SG (stock servo didn't make it 5 feet).
TBR wheelie bar/skid.
Made homemade steel wear plates for the skids.
Shimmed diffs and used 100/500/100 in them.
How many shims did you need to add ? Internal ? I thought the V3 diffs doesn't really need any internal shimming ?
From the MUGE0206 Mugen Seiki kit, I replaced the shims on the ends of the x-shafts, the Arrma ones looked pretty roughed up already only after 2 packs. I also added a shim under each sun gear so the o-ring isn't rubbing on the back of the gear/pin. Still spun smooth once together. On the ring gear side of the diff, I added 2 of SWX-101018 SWorkz 13x16x0.2mm shims to tighten up the mesh. Had very little gear lash after that. There was a pretty noticeable tick of play before I put the shims on the ring gear side.How many shims did you need to add ? Internal ? I thought the V3 diffs doesn't really need any internal shimming ?
Snoprosledneck88
Active Member
- Thread starter
- #36
I put 50k in the front/100k center and 40k in the rear.Had to remove my front diff, started thinking about the diff fluid. Did you just change to 50k in the front and kept center and rear stock fluid ?
Moved my front upper shock mounts out to the furthest hole to hopefully add some stiffness. I have them on the inside hole on the RPM arms to raise the height a bit. Still trying to find springs that are stiffer than the V2 outcast. Have read the Tekno orange are softer.
Moved the camera mount as well. Where I had it, almost all you saw was tire.


Moved the camera mount as well. Where I had it, almost all you saw was tire.
JMS RC
Active Member
- Messages
- 231
- Reaction score
- 641
- Location
- Sweden
- Arrma RC's
- Infraction
- Kraton 8S
- Kraton 6s
- Kraton EXB
- Nero
- Outcast 6s
- Talion
- Typhon 6s
- Typhon 3s
Moved my front upper shock mounts out to the furthest hole to hopefully add some stiffness. I have them on the inside hole on the RPM arms to raise the height a bit. Still trying to find springs that are stiffer than the V2 outcast. Have read the Tekno orange are softer.
Moved the camera mount as well. Where I had it, almost all you saw was tire.
You could try the Outcast/Kraton V3 Springs, Front Springs AR330507 are 85mm 6.2lb/in and Rear AR330508 are 95mm 5.0lb/in
Stiffer than Tekno RC and V2's
JMS RC
Active Member
- Messages
- 231
- Reaction score
- 641
- Location
- Sweden
- Arrma RC's
- Infraction
- Kraton 8S
- Kraton 6s
- Kraton EXB
- Nero
- Outcast 6s
- Talion
- Typhon 6s
- Typhon 3s
Thanks, I've rebuilt and shimmed plenty off diffs but very few Arrma's. The ones on my Talion V3 I did not feel the need to add any internal shims, I've only added one external 13x16 shim to tighten up the mesh. On my Outcast it's like you say, the shims looks kinda rough already, (never looked closely on the Talion I guess) I've read some adding a shim under each sungear and some that only adds one on the crown gear side. Did you use a total of 3 external 13x16 shims on the crown gear side ? On the ones I have made 1 external 13x16 shim was already added from factory.From the MUGE0206 Mugen Seiki kit, I replaced the shims on the ends of the x-shafts, the Arrma ones looked pretty roughed up already only after 2 packs. I also added a shim under each sun gear so the o-ring isn't rubbing on the back of the gear/pin. Still spun smooth once together. On the ring gear side of the diff, I added 2 of SWX-101018 SWorkz 13x16x0.2mm shims to tighten up the mesh. Had very little gear lash after that. There was a pretty noticeable tick of play before I put the shims on the ring gear side.
JMS RC
Active Member
- Messages
- 231
- Reaction score
- 641
- Location
- Sweden
- Arrma RC's
- Infraction
- Kraton 8S
- Kraton 6s
- Kraton EXB
- Nero
- Outcast 6s
- Talion
- Typhon 6s
- Typhon 3s
Just installed a single fan hobbywing motor cooler. Had to crimp it a bit in the vice so it would fit snug. Also removed the endcap screws so I could slide it on easier. I could have turned the fan to be on it's side, but I wanted it pointing up a bit so it could suck in clean air better. To do that, I had to cut the center cage/body brace pin off and the plastic part a bit where the clip goes. Also had to cut a bit off the heat sink. Probably all pointless... but I like it better this way.
The Hobbywing is OK, I installed mine in one of the Talion's , you should try the Yeah Racing one though, much nicer install and better fit.