neighborhater383ci
Active Member
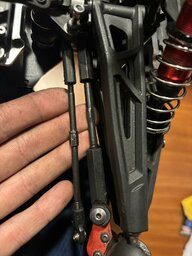
I found my front end extremely loose which probably wouldn't bother a lot of people, but it drives me nuts to have such “variable” geometry up front being an automotive tech. On top of that slop is what breaks stuff, a lot more impact rather than smooth transfer of force. For the steering block to c hub slop I took the little metal bushings I found come in a granite boosts front steering knuckles and using drill bit same size as existing hole In the hub and cleaning it up, you can press the metal bushings in and it takes up almost all of the wobble there. For the tie rods/uppers you can probably just use a metal pivot balls but I chose a set with aluminum ends and bronze pivot “bushings”. For the servo saver I used a gpm tamiya style high torque aluminum saver, and it’s been doing great and you don’t have to lift the servo at all just sand a tiny tiny bit of plastic on the chassis where the linkage attaches to the servo saver itself. Still working on what to do about the lower control arms, haven’t tried but the same bushings from the 3s c hubs might work there too. The difference in predictability and feel in the front end is remarkable and worth the tinkering time


the only other thing I’d recommend is to use a wide head screw in the end of the axle so instead of the hub only having the cross pin attaching it, the wider head screw presses the hub against the cross pin and clamps it to the axle, noticeable difference there too
the only other thing I’d recommend is to use a wide head screw in the end of the axle so instead of the hub only having the cross pin attaching it, the wider head screw presses the hub against the cross pin and clamps it to the axle, noticeable difference there too