Devito1993
Fairly New Member
- Messages
- 30
- Reaction score
- 28
- Arrma RC's
- Outcast 6s
A week or two ago, I got clarification on a truggy build and got all of the needed parts. I wanted to outline my experiences, so people thinking about doing it know what to expect (prices and difficulty of work).
To start, this is the first and only used RC car I have bought. It looked basically new when I got it, and when I got it home, I realized the previous owner tried a few mods, but did them poorly by stripping screws, taking gaskets out, and so on. Because I needed parts, I figured I would try to make a best of both worlds type of thing between an outcast and a typhon.
Parts list:
AR310484 - ALUMINUM WHEEL HEX 17mm: $23.98 (2 packs)
AR330505 - COMPOSITE FRONT STEERING BLOCK: $10.02 (1 pack)
AR310590 - CVD AXLE: $21.19 (1 pack)
AR330404 - REAR HUB: $11.64 (1 pack)
AR310591 - WHEEL AXLE: $19.99 (1 pack)
AR310444 - DIFF GASKET: $4.99 (1 pack)
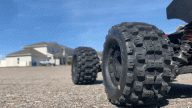
Pro-line Racing Badlands MX28 2.8 Mtd F-11 17mm PRO-MT 4x4: $76.72 (2 packs)
Mugen Super Silicone for Diff 300,000 cst: $19.03
Blue Threadlocker Loctite: $5.97
Total: 193.53
The first thing I wanted to tackle was the center diff because the previous owner changed the spur gear for some reason (same tooth count as stock) and it looked like the diff was leaking. I am not sure how much threadlocker is typically used because this was my first one, however, previous owner used A LOT so just anticipate using heat when you do this. When I finally got the diff out and the spur gear off, there was zero fluid as expected. Stock diff fluid is 100,000 cst, but it seems everyone uses a higher cst, so I went with a 300,000. The car was basically FWD and I hated it. I may have over compensated because there wasn't any fluid, but i like where it is now. I can wheelie if I try, but it stays planted from a roll, which is also nice (have only ran it on 4s so far).
After I finished up the diff, I put the Kraton axles and hubs on. This was the most frustrating part because almost all of the grub screws that hold the hex's in place were stripped (1 by me, 2 were stripped before I started). The best advise I could give out is use quality tools and do not rush it. These grub screws are the hardest out of all of the screws to get out (on mine at least). To make your life easier, clean all of the dirt and crud out of the hex before you start. it is really easy to not be seated into the screw all of the way and it will not help if there is additional dirt in the screw will not help. Also make sure you are careful with the hubs when putting the hub nuts in. It is easy to strip/cross thread the hubs because the hub nut is metal and the hub is plastic.
The last bit of advice I can give is be confident you can do it. I learned throughout massing around with the cars is that they are made to be able to fix them by yourself.


To start, this is the first and only used RC car I have bought. It looked basically new when I got it, and when I got it home, I realized the previous owner tried a few mods, but did them poorly by stripping screws, taking gaskets out, and so on. Because I needed parts, I figured I would try to make a best of both worlds type of thing between an outcast and a typhon.
Parts list:
AR310484 - ALUMINUM WHEEL HEX 17mm: $23.98 (2 packs)
AR330505 - COMPOSITE FRONT STEERING BLOCK: $10.02 (1 pack)
AR310590 - CVD AXLE: $21.19 (1 pack)
AR330404 - REAR HUB: $11.64 (1 pack)
AR310591 - WHEEL AXLE: $19.99 (1 pack)
AR310444 - DIFF GASKET: $4.99 (1 pack)
Pro-line Racing Badlands MX28 2.8 Mtd F-11 17mm PRO-MT 4x4: $76.72 (2 packs)
Mugen Super Silicone for Diff 300,000 cst: $19.03
Blue Threadlocker Loctite: $5.97
Total: 193.53
The first thing I wanted to tackle was the center diff because the previous owner changed the spur gear for some reason (same tooth count as stock) and it looked like the diff was leaking. I am not sure how much threadlocker is typically used because this was my first one, however, previous owner used A LOT so just anticipate using heat when you do this. When I finally got the diff out and the spur gear off, there was zero fluid as expected. Stock diff fluid is 100,000 cst, but it seems everyone uses a higher cst, so I went with a 300,000. The car was basically FWD and I hated it. I may have over compensated because there wasn't any fluid, but i like where it is now. I can wheelie if I try, but it stays planted from a roll, which is also nice (have only ran it on 4s so far).
After I finished up the diff, I put the Kraton axles and hubs on. This was the most frustrating part because almost all of the grub screws that hold the hex's in place were stripped (1 by me, 2 were stripped before I started). The best advise I could give out is use quality tools and do not rush it. These grub screws are the hardest out of all of the screws to get out (on mine at least). To make your life easier, clean all of the dirt and crud out of the hex before you start. it is really easy to not be seated into the screw all of the way and it will not help if there is additional dirt in the screw will not help. Also make sure you are careful with the hubs when putting the hub nuts in. It is easy to strip/cross thread the hubs because the hub nut is metal and the hub is plastic.
The last bit of advice I can give is be confident you can do it. I learned throughout massing around with the cars is that they are made to be able to fix them by yourself.