Granite Granite -> Big Rock Project

This site may earn a commission from merchant affiliate
links, including eBay, Amazon, and others.
Messages
71
Reaction score
43
I just got the notion I´ll document a bit of my journey into RC again. Maybe it will entertain someone :LOL:. Already started so you will have to picture a brand new V3 Granite :p. I´ll post pics and posts to get you up to speed soon.

Edit: Someone said somewhere that it started with cursing and ended with feeling like you won the lottery.

I got to the cursing part yesterday. My 2 mm hex was too thick for the front and rear driveshafts that needs to be removed to check the diff fluid. And the tool that came with the truck is too short... Thats just mean, and wierd. I´ll go scavenging in my toolbox tomorrow. Long term I guess I´ll order a MIP or two...

Anyone know if MIP9040S and MIP9512 is long enough?

Edit: Toolbox ftw. Now we´ll see if I can get enough force (and it holds) to get past the locktite. :LOL:

20211211_081244.jpg
 
Last edited:
Stuff I´ve ordered for the project:
20211211_090518.jpg


20211211_090414.jpg

The body is trimmed and sort of ready. Will need more trimming when I see were the wheels end up. I´ve left the protective plastic on for now and it´s hiding in a box because my son has no idea yet xD.
20211211_090450.jpg

I had ordered some stuff before I decided to make it into a big rock so the rear wing is most likely too small.
20211211_090551.jpg

As far as I´ve gotten atm. The shocks are hiding in a shameful corner until I can get through the snow to the tool shed where I keep my wrenches. The shock caps have been tightened by the hulk!
20211211_090328.jpg


The plan right now is to, in a systematic manner, go though key parts, and move them to the new chassi. I´ll add new posts as it comes along!
 
The axles on the diff that are held with loctited screws.

I haven´t tried removing it yet as I usually only have time in the evenings but I took a peek at the screw (since people have mentioned some harsch words concerning them :LOL:). The front diffs left screw is already stripped. From the factory. Do I contact the local store or Arrma directly? And how do I solve the problem of getting the screw out?

Edit: Checked the rear screws. They are fine. So thats good.
 
Last edited:
The axles on the diff that are held with loctited screws.

I haven´t tried removing it yet as I usually only have time in the evenings but I took a peek at the screw (since people have mentioned some harsch words concerning them :LOL:). The front diffs left screw is already stripped. From the factory. Do I contact the local store or Arrma directly? And how do I solve the problem of getting the screw out?
If bought at LHS.....then go back there. They will prob take care of it for ya.
 
Right, thx. Do you know the part number for the screw in the axle? For my own future fiddlestick ups :D
I'll look. But I think you have to get a new driveshaft. The screws are there from factory. Jennys RC has cheapest sets of stock.
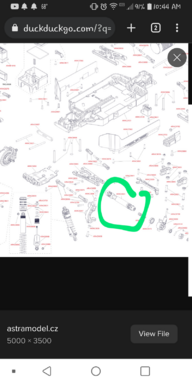
Exploded view only gives the whole driveshaft part #
 

Attachments

  • Screenshot_2021-12-11-10-44-58~2.png
    Screenshot_2021-12-11-10-44-58~2.png
    670.2 KB · Views: 48
I'll look. But I think you have to get a new driveshaft. The screws are there from factory. Jennys RC has cheapest sets of stock.
Exploded view only gives the whole driveshaft part #
Yeah I checked the exploded view. Hence the question. Whole driveshaft, damn. That sucks. I emailed the store, (my "local" store is 470 km away).
 
Yeah I checked the exploded view. Hence the question. Whole driveshaft, damn. That sucks. I emailed the store, (my "local" store is 470 km away).
I understand that. I also don't have a LHS. You may can post in classifieds and see if anyone has a single or just the half u need.
 
First piece in new chassi!

20211211_221958.jpg


Didn´t get as far as I thought this evening but I had to do some troubleshooting since I found there was some resistance in the front diff (when spinning both axles forward or backward). Since I suspect Mr.Gorilla hands have assembled this I checked the screws on the diff and redid these to just snug and added som grease. The resistance is now less. I´ve read it will loosen up a bit after a few packs as well.

20211211_225937.jpg
 
Last edited:
Yep it should clear up. But check it in a couple runs to make sure. Don't want it eating diffs. Its where the pkastics arent exact all way around. Either on ring or pinion or both. If u have patience u xan sand the spots where it binds up.
 
I just check both my Granites.. they both have some movement.
 
Added all the typhon arms and turnbuckles for a wider stance. Big rock chassi. Added front and rear bumpers. Tires are just there for show atm.

Stiff foam in the bumper cavity for less breakage of said bumper. Check.

20211213_233000.jpg


To the extra fun part! Deciding where the body sits best, further in the front or rear, and whether to have a wing or not. The holes for the tires are borked either way. Maybe I should have considered disregarding the default cutouts and just made my own. The small protrusions might have made it look weird though. Oh well, done is done!

20211213_234510.jpg


20211213_235703.jpg


One thing is clear though, IF I´m gonna have a wing, wider would be better.

20211213_235728.jpg
 
Hello again! On account of me becoming a father for the second time, I had to skip tinkering for a few evenings. I might be a bit more sporadic with the updates for a while :LOL:.

That said, been going over the motormodule and all those parts. Been trying to figure out if I need to shim the slipper or not. It doesn´t seem to rub and the raised part, see pic, seems bigger than pictures of previous versions on this forum. The long part in the picture was 1 cm for me and the raised part about 4-5 mm. Can anyone with V1 or V2 Granite/Big Rock check their lengths?

20211214_220144.jpg


I´ve incorporated @Yas solution with a small o-ring and two 5x10x1 shims under the pinion. To seal the motor from possible module dust and random crap.

20211214_221203.jpg


I will add the grub screw. Cleaning it atm. Acetone seems to work the best to get rid of the old loctite, or whatever it is.
20211214_221217.jpg


I´ve added the rear wing properly. In earlier pics is held with sticky stuff :p.
I also started looking at the battery compartment and added som adhesive foam (normally for isolating pipes) in the bottom. I noticed I accidentally bought a huge battery so I had to remove the battery buffer. I will have to add some foam (2 different kinds since I have 2 different sized batteries) on the side to protect the cables from getting squished if the battery slides during a crash.

Battery buffer:
20211216_223711.jpg


I´ve ordered a bigger wing and a better screwdriver for the wheel axles and diffs. So next after powermodule and battery compartment is securing the wheel axle screws with loctite. Not sure I´m writing the correct part here. I saw a great pic with all the names of all the parts recently but I´ve lost it, totally blaming the child birth :p.

Edit: Found it! Axle is correct, the screw is behind the hex hub inside the hub carrier. Yey, learning!
 
Last edited:
Old Thread: Hello . There have been no replies in this thread for 90 days.
Content in this thread may no longer be relevant.
Perhaps it would be better to start a new thread instead.
Back
Top