ck.tan
Member
- Messages
- 21
- Reaction score
- 0
- Arrma RC's
- Talion
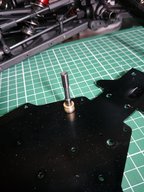
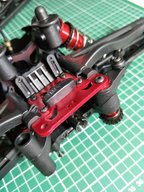
hi, does anyone know how to dismantle the steering posts on the talion v3 ? on mine, one is stuck to the chassis while the other is stuck to the top plate. the steering posts would turn when i turn the screws with a hex wrench. if possible i try not to use a pair of pliers to avoid leaving "bite marks" on the posts.
it will be great if the steering post design is such that its inner wall is of hex shape to form a hex socket that would accept a hex wrench. unfortunately that is not the case, otherwise it would have been much easier.
many thanks in advance !!
it will be great if the steering post design is such that its inner wall is of hex shape to form a hex socket that would accept a hex wrench. unfortunately that is not the case, otherwise it would have been much easier.
many thanks in advance !!