Kraton My new Arrma Kraton 6S BLX V4 upgrades before its maiden run.

This site may earn a commission from merchant affiliate
links, including eBay, Amazon, and others.
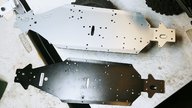
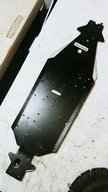
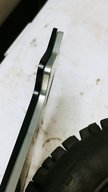
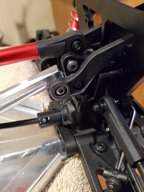
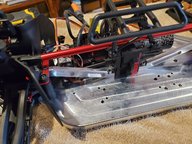
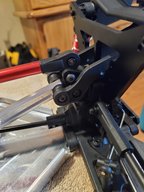
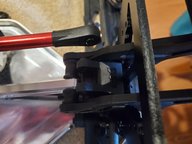
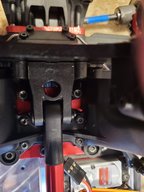
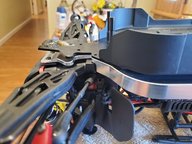
First off I got a new Noble Flysky NB4 with 2 receivers on small and one large. I wanted a better transmitter and receiver than the stock Spektrum that it came with. I also bought a digital metal gear servo coreless and brushless but it hasn't arrived yet, it is rated at 30kg of torque. I also bought a bunch of upgrade parts including a few parts from Just Bash It including a new chassis etc...

If any of you have any hints on installation of the parts would be greatly appreciated.

I flew electric RC airplanes but later shifted to flying on the slope and loved using the wind for lift. The best thing about flying on the slope you can fly as long as you want depending on your receiver battery.

I also have a DJI Phantom 4 and a Mavic 2 Pro.

I had a Team Losi Monster Truck but I did like it because it would always break and would give me so much difficulty repairing it and getting it up and running. I like the Arrma Kraton 6S V4 build so much better and you could not do any of the maneuvers with the Team Losi. Take on jump with the Team Losi and it would be trashed.

Thanks in advanced,
Henry

Shout out to a fellow slope flyer! I did the exact same thing you did. I started with flying 3d foamies. Then I found gliders, and never went back. It just so much more satisfying, and like to said, 45 minutes on a little NIMH pack is so convenient. I do a little DLG, but my real enjoyment comes from slope. Dreamflight has some great models. Now I have a Kraton to entertain me when the weather disagrees.
 
NeverDun; I use to flying on the slope with foamies to full house fiberglass moldies with flaps and crow. But I moved to Carson City, NV where I cant fly on the slope. Now I will stick to drones that I can fly around the neighborhood.

Guys one things that bothers me, the motor pinion does not line up properly with the large drive wheel gear. Should I loosen the two screws holding the motor in place or the red metal mount the motor has two screws on the front part of the motor but not adjustment of the motor position? Will the two top screws allow me to adjust the motor pinion so it will mesh with the big gear cog? I believe it should. I don't want to spin the big wheel cog without spinning the pinion on the motor. Excuse the incorrect terminology.
That worked I just adjust those to top screws allow motor adjustment. Now the pinion and the large gear are nice and tight.
 
Last edited:
NeverDun; I use to flying on the slope with foamies to full house fiberglass moldies with flaps and crow. But I moved to Carson City, NV where I cant fly on the slope. Now I will stick to drones that I can fly around the neighborhood.

Guys one things that bothers me, the motor pinion does not line up properly with the large drive wheel gear. Should I loosen the two screws holding the motor in place or the red metal mount the motor has two screws on the front part of the motor but not adjustment of the motor position? Will the two top screws allow me to adjust the motor pinion so it will mesh with the big gear cog? I believe it should. I don't want to spin the big wheel cog without spinning the pinion on the motor. Excuse the incorrect terminology.
That worked I just adjust those to top screws allow motor adjustment. Now the pinion and the large gear are nice and tight.
Gotcha about not having a good slope to fly. It's definitely something that takes either dedication to travel, or a convenient slope nearby.
With you gear mesh problem, you need to loosen the set screw holding the pinion gear (small one) to the motor shaft. Turn the motor over, and you'll see it aligned with the flat on the motor shaft. Then you can adjust the fore and aft alignment with the spur gear ( on your differential). It can be a bear to get off with all of the red LocTite, so you'll probably have to heat it up with a soldering iron tip to debond it. Arrma is kind of notorious for going overboard with the high strength LocTite.
By the way, that's the axial gear mesh ( parallel to the shaft rotation). For radial (perpendicular to the drive shaft) adjustment, the two screws on top are the ones you're looking for. You do want some lash (slop) in that interface though. Don't take all of the lash out, or you'll get binding and damage to the gears from all of the flexing of the chassis and components. I like to use a folded paper towel as a spacer. You put it in between the gears, push them together, and tighten the motor mount in place. Then pull the towel out, and you should have just a little bit of lash.
 
Last edited:
NeverDun; Sorry for not knowing the names of all the parts and thanks again for knowing what I was talking about. I will play around with it a little to get the right amount lash. Once I get my Blue Loctite loosen up one screw and Loctite it and I will do the other one. I do not the proper terminology but, I will call it the rear drive shaft is not perfectly perpendicular to motor mount. That is Ok! right and that is why you need a little slop in the lashing? "Thanks again" for your help. Now it will be ingrained in my memory. I am not doing bad for an old fart.
 
NeverDun; Sorry for not knowing the names of all the parts and thanks again for knowing what I was talking about. I will play around with it a little to get the right amount lash. Once I get my Blue Loctite loosen up one screw and Loctite it and I will do the other one. I do not the proper terminology but, I will call it the rear drive shaft is not perfectly perpendicular to motor mount. That is Ok! right and that is why you need a little slop in the lashing? "Thanks again" for your help. Now it will be ingrained in my memory. I am not doing bad for an old fart.

Are you referring to the driveshaft between the center differential (the one with the spur gear that we have been talking about) and the rear differential (it has an input from the center diff, and two outputs to the wheels)? If so, the mis-alignment is normal, and accommodated by the drive joint normally referred to as a "dogbone" because that's what its shaped like when you remove it. While driving the chassis will flex constantly lengthwise and torsionally (twist). These joints allow for this to happen without binding in the drivetrain and damage to the components. To a much lesser extent you also get flex between the motor and the differential. This can occur from hard landings, crashes, or drivetrain shock (like landing from a jump with the throttle pinned). Hopefully that explanation helps. Otherwise we should start taking pictures ?
 
M2C is 7075 vs the one you got that is 6061. M2C may be thinner, but its stronger aluminum.

Awesome upgrades!
 

Attachments

  • 20191208_185624.jpg
    20191208_185624.jpg
    226.3 KB · Views: 38
  • 20191208_185959.jpg
    20191208_185959.jpg
    230.6 KB · Views: 41
  • 20191208_185810.jpg
    20191208_185810.jpg
    90.3 KB · Views: 40
I do not know what to call the red that links the front and rear suspension but I have a part # and it is ARA320503. The front is all hooked up but I can not hook rear red rod because it is about 3/8" too long? Things I have tried to get it to fit, I loosened up all the suspension fittings where it mounts to the chassis. Will loosening the screw to the rear portion chassis allow it to fit? The last thing I want to is cut the red rod?
Can you the screw that is to the rear of the brace that holds it in place. Will it allow me to rotate it and give me more length to make it fit. At a loss as to what to do to make it fit?
 

Attachments

  • 20191209_162024.jpg
    20191209_162024.jpg
    225.7 KB · Views: 38
I do not know what to call the red that links the front and rear suspension but I have a part # and it is ARA320503. The front is all hooked up but I can not hook rear red rod because it is about 3/8" too long? Things I have tried to get it to fit, I loosened up all the suspension fittings where it mounts to the chassis. Will loosening the screw to the rear portion chassis allow it to fit? The last thing I want to is cut the red rod?
Can you the screw that is to the rear of the brace that holds it in place. Will it allow me to rotate it and give me more length to make it fit. At a loss as to what to do to make it fit?
Hey from what I see is you need to put the plastic spacers back on each side will tighten all up. Nice looking braces. Good luck.
 
Hrmmmm. It looks like the new chassis might be shorter than the original one? I guess if that were the case the driveline wouldn't fit though.
 
NeverDun; Everything fits on the chassis including both front and rear braces. Photos are download right now and I will post them.

Photo of both braces and they perfectly. The red driveline is still a little too long and I will see if there is any chance to get it fit?
 

Attachments

  • 20191210_081655.jpg
    20191210_081655.jpg
    387.6 KB · Views: 36
  • 20191210_081723 (1).jpg
    20191210_081723 (1).jpg
    268.3 KB · Views: 44
Last edited:
Is there any means of adjusting where the front and rear driveline attachments to get to fit? Like lift up the front and rear attachments pieces? Another choice is to and somehow separate driveline from the black piece with bearing? Everything else fits except for the driveline?
Any suggestions???
 

Attachments

  • 20191210_083621 (1).jpg
    20191210_083621 (1).jpg
    194.7 KB · Views: 36
  • 20191210_083538.jpg
    20191210_083538.jpg
    218.5 KB · Views: 40
That is super wierd. This brace fit perfectly when the truck was assembled with the original Kraton chassis though, right?
I just installed one of those diff to diff braces from a V4 on my V2 kraton and it dropped right on.
 
The brace fits just fine in the original chassis and so did everything which was mounted on the Just Bash It chassis. Would detaching the rear brace and rear shock and suspension assembly from the chassis and then try to re-attach the red brace. But I do not know if that will work? I do not know the proper order of reassembly of everything, if it didn't work at first I attempted to do it a different way. I have to figure out some way to extend the front and rear shock assembly to me a little more length to attach the brace but how??? I am little more than frustrated.
 
Last edited:
It doesn't matter what order you assemble the truck. You can take entire rear, front, or center assemblies off independently, and it should all just pop back together. What I'm gathering from your situation is that the differentials are mounted a little closer together on the new chassis than the old one. The only other thing that could effect the fit of the Diff to diff brace would be if the kick up on the front of the new chassis is more than the original. Can you take a picture (Directly horizontal) of the bottom of both chassis so I can look at the hole locations?
 
NeverDun; I see the problem the original chassis is kicked about 3/4" of an inch versus the Just Bash It chassis perfectly flat. Looks like I need to bend it, that will be a job. The rest of the holes for all the screws line up. Now do I attempt to bend it???
This is the view of both chassis's with the original on top and you can see how the original is kicked up and the Just Bash It is perfectly flat.
20191210_130115 (1).jpg

This is the view of both chassis's with the original on top and you can see how the original is kicked up and the Just Bash It is perfectly flat.
20191210_130115 (1).jpg

Do I need to contact Just Bash It to see what I need to do or see about exchanging it?
 

Attachments

  • 20191210_130053 (1).jpg
    20191210_130053 (1).jpg
    258.4 KB · Views: 33
Last edited:
It looks like the JBR chassis is kicked up as well from the pic. Can you put a straight edge on the bottom of the JBR chassis? If anything, too much kick up would cause your issue, not too little. can you take a pic of the bottom of the two chassis next to one another as well? I'd like to see the hole spacing.
 
I went to their website, and you're right, it appears the chassis are flat. I'm not sure why they chose to eliminate the kick up. I would contact them, and show them the pics of the upper brace mis alignment and see what they say. They offer an aluminum rear combination brace, so they obviously expect you to be able to use the original one with their chassis:
https://justbashitrc.com/shop/arrma-v4-6s-aluminum-wing-support-center-brace-mount/
 
The Just Bash It when I checked again does not have so much of a bend in the front part of the chassis? I need to take part front shock towers and see if I can make any adjustments and correct what I might have done wrong. I cross my fingers and pray that it works?
Full Throttle RC;
Did you have the same problem as I did? Is the T2T brace really needed since I have the Just Bash It front and rear brace? That give me a fix that would be so much easier. After words I could try to shorten the T2T brace. I was thinking what have I done wrong?

Thank you,
 
Last edited:
Old Thread: Hello . There have been no replies in this thread for 90 days.
Content in this thread may no longer be relevant.
Perhaps it would be better to start a new thread instead.
Back
Top