
Navigation
Install the app
How to install the app on iOS
Follow along with the video below to see how to install our site as a web app on your home screen.
Note: This feature may not be available in some browsers.
More options
You are using an out of date browser. It may not display this or other websites correctly.
You should upgrade or use an alternative browser.
You should upgrade or use an alternative browser.
Granite Hot Racing Shock Bodies - Now Available
- Thread starter scv484
- Start date
This site may earn a commission from merchant affiliate
links, including eBay, Amazon, and others.
links, including eBay, Amazon, and others.
Eeeeenteresting. So, you keep the shock shaft and the lower mount/spring perch. The picture seems to have a new piston and some shaft seals as well. I can't tell for sure, but it almost looks like the pistons aren't pre-drilled with any holes. Color me curious.
Wonder if they use bladders in the caps or if they are emulsion type shocks.
bicketybam
Back from vacation!
Lifetime Premium!
Premium Member
Excellence Award
Build Thread Contributor
- Messages
- 13,394
- Reaction score
- 23,196
- Location
- New Milford, CT
- Arrma RC's
- BigRock 4x4
- Granite
- Infraction
- Kraton 8S
- Kraton 6s
- Kraton 4s
- Mojave
- Notorious
- Talion
- Typhon 6s
If they are as good as their metal driveshafts, RUN AWAY AS FAST AS YOU CAN. Honestly, I really don't like any of the HR aftermarket for the 3S line. Even the 17mm hubs have issues and the alloy for their stuff is as strong as straw.
- Messages
- 6,083
- Reaction score
- 13,924
- Location
- UK..
- Arrma RC's
- Infraction
- Mojave EXB
- Outcast 8s
- Outcast EXB
- Talion EXB
- Typhon 6s
The price is pretty reasonable ..??
I'm not trying to talk you out of trying these, but I rebuilt the shocks on 2 3s rigs using green slime on everything I could and had great luck with it. Here's the video I followed - https://www.arrmaforum.com/threads/razorrc-granite-4x4-blx-build.8166/post-94381Anyone actually try these? All 4 of my shocks are leaking... even after rebuilding them with new o-rings.
Might pop on them and Guinea-pig a set.
If you do get the HR ones, post up your experience!
AimlessRC
Active Member
- Messages
- 189
- Reaction score
- 212
- Arrma RC's
- Granite
I'm not trying to talk you out of trying these, but I rebuilt the shocks on 2 3s rigs using green slime on everything I could and had great luck with it. Here's the video I followed - https://www.arrmaforum.com/threads/razorrc-granite-4x4-blx-build.8166/post-94381
If you do get the HR ones, post up your experience!
I did the exact same process, minus stabbing my thumb, and I used the "good stuff" Losi lube instead of green slime, and they still leak. The large o-ring at the base of the threads wont seal into the upper shock body. It's like the bottom of the shock body has spread, causing the leak. It's the same on all 4 shocks.
Last edited:
- Messages
- 2,503
- Reaction score
- 2,699
- Location
- Tel Aviv, Israel
- Arrma RC's
- Granite
- Senton 3s
- Talion
- Typhon 6s
- Typhon 3s
- Voltage
I always use green slime when i re-fill my shocks, sometime it holds 6 month without leaking, sometime it leaks the next day, coudnt figure out a reliable way to seal it. I feel the issue is the auto bleeding gap in the thread, it compromising the seal, so the further from it the bond between the two halves of the shock body, the better is the seal.
I’ve ordered the HR bodies, i’m eager to test them. it’s the only replacement to the stock shocks that keeps the original properties of the shocks, as it uses the stock piston and spring. any other option changes settings
I’ve ordered the HR bodies, i’m eager to test them. it’s the only replacement to the stock shocks that keeps the original properties of the shocks, as it uses the stock piston and spring. any other option changes settings
Did you put anything on the threads when you reassembled? I did plumbers tape on 1 set and they leaked. 2nd go round I put slime on em, which was a great end result, but I don't do enough of these to say it's what soleved my issue. I still think that there are some pretty bad batches of arrma parts kickin around.I did the exact same process, minus stabbing my thumb, and I used the "good stuff" Losi lube instead of green slime, and they still leak. The large o-ring at the base of the threads wont seal into the upper shock body. It's like the bottom of the shock body has spread, causing the leak. It's the same on all 4 shocks.
AimlessRC
Active Member
- Messages
- 189
- Reaction score
- 212
- Arrma RC's
- Granite
Just the blue good stuff grease...Did you put anything on the threads when you
reassembled? I did plumbers tape on 1 set and they leaked. 2nd go round I put slime on em, which was a great end result, but I don't do enough of these to say it's what soleved my issue. I still think that there are some pretty bad batches of arrma parts kickin around.
AimlessRC
Active Member
- Messages
- 189
- Reaction score
- 212
- Arrma RC's
- Granite
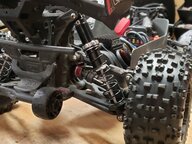
Shock bodies arrived today, and my 4 year-old and I bashed the crap out of the Granite today, and we picked up some green slime. Going to try them out with 80w to start... there are no holes in the pistons but the oil travels around them.
bicketybam
Back from vacation!
Lifetime Premium!
Premium Member
Excellence Award
Build Thread Contributor
- Messages
- 13,394
- Reaction score
- 23,196
- Location
- New Milford, CT
- Arrma RC's
- BigRock 4x4
- Granite
- Infraction
- Kraton 8S
- Kraton 6s
- Kraton 4s
- Mojave
- Notorious
- Talion
- Typhon 6s
80 seems really heavy. Let us know how it goes ??Shock bodies arrived today, and my 4 year-old and I bashed the crap out of the Granite today, and we picked up some green slime. Going to try them out with 80w to start... there are no holes in the pistons but the oil travels around them.
AimlessRC
Active Member
- Messages
- 189
- Reaction score
- 212
- Arrma RC's
- Granite
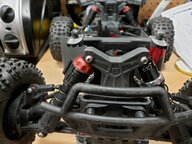
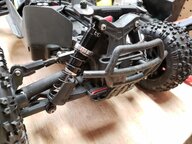
So yea... 80 is too high, or rather not needed on these shocks. Stock shocks have 70 in them now, and compared to the HR bodies, I was able to put 50 in them and get the same "feel". This is probably due to the leaks, and sucking air into them.
Install is a breeze. Bleeding takes the most time. Turn and pump as you install the piston... cap it off... pump as much as you can... let it sit upright for 5 mins... take out the bleeder and compress slowly until no bubbles... pump again... let sit... pull the bleeder compress fully... install bleeder... done.
The shocks have about 10mm more travel than stock, which only helps if you land off-camber or are really pushing a corner. The bottom of the tires can lift about 12mm above the bottom of the chassis. This can be managed by not bottoming out the shocks when bleeding... but compressing oil only leads to blown o-rings or broken parts.
They look really nice... and adjustment for bash to offroad to street to track takes about twice as much time as fiddling around with clips. But the over-all build quality seems good!
I'll post up an install video in a week or two.
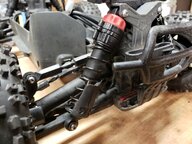
Oh! And for clarity. These shocks use the stock piston, washer and lock nut. The items pictured are a guide bushing for the opening of the bottom of the shock, 2 o-rings, and a white cap to keep the o-rings in place. The white cap sits at the base of the threads inside the shock body when fully assembled.
Install is a breeze. Bleeding takes the most time. Turn and pump as you install the piston... cap it off... pump as much as you can... let it sit upright for 5 mins... take out the bleeder and compress slowly until no bubbles... pump again... let sit... pull the bleeder compress fully... install bleeder... done.
The shocks have about 10mm more travel than stock, which only helps if you land off-camber or are really pushing a corner. The bottom of the tires can lift about 12mm above the bottom of the chassis. This can be managed by not bottoming out the shocks when bleeding... but compressing oil only leads to blown o-rings or broken parts.
They look really nice... and adjustment for bash to offroad to street to track takes about twice as much time as fiddling around with clips. But the over-all build quality seems good!
I'll post up an install video in a week or two.
Oh! And for clarity. These shocks use the stock piston, washer and lock nut. The items pictured are a guide bushing for the opening of the bottom of the shock, 2 o-rings, and a white cap to keep the o-rings in place. The white cap sits at the base of the threads inside the shock body when fully assembled.
Attachments
- Messages
- 65
- Reaction score
- 77
- Location
- Upstate NY
- Arrma RC's
- 4x4-Mega
- Granite
- Outcast 4s
- Typhon 3s
- Voltage
Copy pasta from other thread;
I do have it sitting on some clean cardboard, just to spot any leaks, but nothing yet.
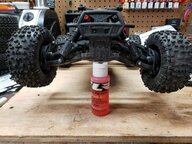
Still haven't bashed the Granite more, it won't stop raining here lolSo I finally got around to building these. I used green slime anywhere there was an oring, and AE 55wt oil. Bashed it for a full pack yesterday, no leaks, very smooth. My ESC actually came unstuck for the first time, after some failed backflips, but no damage to the shocks. I think for the $40 I'd recommend them for a bolt on replacement alternative to $60 6s shocks.
I do have it sitting on some clean cardboard, just to spot any leaks, but nothing yet.
- Messages
- 2,503
- Reaction score
- 2,699
- Location
- Tel Aviv, Israel
- Arrma RC's
- Granite
- Senton 3s
- Talion
- Typhon 6s
- Typhon 3s
- Voltage
I’m pretty bummed about the extra travel, I assumed the point was to retain the original properties. You sure you didn’t used the rear shafts on the front bodies or something?
AimlessRC
Active Member
- Messages
- 189
- Reaction score
- 212
- Arrma RC's
- Granite
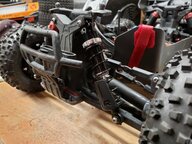
Positive. Noticeable difference between front and rear. They are about 5mm shorter than the stock bodies, so you expose a lot more of the shaft as well.I’m pretty bummed about the extra travel, I assumed the point was to retain the original properties. You sure you didn’t used the rear shafts on the front bodies or something?
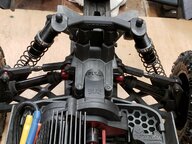
Bashed it around the yard a bit today, then dropped it down to level the a-arms and tossed some Duratrax Picket STs on and ran it on the street pretty aggressively... they handle great! No leaks yet! I would imagine some limiting straps could be fabbed up if excess droop is a huge turn-off. Other than that I like having the extra travel for running through grass and jumping it.
They look so damn sexy too.
Attachments
I like more travel on my trucks as well. Just be mindful of the fact that it's puts more strain on the u-joints/cvd's when at full extension.Positive. Noticeable difference between front and rear. They are about 5mm shorter than the stock bodies, so you expose a lot more of the shaft as well.
Bashed it around the yard a bit today, then dropped it down to level the a-arms and tossed some Duratrax Picket STs on and ran it on the street pretty aggressively... they handle great! No leaks yet! I would imagine some limiting straps could be fabbed up if excess droop is a huge turn-off. Other than that I like having the extra travel for running through grass and jumping it.
They look so damn sexy too.
Wheels007
Very Active Member
Well they are sexy looking...for shocks that isSo yea... 80 is too high, or rather not needed on these shocks. Stock shocks have 70 in them now, and compared to the HR bodies, I was able to put 50 in them and get the same "feel". This is probably due to the leaks, and sucking air into them.
Install is a breeze. Bleeding takes the most time. Turn and pump as you install the piston... cap it off... pump as much as you can... let it sit upright for 5 mins... take out the bleeder and compress slowly until no bubbles... pump again... let sit... pull the bleeder compress fully... install bleeder... done.
The shocks have about 10mm more travel than stock, which only helps if you land off-camber or are really pushing a corner. The bottom of the tires can lift about 12mm above the bottom of the chassis. This can be managed by not bottoming out the shocks when bleeding... but compressing oil only leads to blown o-rings or broken parts.
They look really nice... and adjustment for bash to offroad to street to track takes about twice as much time as fiddling around with clips. But the over-all build quality seems good!
I'll post up an install video in a week or two.
Oh! And for clarity. These shocks use the stock piston, washer and lock nut. The items pictured are a guide bushing for the opening of the bottom of the shock, 2 o-rings, and a white cap to keep the o-rings in place. The white cap sits at the base of the threads inside the shock body when fully assembled.
")
Similar threads
- Replies
- 28
- Views
- 1K