What did you print/CAD today?

This site may earn a commission from merchant affiliate
links, including eBay, Amazon, and others.
Check to make sure the thermal runaway is enabled in the firmware.

Uploaded new firmware to 32bit board and the default code had it activated. 👍

Agree on thermal runaway.


Any help for a complete noob about how to check these settings are enabled? If its firmware i guess its not in the slicer/software side of things, so im not sure how to go about checking these kind of things.

Thanks.
 
Agree on thermal runaway. I also have a smoke detector inside the enclosure, and a smart power switch to turn off the printer’s power if the smoke detector rings.
I forgot to mention that I also have the same setup for my lipo chargers, which is probably even more important than for the printer.
 
I forgot to mention that I also have the same setup for my lipo chargers, which is probably even more important than for the printer.
Mind showing your setup? Sounds interesting.

Printed a how to train your dragon figure for my son and a "credit card" for my daughter to use with her toy cash register.
IMG_20230411_180812~2.jpg


IMG_20230411_180856.jpg
 
Should use some silk PLA for the dragons.. Will really make them pop!
I agree. I have a feeling I'm going to have a filament collection worse than my rc collection. Is the silk pla just more glossy?

Forgot I drafted and printed a simplified version for the panel key that I needed.
IMG_20230411_202509.jpg
 
Last edited:
Mind showing your setup? Sounds interesting.
It’s pretty basic and cheap. Battery-powered smoke detector, wyze cam, and wyze smart power switch.The wyze cam can detect the sound of a smoke detector and automatically turn off the smart power switch. I also use the wyze cam for a live view of the printing.

SITERLINK Mini Smoke Detector Fire Alarm, Small 10 Year Battery Photoelectric Smoke Alarm, Fire Detector with Test & Silence Button for Home, UL Listed, GS521C-A, 1 Pack https://a.co/d/6UPCW2s

Wyze Cam v3 1080p HD Indoor/Outdoor Security Camera with Color Night Vision, 2-Way Audio, Compatible with Alexa & The Google Assistant and IFTTT with Wyze Cam Plus A.I. 3 Month Detection Service https://a.co/d/4Gk3aqU

Wyze Smart Home Plug, Two-Pack,... https://www.amazon.com/dp/B07XZT24B8?ref=ppx_pop_mob_ap_share
 
Drew up this rim today, not trusting the China plastic to hold up to my driving(in to curbs and stuff) so I'll try make these at work. Not sure what material to use yet. View attachment 292711

Use PLA+ for initial fitment & light test driving..
Then use Nylon or CF for final version ,would be best.

Good luck.
Keep us posted!
 
Use PLA+ for initial fitment & light test driving..
Then use Nylon or CF for final version ,would be best.

Good luck.
Keep us posted!
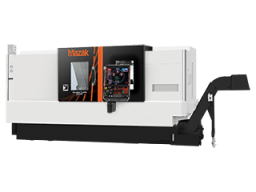
I was planning on using lathe with milling options, also called live tooling. So it will be machined from round bar material. And i think I saw some PA6 today, but it's horrible to machine with lathe. Think I have to use mill for most of the part, and only use turning where it's absolutely needed.
This type 😁
 

Attachments

  • quick+turn+edits+MY-L.png
    quick+turn+edits+MY-L.png
    109 KB · Views: 24
I was planning on using lathe with milling options, also called live tooling. So it will be machined from round bar material. And i think I saw some PA6 today, but it's horrible to machine with lathe. Think I have to use mill for most of the part, and only use turning where it's absolutely needed.
This type 😁

Well then...

In that case, use Magnesium or Titanium would be Really nice 😁🍺👊
 
Well then...

In that case, use Magnesium or Titanium would be Really nice 😁🍺👊
Well, I the thought crossed my mind about titanium, but my kids can't have more awesome rims than me 😈(and they would be expensive since i still have to pay for material)
Any help for a complete noob about how to check these settings are enabled? If its firmware i guess its not in the slicer/software side of things, so im not sure how to go about checking these kind of things.

Thanks.
Did you get answer to this post?

"Easy" way is to heat up printer hotend, and just pull out the thermistor wire to the hotend from the motherboard. Then the printer should come up with an alarm on the display within seconds.(5-10seconds maybe?) Thermal runaway. At least that's what happened with mine, and how I tested it.
 
Last edited:
Been working on replacing my WFO broken receiver parts in my X-Maxx.

Finally got it all buttoned up two days ago. Last thing to do is figure out how to add a second antenna hole in the receiver box


…and just finished this morning is my Subrmarine I printed for my dad. He was on the USS Plunger, yes it was a real submarine name, and found somebody selling the stl for the “Thresher” class submarine which is what his submarine was modeled after.

9CD564AA-9492-4ABC-A620-C81ED80D77C2.jpeg


C49FE1C1-54FD-42C1-B6EE-CC3C6032DDD5.jpeg


B0292DCC-11B9-48C1-B8FD-CF9028D61CA3.jpeg


960CB422-BCD8-41BB-AE1A-8842729669BF.jpeg


DFCD9A63-FE8F-4CCE-92F0-3343B0DEAE13.jpeg


14F00C1B-0E33-4FE4-B8EE-BE859ADCD9B7.jpeg


8F76A79C-6322-41F1-B828-954BB8CCF55F.jpeg


EBD4BA87-78CA-40E9-A116-6FDD45E3532D.jpeg
 
Been working on replacing my WFO broken receiver parts in my X-Maxx.

Finally got it all buttoned up two days ago. Last thing to do is figure out how to add a second antenna hole in the receiver box


…and just finished this morning is my Subrmarine I printed for my dad. He was on the USS Plunger, yes it was a real submarine name, and found somebody selling the stl for the “Thresher” class submarine which is what his submarine was modeled after.

View attachment 292734

View attachment 292735

View attachment 292736

View attachment 292737

View attachment 292738

View attachment 292739

View attachment 292740

View attachment 292741

Send over the file and let me know where you need the second antenna hole to be and I'll work it into the design and send it back to you.


Also, if you cut the submarine in half (via Cura) ,right behind the conning tower.
And print the two parts vertically. Then glue the two halves back together, you will end up with Much better surface finish on the Sub. 👊

Yeah, and if you were to print it in this orientation. You can Up Scale it to MUCH Large print!! 🤘🍺
(Or, if you cut it into five sections, you can make it Really Big! Ha ha ha)

Note-
You'll need some small supports for the masts. But no need for the rear planes.
You might need to use support blockers for them. Just a heads up.
 
Last edited:
Send over the file and let me know where you need the second antenna hole to be and I'll work it into the design and send it back to you.
Thank you sir I will definitely do that.
Also, if you cut the submarine in half (via Cura) ,right behind the conning tower.
And print the two parts vertically. Then glue the two halves back together, you will end up with Much better surface finish on the Sub
That would be amazing. I didn't even think to do that or really even know how to do that. I will dabble in the settings and see what I can find. I know my pops would appreciate an even larger one.

in the file it also has this weird thing attached to the planes / rudder of the boat. I really wish I knew how to modify stl files

1681492055323.png
 
Thank you sir I will definitely do that.

That would be amazing. I didn't even think to do that or really even know how to do that. I will dabble in the settings and see what I can find. I know my pops would appreciate an even larger one.

in the file it also has this weird thing attached to the planes / rudder of the boat.

What is that thing?
Magnetic Propulsion tube??

I really wish I knew how to modify stl files

View attachment 292763

Did you take a look at MeshMixer?
 
Back
Top