
Navigation
Install the app
How to install the app on iOS
Follow along with the video below to see how to install our site as a web app on your home screen.
Note: This feature may not be available in some browsers.
More options
You are using an out of date browser. It may not display this or other websites correctly.
You should upgrade or use an alternative browser.
You should upgrade or use an alternative browser.
Notorious I have some work to do....
- Thread starter PowerDubs
- Start date
This site may earn a commission from merchant affiliate
links, including eBay, Amazon, and others.
links, including eBay, Amazon, and others.
- Messages
- 807
- Reaction score
- 795
- Thread starter
- #62
F -it!
I welcome your responses on recommended greases, but I’m just gonna go ahead and put this in as I am sure this is not the last time I’m going to be in there and absolute worst case scenario if the gears die parts for these things are so cheap it almost doesn’t matter.
I welcome your responses on recommended greases, but I’m just gonna go ahead and put this in as I am sure this is not the last time I’m going to be in there and absolute worst case scenario if the gears die parts for these things are so cheap it almost doesn’t matter.
- Messages
- 807
- Reaction score
- 795
- Thread starter
- #63
OK getting closer to putting this back together finally. Just waiting on a few more parts to arrive.
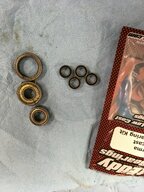
What do these little tiny bearings go to? Old bearings next to them for size reference.
Also I saw mention of a flange bearing in another post, which I saved the info on in case I will need it in the future, but I don’t see that anywhere either? What am I missing?
What do these little tiny bearings go to? Old bearings next to them for size reference.
Also I saw mention of a flange bearing in another post, which I saved the info on in case I will need it in the future, but I don’t see that anywhere either? What am I missing?
Attachments
Notorious J
It's gonna break, so might as well send it!
Lifetime Premium!
Premium Member
ArrmaForum Fan
Excellence Award
Hospitality Award
Rig of the Month Winner
Build Thread Contributor
- Messages
- 12,674
- Reaction score
- 29,581
- Location
- On a midnight train to nowhere
- Arrma RC's
- Gorgon
- Granite
- Notorious
- Typhon 6s
Replaces the steering bushings, top and bottomOK getting closer to putting this back together finally. Just waiting on a few more parts to arrive.
What do these little tiny bearings go to? Old bearings next to them for size reference.
Also I saw mention of a flange bearing in another post, which I saved the info on in case I will need it in the future, but I don’t see that anywhere either? What am I missing?
Notorious J
It's gonna break, so might as well send it!
Lifetime Premium!
Premium Member
ArrmaForum Fan
Excellence Award
Hospitality Award
Rig of the Month Winner
Build Thread Contributor
- Messages
- 12,674
- Reaction score
- 29,581
- Location
- On a midnight train to nowhere
- Arrma RC's
- Gorgon
- Granite
- Notorious
- Typhon 6s
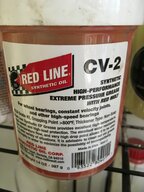
Should be fine. It's just to help reduce the wear on the pinion and ring gear. I use a syringe to apply it right to the teeth, so I don't have a ton of it to clean later.F -it!
I welcome your responses on recommended greases, but I’m just gonna go ahead and put this in as I am sure this is not the last time I’m going to be in there and absolute worst case scenario if the gears die parts for these things are so cheap it almost doesn’t matter.
- Messages
- 807
- Reaction score
- 795
- Thread starter
- #71
I am a dumbass.
I put the new shim part number in the horizon website and clicked search, but it was late at night and I had a few beers so I wasn’t paying attention when it popped up a result I just clicked buy.
Until they showed up in the mail, I did not realize that it actually said no results found and just substituted the next closest thing which was the original shims which really are no use to me but oh well - my own fault they are here and I bought them.
So with that, I will just put everything back together as is and if and when I blow up a diff I will get them later.
- Messages
- 807
- Reaction score
- 795
- Thread starter
- #72
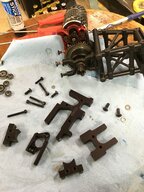
So between work, house, wife, and new puppy, I have very very little time to play with this thing.
I was able to get out to the garage for a little bit tonight – granted I am getting more and more involved in buying more more parts the further I take it apart.
I never expected to be anywhere near this amount of time, parts, work, cost but I want to make it the best I can and hopefully not have to tear it this far apart again for a long long time.
The rear end is done with RPM a-arms, techno shock ends, voltage tower, Eddie bearings, and diff with 30 K fluid.
So tonight I worked on the front end- rpm a-arms are in, Eddie bearings, voltage tower, techno shock ends, just need to reassemble the diff with 60K fluid, hopefully tomorrow. Using the HR aluminum diff housing, as I managed to break the stock front one already.
Since I want to wait till tomorrow to clean the front diff parts outside because of the smell of the cleaner, I thought I would start on taking apart the center diff and motor mount. I bought the M2c mount, and I am doing 500K fluid with Eddie bearings.
I don’t have the mental capacity to figure this out right now, so I am going to bed. ?
Attachments
Saltystevo
Active Member
- Messages
- 713
- Reaction score
- 393
WOW man, just read this thread... I'm in the same boat. Just started my tear down, I got the whole center of the truck from tower to tower removed. Currently I'm a noob too with the house, wife, dog and newly added 16 month old. Talk about limited time! The little guy is a huge time suck lol but he's awesome and I can't wait till I can share the garage time with him. And you can never ignore the dog or he'll get jealous or sad. I'll head out to the garage at night and she'll open the door to say she's headed up and I'm like "I'll be up in a few minutes"So between work, house, wife, and new puppy, I have very very little time to play with this thing.
I was able to get out to the garage for a little bit tonight – granted I am getting more and more involved in buying more more parts the further I take it apart.
I never expected to be anywhere near this amount of time, parts, work, cost but I want to make it the best I can and hopefully not have to tear it this far apart again for a long long time.
The rear end is done with RPM a-arms, techno shock ends, voltage tower, Eddie bearings, and diff with 30 K fluid.
So tonight I worked on the front end- rpm a-arms are in, Eddie bearings, voltage tower, techno shock ends, just need to reassemble the diff with 60K fluid, hopefully tomorrow. Using the HR aluminum diff housing, as I managed to break the stock front one already.
Since I want to wait till tomorrow to clean the front diff parts outside because of the smell of the cleaner, I thought I would start on taking apart the center diff and motor mount. I bought the M2c mount, and I am doing 500K fluid with Eddie bearings.
I don’t have the mental capacity to figure this out right now, so I am going to bed. ?
 she just tilts her head and gives me this look, like ya right. ?
Lol it's all good. I need some unwind garage time. And usually my dog is in the garage biting and tugging my pants to play. Haha ahhhhhhhh, I can't take it anymore!
No it's all good stuff. I appreciated your tear down post because that's me, just in another state. Good tip with the oil and hot water trick. Lmk how that works out with the 500k
- Messages
- 807
- Reaction score
- 795
- Thread starter
- #74
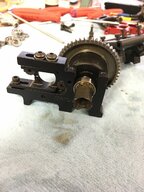
Hi guys.
Back in the garage for a short while.
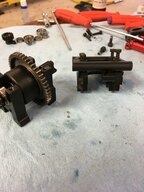
Trying to figure out this M2c motor mount assembly.
Please remember I am new to not only this car but this aftermarket part as well.
From what I can tell this is how it goes together, subject to change as I start putting the chassis back together.
Bear with me, but hopefully this appears to be right and will help others as we go along.
Back in the garage for a short while.
Trying to figure out this M2c motor mount assembly.
Please remember I am new to not only this car but this aftermarket part as well.
From what I can tell this is how it goes together, subject to change as I start putting the chassis back together.
Bear with me, but hopefully this appears to be right and will help others as we go along.
Attachments
- Messages
- 807
- Reaction score
- 795
- Thread starter
- #75
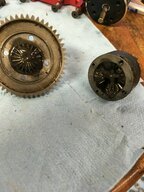
Just popped my center diff open.
It definitely appears to be not only stiffer by feel of turning, but a darker fluid as well.
Of course the darkness could be from more wear on the metal from more stress on the center diff but who knows.
I have no idea I’m just letting you know what I see.
For what it’s worth this truck only has maybe three battery packs ran through it since brand new.
Attachments
- Messages
- 807
- Reaction score
- 795
- Thread starter
- #76
OK – WTF?
After I split the diff open I went to pull the insides out and they wouldn’t come out so I just took a small flat blade and went to try to gently pry them to move them along thinking that the fluid is much stiffer which it is.
They wouldn’t move so I grab the needle nose and reached in and went to pull on the upper pin and nothing moved so I tried both sides of that and then the lower pin and I am literally pulling as hard as I can and neither of the pins will budge.
- Messages
- 807
- Reaction score
- 795
- Thread starter
- #77
Not that I think it is going to make any difference but I’m going to go ahead and throw the entire fiddlesticking cup in the naphtha.
It may not be good for the o-ring, or the cup itself but at this point I am so far deep in this project- whatever.
It may not be good for the o-ring, or the cup itself but at this point I am so far deep in this project- whatever.
- Messages
- 807
- Reaction score
- 795
- Thread starter
- #78
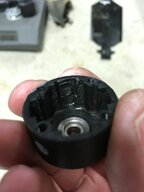
OK. So I literally took the diff cup and held the outdrive in my vice so I could grab the pins with needle nose and manage to work them back-and-forth until I was able to remove them.
I then cleaned the parts so I could get a better look. Remember this truck had only maybe three battery packs run on it. At that point totally stock un-modified.
I can’t believe what I am seeing.
I thought that the fluid seemed much much darker than the front and back, but the condition of the internals is horrible.
No wonder I couldn’t just slide the parts out like normal, they are deformed and worn as is the case itself.
Can’t say I am happy with this at all.
If I break a part, then does on me fine.
But I can’t imagine how I possibly caused this on my center diff??
Does anybody else have any thoughts?
Attachments
Notorious J
It's gonna break, so might as well send it!
Lifetime Premium!
Premium Member
ArrmaForum Fan
Excellence Award
Hospitality Award
Rig of the Month Winner
Build Thread Contributor
- Messages
- 12,674
- Reaction score
- 29,581
- Location
- On a midnight train to nowhere
- Arrma RC's
- Gorgon
- Granite
- Notorious
- Typhon 6s
Send these pics to Horizon right away. Those difs look like they were put in on cock-eyed.OK. So I literally took the diff cup and held the outdrive in my vice so I could grab the pins with needle nose and manage to work them back-and-forth until I was able to remove them.
I then cleaned the parts so I could get a better look. Remember this truck had only maybe three battery packs run on it. At that point totally stock un-modified.
I can’t believe what I am seeing.
I thought that the fluid seemed much much darker than the front and back, but the condition of the internals is horrible.
No wonder I couldn’t just slide the parts out like normal, they are deformed and worn as is the case itself.
Can’t say I am happy with this at all.
If I break a part, then does on me fine.
But I can’t imagine how I possibly caused this on my center diff??
Does anybody else have any thoughts?
Similar threads
- Replies
- 3
- Views
- 383
- Replies
- 12
- Views
- 967
- Replies
- 47
- Views
- 2K
- Replies
- 78
- Views
- 3K