
Navigation
Install the app
How to install the app on iOS
Follow along with the video below to see how to install our site as a web app on your home screen.
Note: This feature may not be available in some browsers.
More options
You are using an out of date browser. It may not display this or other websites correctly.
You should upgrade or use an alternative browser.
You should upgrade or use an alternative browser.
What did you work on today?
- Thread starter olds97_lss
- Start date
This site may earn a commission from merchant affiliate
links, including eBay, Amazon, and others.
links, including eBay, Amazon, and others.
- Thread starter
- #482
I did the same thing you did. Bottom washer removed, top shim moved to the bottom. I have RPM arms all around on my outcast. One of my front bones kept popping out on hard crashes. Hoping this helps with that.Thanks @bicketybam. Just wanted to make sure that others had already tried it, and aren't having any issues. Gonna replace those stock lower arms with RPM too.")
- Messages
- 5,985
- Reaction score
- 8,908
- Location
- South Louisiana
- Arrma RC's
- BigRock 4x4
- Granite
- Kraton 6s
- Mojave
- Notorious
- Talion
- Typhon 6s
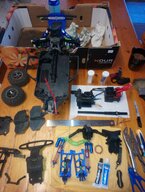
I decided today was the day to bring "The Man" back up to running spec.
Talion got front and rear chassis braces, rear skid, wing mount holder thingy, new wing mount (I run stock until I see an aftermarket one that is better.)
I decided to keep it on the stock tires until I blow them out again....then I'll maybe get the new Kraton Copperhead 2 as soon as I can catch Jenny's.
Cleaned up, SC1 polished "new rig in a can."
I love this mfr as much if not better than any of my Arrma rigs. I held out as long as I could to see if it felt like a new experience when I got it back running again. It was. Doing the same with the Noto.
Dude putting siding on a new house across the street from me couldn't stop watching. Said, "that's cool as sh*t, bro" I said, "sure is. I got more where this comes from"
- Messages
- 5,985
- Reaction score
- 8,908
- Location
- South Louisiana
- Arrma RC's
- BigRock 4x4
- Granite
- Kraton 6s
- Mojave
- Notorious
- Talion
- Typhon 6s
PS: I usually run Sweep Terrain Crushers on here but need to see how it jumps. Might try the Crushers on the Typhon.I decided today was the day to bring "The Man" back up to running spec.
Talion got front and rear chassis braces, rear skid, wing mount holder thingy, new wing mount (I run stock until I see an aftermarket one that is better.)
I decided to keep it on the stock tires until I blow them out again....then I'll maybe get the new Kraton Copperhead 2 as soon as I can catch Jenny's.
Cleaned up, SC1 polished "new rig in a can."
I love this mfr as much if not better than any of my Arrma rigs. I held out as long as I could to see if it felt like a new experience when I got it back running again. It was. Doing the same with the Noto.
Dude putting siding on a new house across the street from me couldn't stop watching. Said, "that's cool as sh*t, bro" I said, "sure is. I got more where this comes from"
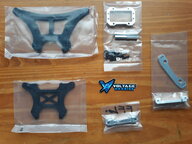
View attachment 37005
View attachment 37006
View attachment 37007
PSS: also these. I have two sets:
https://justbashitrc.com/product/arrma-6s-rear-brace-spacer-spindles/
Last edited:
- Messages
- 1,638
- Reaction score
- 1,953
- Location
- Texas
- Arrma RC's
- Infraction
- Kraton 6s
- Notorious
- Outcast 6s
- Typhon 6s
Skid marks on the kitchen floor...?...you must be single or an extremely passive wife. Either way, congratulations!!Just pulled the MAX6 out of my speed Typhon, and installed a MMX, set everything up, added some new burn out marks to the kitchen floor. Will give her a run in a day or two.
View attachment 37004
Lazy Bushman
Very Active Member
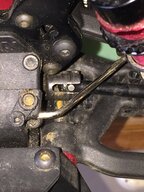
I'm going to have to pull my shims out. I replaced my dog bones, knuckles and turn turnbuckles with GPM after a big crash recently. I was already running PRM arms up front. Took it out for a run at my local park today and even landing from wheelies caused my front left Dog Bone to pop out. I haven't had that before. The pic show how far the dog bone is seated. I can't remember how the stock ones sat. Is this the depth you get (not this is with the shims still in place....they won't be in about 10 minutes from posting)Put a stock servo in, as the gears on my Savox 0231-MG, might be a little shaved. I also had to put the stock bumper back on, as I snapped my T-Bone in two, ripping through massive clumps of hardened dirt that felt like cement after drying up from all the rain. I also did something else, and you guys can tell me what you think. The camber on the Noto is adjusted by two plastic shims that go on the outside of the upper and lower front arms, where the pillow balls screw in. I've been having an issue with the front dirveshaft popping out of the out drive on hard landings. So I removed the shims, and only replace the lower one, with the one that was on the upper. The lower was 1.5mm and the upper is 1mm. There's still negative camber, but a fraction less. Since I only bash, and camber doesn't really play into it that much, The change means the drive shaft since slightly tighter in the out drive, and doesn't bind or come to close to anything because of the change. To be honest, I could probably run with no spacers/shims there, and I don't think it would negatively impact how the truck runs or turns. The tolerances of these 6s trucks, isn't that precise to begin with, and with the big back flips on there, not sure how much camber will come into play anyways. Thoughts?
Attachments
Notorious J
It's gonna break, so might as well send it!
Lifetime Premium!
Premium Member
ArrmaForum Fan
Excellence Award
Hospitality Award
Rig of the Month Winner
Build Thread Contributor
- Messages
- 12,675
- Reaction score
- 29,594
- Location
- On a midnight train to nowhere
- Arrma RC's
- Gorgon
- Granite
- Notorious
- Typhon 6s
Honestly, that looks way too close to the edge of the out drive. The dog bone was at the half way point with the shims in, and now that I've removed them completely, they are tucked in just a little bit closer. This was my fear about switching to RPM on the front. An easy fix here, would be to start grinding down the outside of the arms, where the pillow ball studs screw in. You could probably shave 1 to 1.5mm off, and get that dog bone in a little tighter. Just check the depth of the hole, and make sure there's enough room that the pillow ball will seat all the way once you've shortened the arm. Shouldn't affect anything else. All comparisons people have shown, say the RPM arms are the same as stock, but your photo says differently. I'd like other members to comment here as well, before you start modding that arm. Trying to tag members, but for some reason, phone is not creating the links. @olds97_lss, @bicketybam, @slick2500 have all used the RPM arms, and might be able to have more input.I'm going to have to pull my shims out. I replaced my dog bones, knuckles and turn turnbuckles with GPM after a big crash recently. I was already running PRM arms up front. Took it out for a run at my local park today and even landing from wheelies caused my front left Dog Bone to pop out. I haven't had that before. The pic show how far the dog bone is seated. I can't remember how the stock ones sat. Is this the depth you get (not this is with the shims still in place....they won't be in about 10 minutes from posting)
Lazy Bushman
Very Active Member
Thanks mate. I might start a new thread over at the RPM vendor thread, in the morning....getting a bit tired now. Certainly when the arm flexes up it drags that shaft out closer to the edge for sureHonestly, that looks way too close to the edge of the out drive. The dog bone was at the half way point with the shims in, and now that I've removed them completely, they are tucked in just a little bit closer. This was my fear about switching to RPM on the front. An easy fix here, would be to start grinding down the outside of the arms, where the pillow ball studs screw in. You could probably shave 1 to 1.5mm off, and get that dog bone in a little tighter. Just check the depth of the hole, and make sure there's enough room that the pillow ball will seat all the way once you've shortened the arm. Shouldn't affect anything else. All comparisons people have shown, say the RPM arms are the same as stock, but your photo says differently. I'd like other members to comment here as well, before you start modding that arm. Trying to tag members, but for some reason, phone is not creating the links. @olds97_lss, @bicketybam, @slick2500 have all used the RPM arms, and might be able to have more input.
- Messages
- 1,638
- Reaction score
- 1,953
- Location
- Texas
- Arrma RC's
- Infraction
- Kraton 6s
- Notorious
- Outcast 6s
- Typhon 6s
I've always used RPM on previous traxx-ass models. So far my Arrma stock arms have taken a lot of abuse and have held up very well. I went ahead and ordered arm sets from Jenny's for my Kraton when I need them. Full set front and rear for $11! IMO they are tougher than RPM plastic. My $0.02.
slick2500
Anything will break if you drive it wrong enough.
Community Leader
Premium Member
ArrmaForum Fan
Excellence Award
Build Thread Contributor
- Messages
- 26,929
- Reaction score
- 42,951
- Location
- Rapid City, SD
- Arrma RC's
- Fireteam
- Kraton 6s
- Kraton EXB
- Outcast 6s
- Senton 3s
- Typhon 3s
I have never had a front cvd pop out of my Outcast with the Rpm a arms but I have a V1, not sure if that makes any difference or not.Honestly, that looks way too close to the edge of the out drive. The dog bone was at the half way point with the shims in, and now that I've removed them completely, they are tucked in just a little bit closer. This was my fear about switching to RPM on the front. An easy fix here, would be to start grinding down the outside of the arms, where the pillow ball studs screw in. You could probably shave 1 to 1.5mm off, and get that dog bone in a little tighter. Just check the depth of the hole, and make sure there's enough room that the pillow ball will seat all the way once you've shortened the arm. Shouldn't affect anything else. All comparisons people have shown, say the RPM arms are the same as stock, but your photo says differently. I'd like other members to comment here as well, before you start modding that arm. Trying to tag members, but for some reason, phone is not creating the links. @olds97_lss, @bicketybam, @slick2500 have all used the RPM arms, and might be able to have more input.
But this is how my front axles sit in the diff cups.
These are the spacers in place.
Last edited:
Notorious J
It's gonna break, so might as well send it!
Lifetime Premium!
Premium Member
ArrmaForum Fan
Excellence Award
Hospitality Award
Rig of the Month Winner
Build Thread Contributor
- Messages
- 12,675
- Reaction score
- 29,594
- Location
- On a midnight train to nowhere
- Arrma RC's
- Gorgon
- Granite
- Notorious
- Typhon 6s
That is much deeper than where it sits in @Lazy Bushman's truck. There has to be a difference in the tolerances of these parts.I have never had a front cvd pop out of my Outcast with the Rpm a arms but I have a V1, not sure if that makes any difference or not.
But this is how my front axles sit in the diff cups.
View attachment 37033
slick2500
Anything will break if you drive it wrong enough.
Community Leader
Premium Member
ArrmaForum Fan
Excellence Award
Build Thread Contributor
- Messages
- 26,929
- Reaction score
- 42,951
- Location
- Rapid City, SD
- Arrma RC's
- Fireteam
- Kraton 6s
- Kraton EXB
- Outcast 6s
- Senton 3s
- Typhon 3s
I noticed that. When I get home from work I'll tear apart the front end and get some measurements.That is much deeper than where it sits in @Lazy Bushman's truck. There has to be a difference in the tolerances of these parts.
- Thread starter
- #494
Yeah, mine don't sit near as deep. I recently removed the washer off the bottom ball end and put the shim from the top on the bottom just to close up the gap a bit. I'll take some photo's later with it full extension and compression with the tires pointing forward to show where the bone sits. Under full compression, they are near the edge of the cup if I remember right.That is much deeper than where it sits in @Lazy Bushman's truck. There has to be a difference in the tolerances of these parts.
EDIT:
Couldn't help myself, took a couple photos, blurrier than I'd hoped. Hard to hold the wheel up, truck and camera all at once. lol
Fully extended (arm set screw stopping near full shock extension):

Compressed with the bone parallel to the chassis:

Compressed with the bone perpendicular to the chassis:

You can see how the bottom ear is almost out of the cup when in that last orientation. Now extend it out a bit further due to impact stretching/bending the arms and BOING!
This is with the lower shim/washer removed and replaced with the upper shim. The upper doesn't have a shim at all now.
Looking at the photo... wonder why the left cup is more chewed up than the right one... odd. Well, the right one in the photo, but it's the left side of the truck when it's pointed away from me.
Last edited:
Lazy Bushman
Very Active Member
Thanks for the picks @slick2500 and @olds97_lss now that it is morning here in the land of milk and honey, I, start a thread over in the RPM Vendor section on this. I see @slick2500 is running the stock knuckles, how about you @olds97_lss ? I am running the GPM knuckles now and I reckon it happens to me more now which could be another factor. I will swap one side back to stock knuckles and compare the two
Ok, I just discovered that we don’t have an RPM vendor section, so that thread won’t be happening....I must have confused them with TBone maybe
Ok, I just discovered that we don’t have an RPM vendor section, so that thread won’t be happening....I must have confused them with TBone maybe
- Thread starter
- #496
Can still start your own thread, then we can post there instead of here.Thanks for the picks @slick2500 and @olds97_lss now that it is morning here in the land of milk and honey, I, start a thread over in the RPM Vendor section on this. I see @slick2500 is running the stock knuckles, how about you @olds97_lss ? I am running the GPM knuckles now and I reckon it happens to me more now which could be another factor. I will swap one side back to stock knuckles and compare the two
Ok, I just discovered that we don’t have an RPM vendor section, so that thread won’t be happening....I must have confused them with TBone maybe
Lazy Bushman
Very Active Member
Despite the issues I'm having, I haven't snapped RPM's but I have the stock ones. I am thinking of changing back to stock however if I can't resolve the dog bone issueI've always used RPM on previous traxx-ass models. So far my Arrma stock arms have taken a lot of abuse and have held up very well. I went ahead and ordered arm sets from Jenny's for my Kraton when I need them. Full set front and rear for $11! IMO they are tougher than RPM plastic. My $0.02.
- Messages
- 5,985
- Reaction score
- 8,908
- Location
- South Louisiana
- Arrma RC's
- BigRock 4x4
- Granite
- Kraton 6s
- Mojave
- Notorious
- Talion
- Typhon 6s
I'll be using stock arms on all my 6s. I never break em anyway and no reason to change. Same with wing mounts.I've always used RPM on previous traxx-ass models. So far my Arrma stock arms have taken a lot of abuse and have held up very well. I went ahead and ordered arm sets from Jenny's for my Kraton when I need them. Full set front and rear for $11! IMO they are tougher than RPM plastic. My $0.02.
pl9171
Very Active Member
If you're running mostly on tracks, and don't do a lot of big jumping, those chassis braces that run through the center should be enough. The tower to tower is only functional when you are landing from huge air, and want to minimize the flex/bending towards the middle, when landing heavily on either the front or rear. Looks like you already have something to help offset that, with those turnbuckles that are attached to the center from the front and back.
Hi,
Ok... Good point.
This big tower has a weight and I already added rear stick weight... And the 6s is overweight. So, weight + weight + weight...
So, standby for the moment.
PL