What did you work on today?

This site may earn a commission from merchant affiliate
links, including eBay, Amazon, and others.
Just got done installing my yeah racing fan system on my new motor. Took a minute getting everything fitting well with each other but I think I got it situated pretty good. Also, this fan came with risers to put under the fan to raise it up. You could use those or just fasten it right to the heat sink. I opted to fasten it directly to the heat sink.. What do you guys do? the way I was thinking about it, it seemed to make more sense to put it right on the motor because it'll get better suction? Please let me know if my logic is flawed ??View attachment 82964View attachment 82965
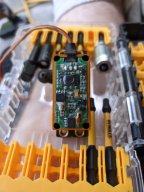
On the YR fans they blow down onto the heatsink. I put the risers on my fans to allow more air to come out of the fan. Seems to be ok.
 
Got the 2050kv motor, heatsink and 2x Hobbystar fans into the Typhon 3S. The fans are spaced up pretty far and I have them running on a 2S pack with the rear LEDs. They are pretty loud on 7.4v. I used leftover HR pivot balls as spacers. I either had too short or too long of screws so I went long and added plastic balls on top of the fans. I will eventually make a fan guard and remove these excess balls and get proper length screws.

53064E38-0FC0-4F1F-984D-61304424F8BF.jpeg
 
Got the 2050kv motor, heatsink and 2x Hobbystar fans into the Typhon 3S. The fans are spaced up pretty far and I have them running on a 2S pack with the rear LEDs. They are pretty loud on 7.4v. I used leftover HR pivot balls as spacers. I either had too short or too long of screws so I went long and added plastic balls on top of the fans. I will eventually make a fan guard and remove these excess balls and get proper length screws.

View attachment 82996
I just put my fans in today as well. I didn't use the spacers though. I've been asking everyone's opinions on spacers or no spacers. What do you think? Do the spacers make a difference ?
 
I got told once before that ideally your fans should be a minimum of 10mm above anything they are going to blow on..!!
Can’t recall the reason why but I’m sure if you google it you’ll find an explanation..???
 
I got told once before that ideally your fans should be a minimum of 10mm above anything they are going to blow on..!!
Can’t recall the reason why but I’m sure if you google it you’ll find an explanation..???
:unsure: I have never hear this before and I have been through a lot of computer coolers over the past 30 years every single one of them has had the fan bolted right on or between the heatsink(s).
 
I just put my fans in today as well. I didn't use the spacers though. I've been asking everyone's opinions on spacers or no spacers. What do you think? Do the spacers make a difference ?
The thinking is if the fans are too close, they get back pressure from the wind blowing back at the fan. Spacing allows the max air volume to be pushed with the least resistance. Most products are trying to save space. I don’t have these concerns. I want max cooling. Also, if they aren’t spaced, they only blow across the immediate fins. With the spacing it blows on the side fins too.
 
I don't want to use a rtr esc and the MM2 is cheaper than a Max8, the Mamba X and the Mamba Monster X.

I just changed out a bunch of stuff so I could run my 3s batteries in it though ?
After having the HW esc's and ability to program them via the fan port... I'm almost all in with HW. I have a new take off MXL-6S (MMv2), an old HPI F360C (MMv1) and a sct sv3 all in a drawer doing nothing at the moment. I'll likely put my max10 sct on my eJato and pull the traxxas vxl-3s I have in it now. Then my only hold out will be the MMX in my savage... which I don't really drive.

I'll keep the castle's as spares and I'd get the bluetooth thing for the MMX, except it won't let you download the logs, which is half the reason I'd plug my pc into the thing. As it is, I have a splitter outside of the receiver box so I can disconnect it from there and download. Less annoying that way.
I guess I just like the finer tunability of the MM2 over my Max8 plus it just feels like it has a bit more power than the Max8 did as well.
 
My steering servo started acting funny after I submarined my truck over the weekend, so I decided to figure out what was going on thinking that my radio was going bad. Turns out the entire steering servo was filled with water. Whoops.
 

Attachments

  • IMG_20200601_193315.jpg
    IMG_20200601_193315.jpg
    241.8 KB · Views: 19
I took apart my hitec d7 charger... it seems to be having issues balancing. For storage or full balance charge, my packs are coming off with a .05V variance or more and takes forever to charge brand new packs, even from storage. 2 hours at 10A when it should be taking 30 minutes.

I have an isdt q6 pro, but lack a dc psu. So, I figured I'd take apart the d7, see if the psu was just a psu to a main board, then splice into it and try that just for my own amusement. Seems it's one PSU which should be good for 40A (the charger is 2x20A) and with no load it puts out 17.5V. Under load (while charging a pack at 10A via the isdt) it drops to about 16.9V.

The isdt charger topped an old 5200 3S pack off to within .01v on each cell (4.19,4.20,4.20) in about 20 minutes. Going to try one of my new CNHL packs tomorrow.

The downside is it doesn't spool up the fans. Guessing that's controlled while charging, so I put a large fan on it while I test stuff out.

I have a proper 70A/24V psu coming in the next week. Just figured I'd tinker a bit.

I think I would cry if my Hitec X2 400 died.
 
Installed several new upgrades to my outcast. Most notably was the Protek 370tbl, everyone was definitely right about this thing being way overkill. But it does make me grin.
 
After waiting what seemed like forever, I finally got the wheel bearings for my Senton I had ordered from Amazon.

One of mine (the larger one) had gone crunchy. Unfortunately, that lead to the inner race spinning on the driveshaft, and wearing it away a bit. I put a very narrow strip of electrical tape, 1 wrap around, in the lowest part of the valley that was worn into the shaft, before sliding on the new bearing. That seemed to get the inner race fitted securely.

In hindsight, I probably should have just taken it apart first to assess the damage. I thought the bearing was completely shot (thus ordering and waiting for new bearings), based on how much the wheel was wobbling. However the wobble was because of the damage to the shaft. With just a bit of TLC, the old bearing feels pretty good again. I could have saved a lot of down time. Oh well. I still popped the new rubber sealed bearings in that one wheel, since I had them.

I also fitted a new tire and wheel, since I had been running a tire that got badly ripped for a long time. The glue holding the tear together had done an admirable job, but was starting to come up at the edges.

I continue to be impressed by how easy it is to work on the Senton 3S.

Now, for the first time in a long time, the Senton is ready to rip again! Hopefully I can get out with it tonight.
 
Back
Top